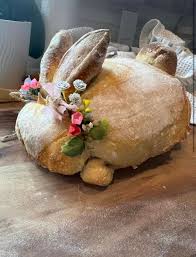
A sculpted sourdough-style yeasted loaf shaped into an adorable Easter bunny
IntermediateSculpted Easter BunnyBread
by Henry Hunter Jr.
One dough. One boule. One unforgettable Easter centerpiece.
Fermentation
1-2 hours bulk + overnight cold proof
Bake Time
40-45 minutes
Yield
Serves 6-8

Perfection is not required
"Perfection is not required. Progress is."— Henry Hunter Jr.
By Henry Hunter Jr., founder of Crust & Crumb Academy and Baking Great Bread at Home.
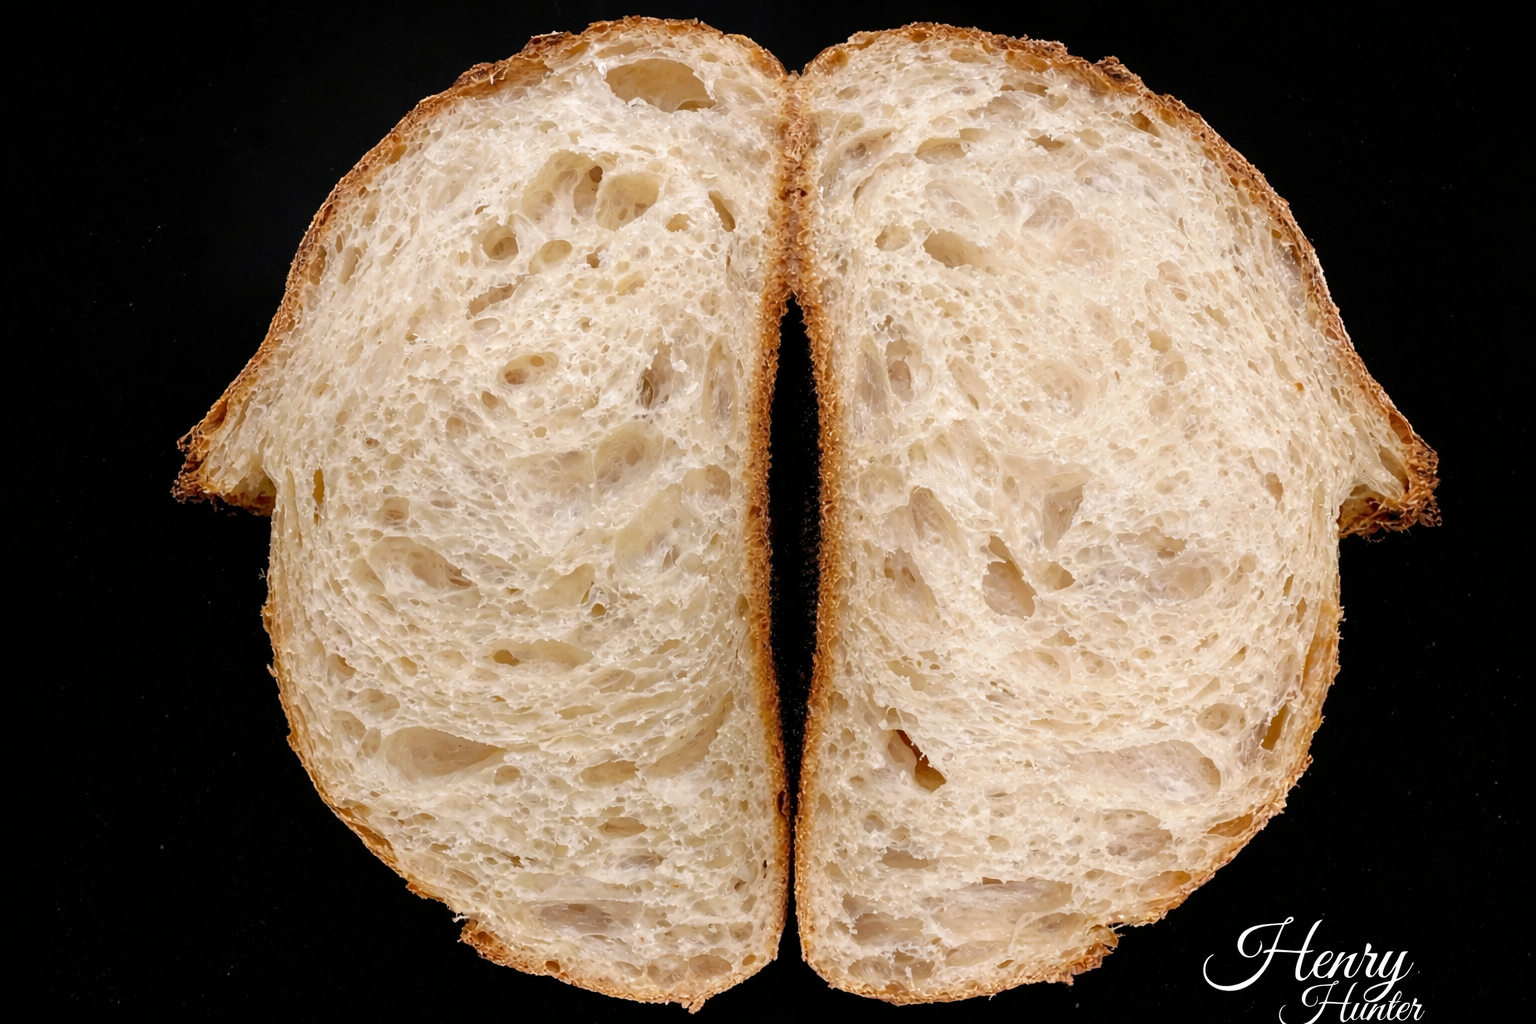
Authentic Bread Flavor
I baked my first bunny bread the week before Easter and immediately understood why people say they couldn't cut into it. Make it anyway. It's still bread.
Equipment Needed
Ingredients
The Dough
Pro Tip
65% hydration is intentionally lower than a standard artisan loaf. You need a dough that holds its sculpted shape. Resist the urge to add more water.
Day 1 — Mix
Mix the Dough
This is a simple, straightforward mix. No autolyse needed here. You want a smooth, elastic dough that will hold its shape after sculpting.
Click each step to mark complete
Combine Wet Ingredients
Add the warm water to your mixing bowl. Sprinkle the instant yeast over the top and give it a quick stir. Let it sit for 2 minutes.
Add Flour and Salt
Add the bread flour and salt. Mix until a shaggy dough forms, then add the olive oil. Knead by hand for 8-10 minutes, or use a stand mixer with a dough hook on medium for 5-6 minutes. You're looking for a smooth, elastic dough that passes the .
Structure Over Spring
Most artisan bread recipes run 72-78% hydration for an open crumb. This bunny needs to hold ears, feet, and a tail in place through a 40-minute bake. Lower hydration means tighter gluten structure, less spread, and sculptural detail that survives the oven.
The Olive Oil Factor
A small amount of fat makes the dough more extensible, which helps when you're cutting and repositioning pieces without tearing. It also keeps the crumb a little more tender even at lower hydration.
The Takeaway
Stiffer dough = better sculptor's clay. Save the high-hydration loaves for another day.
Day 1 — Bulk
Bulk Fermentation
Cover the bowl and let the dough at room temperature until it has grown by about 50-75%. This is not a full double — you want some fermentation activity but a tight, structured dough going into the fridge.
Click each step to mark complete
Cover and Ferment
Cover the bowl with plastic wrap or a damp towel. Let the dough rest at room temperature (68-74°F / 20-23°C) for 1 to 1.5 hours. It should look puffier and feel lighter, but you're not waiting for a full double.
Shape into a Boule
Turn the dough out onto a lightly floured surface. Do a pre-shape: fold the edges into the center, flip it over, and use your hands to pull the dough toward you, creating surface tension (see ). Let it rest uncovered for 15 minutes, then do a final shape into a tight boule. Place it seam-side down in a well-floured banneton or a bowl lined with a floured kitchen towel.
Cover and Refrigerate
Cover the shaped boule tightly with plastic wrap and place it in the refrigerator. Cold proof for at least 8 hours, up to 16 hours maximum. Do not go longer than 16 hours — the sculptural pieces need the dough to have some structure left.
⏱ Wait Time
8-16 hours
Pro Tip
The cold retard is not optional for this recipe. Cold dough is firm dough, and firm dough is what makes clean cuts and ear shapes possible. Warm, relaxed dough will spread and lose definition.
Precise Timers
Use these interactive timers to track your stages.
Bulk Fermentation
Day 2 — Shape
Shape the Bunny
This is where it gets fun. Work quickly and confidently with the cold dough. The whole shaping process should take about 10 minutes. Cold dough is forgiving — warm dough is not.
Click each step to mark complete
Prep Your Work Surface
Cut a large piece of parchment paper and place it on a baking sheet or sheet pan. Flour it lightly. Set out your baker's twine, bench scraper, and sharp knife. Get your small foil pieces ready now — you'll use them during the bake.
Turn Out the Cold Boule
Remove the dough from the fridge. Flip the banneton or bowl and let the boule fall gently onto a lightly floured surface, seam-side up. Let it sit for 2 minutes. Do not let it warm up.
Cut the Side Trim Pieces
Using your sharp knife, cut a strip of dough from each long side of the boule. Each strip should be about 1 inch wide and run the full length of the loaf. You'll have two trim pieces, roughly 50-55g each. Set them aside. These two pieces become your ears, tail, and feet — nothing else gets cut from the main body.
Shape the Body
Place the main body onto the parchment-lined sheet, seam-side down. Gently nudge it into a slightly oval shape — this is the bunny's body. Don't handle it more than necessary.
Divide the Trim Pieces
Take each trim piece and cut off roughly 1/3 from one end. The larger 2/3 section becomes an ear. From the two smaller 1/3 sections: roll one into a smooth round ball for the tail, and divide the other into two smaller balls for the front feet. You now have: 2 ears, 1 tail ball, 2 foot balls.
Tie the Twine
Before attaching the ears, run a length of baker's twine under the body of the loaf, positioning it about 3 inches in from the head end. Bring both ends up and over where the ears will sit. Leave the twine loose for now — you'll tighten and tie it after the ears are in place.
Attach the Ears
Place the two ear pieces seam-side down on top of the head end of the body, with the pointed tips facing inward toward the center of the loaf. They should look like two tall leaf shapes pointing up. Pull the twine up between the ears, cross it over, then bring each end down around the base of the ears and tie a loose knot underneath. Loose is the key word — the dough will expand in the oven and tight twine will split the loaf.
Attach Tail and Feet
Dab a tiny bit of water on the spots where the tail and feet will go. Press the tail ball onto the back of the body. Tuck the two small foot balls underneath the back end of the loaf so they peek out just slightly on each side. Lightly dust the entire bunny with rice flour or all-purpose flour for a rustic look.
Pro Tip
If an ear leans, that's character. Don't fuss with it. Over-handling warm dough destroys surface tension and you'll lose definition in the bake.
Why This Method Works
Cutting from the same cold, fermented boule means every piece has the same gluten structure, the same hydration, and the same fermentation level. That means everything bakes at the same rate and browns evenly. Pieces from a different batch of dough can behave unpredictably.
The Takeaway
One boule. One bunny. Trust the trim.
Day 2 — Final Proof
Final Proof
The shaped bunny needs a short rest before it goes into the oven. This is not a long proof — you want the dough alert, not exhausted.
Click each step to mark complete
Rest at Room Temperature
Cover the shaped bunny loosely with plastic wrap or a clean kitchen towel. Let it rest at room temperature for 30-45 minutes while you preheat the oven and Dutch oven.
⏱ Wait Time
30-45 minutes
Precise Timers
Use these interactive timers to track your stages.
Final Proof
Day 2 — Bake
Bake the Bunny
The bake has two stages: steam phase with the lid on, then the browning phase with the lid off. The small sculptural pieces brown faster than the body — be ready with foil.
Step by Step
Preheat with Dutch Oven Inside
Place your Dutch oven (with lid) inside the oven and preheat to 450°F (230°C). Preheat for at least 45 minutes. A properly preheated Dutch oven is what creates the oven spring and crust on this loaf.
Transfer the Bunny
Carefully lift the parchment paper with the bunny on it and lower it into the preheated Dutch oven. The parchment acts as a sling — you don't need to touch the dough. Score the body with one or two light slashes if desired, but keep it minimal. The sculptural elements are the show here.
Bake with Lid On
Place the lid on the Dutch oven and bake for 25 minutes at 450°F (230°C). Do not open the oven during this time. The steam trapped inside is building the crust and giving you .
Remove Lid and Finish
After 25 minutes, remove the lid. Check the ears and tail. If they're browning faster than the body, tent them loosely with small pieces of foil now. Continue baking for 15-20 more minutes, until the body is deep golden brown and the internal temperature reads 200-205°F (93-96°C).
Cool Completely
Lift the bunny out by the parchment and place on a wire cooling rack. Do not remove the twine until the loaf is completely cool — hot bread is still setting its structure. Once cool, the twine will peel away cleanly and leave a gentle indentation around the ears that actually adds to the look.
Preheat Oven and Dutch Oven
Bake Covered (Steam Phase)
Bake Uncovered (Browning Phase)
Cool Before Cutting
Baking Methods
The preferred method. Traps steam in the first phase for oven spring, then browns the crust in the second phase.
Equipment: 5.5 qt Dutch oven or larger, parchment paper
Preheat
450°F (230°C) with Dutch oven inside for 45 minutes.
Steam Bake
25 minutes lid on.
Finish
15-20 minutes lid off, foil on ears if needed.
Nutrition Facts
Per 1 slice (approximately 1/8 of loaf) • 8 servings per recipe
* Values are estimates based on standard ingredients
Storage
Room Temperature
2-3 days wrapped in a clean kitchen towel or paper bag
Frozen
Up to 2 months. Slice before freezing for easier use.
💡 Warm at 325°F (165°C) for 10 minutes to revive the crust
Your Feedback
Rate This Recipe
Loading ratings...
Troubleshooting
Baker's Notes
Common questions and solutions for perfect results
If you're serious about scoring, you need the right blade in your hand. Wire Monkey makes handcrafted bread lames from black walnut — built to last, balanced in the hand, and sharp enough to glide through cold dough cleanly every single time. No dragging, no hesitation marks. Just a clean cut.

Wire Monkey Handcrafted Bread Lames
You Might Also Enjoy
More recipes from our pantry that pair well with this bake.

Get More Recipes in Your Inbox
Join thousands of home bakers receiving weekly recipes, tips, and techniques to elevate your bread game.
No spam, ever. Unsubscribe anytime.
More from Baking Great Bread at Home
Tools, resources, and community to help you bake better bread

Crust & Crumb Academy
Go deeper into your craft. FREE courses, challenges, and real feedback. No gatekeeping. Perfection is not required.

Sourdough Starter Companion
Your AI-powered starter assistant. Track feedings, troubleshoot issues, and keep your starter thriving.

BakingGreatBread.com
Real bread for the rest of us

Baking Great Bread Blog
Recipes, tips, and stories from the bread journey

Recipe Converter
Convert sourdough recipes to yeast and back again

Crust & Crumb App
Your AI-powered baking assistant

Facebook Community
Join 50,000+ bakers sharing, learning, and supporting each other

Sourdough for the Rest of Us
Free beginner's guide to sourdough