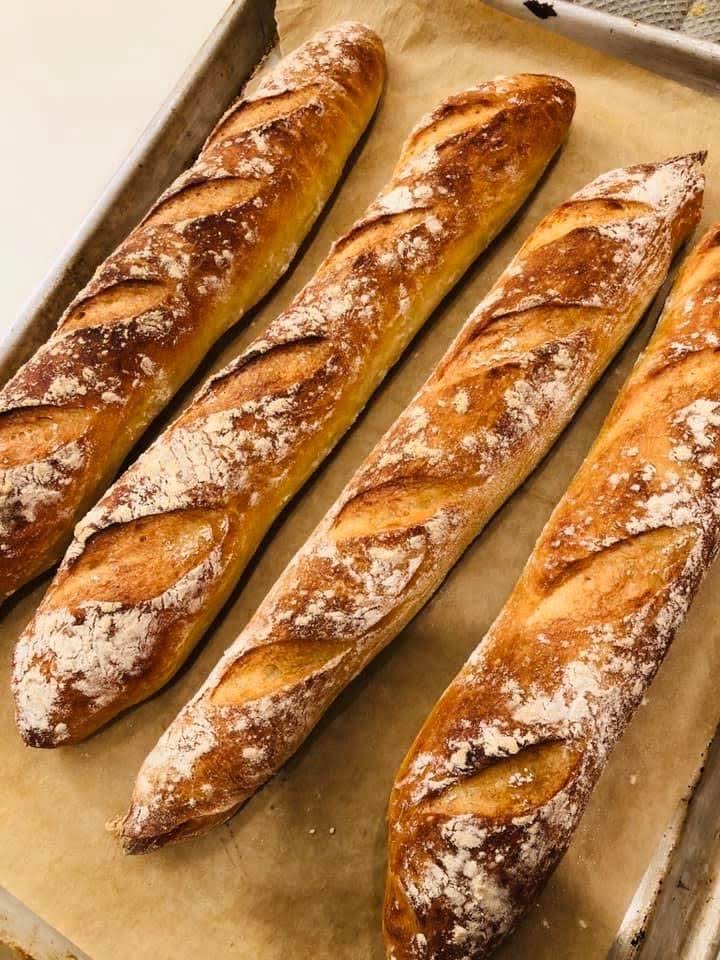
The Art of Traditional French Baking
IntermediateClassic PoolishBaguette
by Henry Hunter Jr.
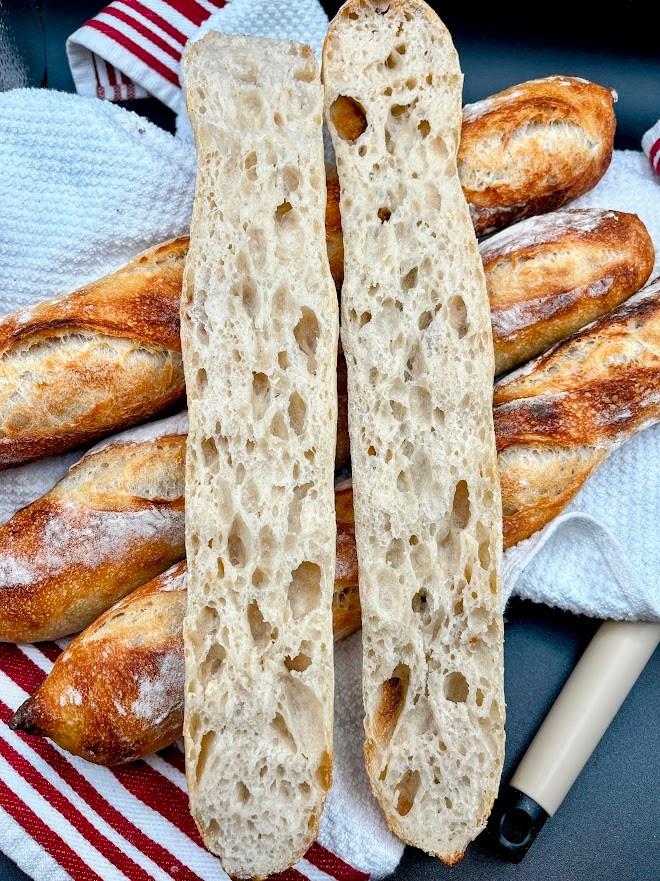
Thin, shattering crust and open crumb from a traditional pre-ferment
Fermentation
12-16 hours
Bake Time
22-25 minutes
Yield
approximately 280g each

Perfection is not required
"Great bread isn't about perfect technique—it's about understanding the dough."— Henry Hunter Jr.
By Henry Hunter Jr., founder of Crust & Crumb Academy and Baking Great Bread at Home.
Authentic Flavor
Master the art of French baguettes with this classic poolish recipe. 75% hydration dough creates thin, shattering crust and open, irregular crumb with mild sweetness.
Equipment Needed
Ingredients
Poolish (12-16 hours ahead)
The pre-ferment that develops flavor and extensibility
Final Dough
Pro Tip
Use cool water (65°F) to control fermentation speed and develop maximum flavor.
Day 1
Build the Poolish
The is a 100% hydration pre-ferment that develops complex flavors and improves dough extensibility. Start this 12-16 hours before you plan to mix your final dough.
Click each step to mark complete
Combine flour and water
Add the bread flour (250g) and room temperature water (250g) to a medium container (at least 1-quart capacity). Stir with a fork until no dry flour remains.
Add yeast
Sprinkle the tiny amount of (0.2g) over the surface and stir until evenly distributed. The mixture will look like thick pancake batter.
Cover loosely
Use plastic wrap with a small gap, or a lid set ajar. needs some air exchange during fermentation.
Ferment overnight
Leave at cool room temperature (65-70°F / 18-21°C) for 12-16 hours. Ready when domed, covered with bubbles, and roughly doubled. Should smell yeasty and slightly sweet.
Now
12-16 hours
Let the poolish ferment overnight at room temperature
Day 2
Autolyse
hydrates the flour and begins gluten development before adding the poolish, making the dough easier to mix.
Click each step to mark complete
Mix fresh flour and water
Add the fresh bread flour (250g) and cool water (125g) to your mixing bowl. Mix until no dry flour remains.
Rest
Cover and rest for 20-30 minutes. This hydrates the flour before adding the .
⏱ Wait Time
Let the flour fully hydrate
Precise Timers
Use these interactive timers to track your stages.
Autolyse Rest
Mixing
Add Poolish and Mix
Combine the with your autolysed dough and develop gluten through mixing. The dough will be soft and tacky at 75% hydration.
Click each step to mark complete
Check your poolish
It should be domed and bubbly. If collapsed significantly, it's past peak but still usable—flavor may be slightly more acidic.
Combine ingredients
Add the to the autolysed dough along with the salt (10g) and (2g).
Mix (stand mixer option)
Mix on low speed for 2 minutes until incorporated. Increase to medium speed and mix for 6-8 minutes until smooth and passes a modified .
Mix (by hand option)
Combine using a pinching and folding motion for 4 minutes. Turn onto a clean surface and use technique for 8-10 minutes until smooth and elastic.
Pro Tip
Target dough temperature: 75-78°F (24-26°C). The dough will be soft at 75% hydration—tacky but not sticky.
Bulk Rise
Bulk Fermentation
During , the dough develops flavor and structure. Stretch and folds strengthen the gluten network without heavy kneading.
Click each step to mark complete
Transfer and cover
Transfer dough to a lightly oiled container. Cover with plastic wrap or a damp towel.
First fold (30 min)
Perform a set of : wet hands, stretch one side up and fold over center, rotate 90° and repeat for all four sides. Flip dough so folds are underneath.
Second fold (1 hour)
Repeat the stretch and fold process. You'll notice the dough becoming stronger and holding its shape better.
Third fold (1.5 hours)
Perform a third set of folds. The dough should now feel airy and hold together well.
Check for readiness
After 2-2.5 hours total, dough should be 50-75% larger, slightly domed, and jiggly. When poked, indent fills back slowly.
⏱ Wait Time
With 3-4 sets of stretch and folds
Pro Tip
The folds build strength. dough lacks structure on its own—folds compensate by aligning gluten without traditional kneading.
Precise Timers
Use these interactive timers to track your stages.
First Fold
Second Fold
Third Fold
Final Rise
Pre-Shape
Divide and Pre-Shape
Dividing the dough evenly and pre-shaping sets up even baguettes and allows the gluten to relax before final shaping.
Click each step to mark complete
Turn out dough
Turn dough onto a lightly floured surface. It will spread somewhat due to extensibility.
Divide
Using a , divide into 3 equal pieces (approximately 280g each).
Pre-shape
Gently pat each piece into a rough rectangle. Fold top third down, bottom third up, like a letter. Flip seam-side down.
Cover loosely with a towel. Rest for 20 minutes to relax the gluten before final shaping.
⏱ Wait Time
Let the dough relax before final shaping
Precise Timers
Use these interactive timers to track your stages.
Bench Rest
Proof
Final Proof
The final proof allows the shaped baguettes to rise before baking. Proper proofing ensures good oven spring and open crumb.
Click each step to mark complete
Proof at room temperature
Let shaped baguettes proof until increased by about 50% and feel light and airy when you gently lift the .
Poke test
Press gently with a floured finger. Indent should spring back slowly and mostly fill in. If it springs back immediately, proof longer. If indent stays, bake immediately.
⏱ Wait Time
Until baguettes are puffy and pass the poke test
Pro Tip
You can refrigerate shaped baguettes up to 2 hours if needed. Remove 30 minutes before baking. Do not refrigerate overnight—baguettes don't handle extended cold proofs well.
Precise Timers
Use these interactive timers to track your stages.
Final Proof
Shaping
Final Shape
The classic baguette shape requires practice. Your first attempts may be uneven—the bread will still taste excellent.
Baguette
RecommendedClick each step to mark complete
Prepare
Dust generously with flour (rice flour works well, or 50/50 bread flour and rice flour).
Shape the baguette
Flip dough seam-side up. Press into rectangle about 4" × 6". Fold top edge to center and seal. Fold again to meet bottom edge. Seal seam firmly with heel of hand.
Roll and taper
Roll back and forth under palms, applying gentle pressure outward toward ends. Taper ends with slightly more pressure. Final length: 12-14 inches.
Transfer to
Place seam-side up on floured . Create pleats between each baguette to support the sides. Cover loosely.
The Final Step
Score and Bake
High heat and steam are critical for achieving the thin, shattering crust that defines a great baguette.
Baking Methods
Equipment: Baking stone, Metal pan for steam
Preheat thoroughly
Place baking stone on middle rack and empty metal pan on rack below. Preheat to 500°F (260°C) for at least 45 minutes.
Transfer baguettes
Gently roll each baguette from onto parchment, seam-side down.
Score
Using a held at 30-45° angle, make 3-5 overlapping slashes down the length. Each cut 3-4" long, overlapping by ¼ inch. Work quickly.
Bake with steam
Slide baguettes onto hot stone. Pour 1 cup hot water into metal pan below and close door quickly. Bake 10 minutes at 500°F.
Vent and finish
Remove steam pan carefully. Reduce to 475°F (245°C). Bake 12-15 minutes more until deep golden brown with internal temp of 205-210°F.
"Steam is critical for crust. Without it, crust sets too early and baguettes can't expand fully."
Nutrition Facts
Per 1/3 baguette (about 93g) • 9 servings per recipe
* Values are estimates based on standard ingredients
Storage
Room Temperature
Best eaten same day. Store cut-side down on a cutting board for up to 1 day. The crust will soften.
Frozen
Freeze whole or sliced for up to 1 month. Refresh in a 400°F oven for 5-8 minutes.
💡 Refresh day-old baguettes in a 400°F oven for 5 minutes to re-crisp the crust.
Your Feedback
Rate This Recipe
Loading ratings...
Troubleshooting
Baker's Notes
Common questions and solutions for perfect results
If you're serious about scoring, you need the right blade in your hand. Wire Monkey makes handcrafted bread lames from black walnut — built to last, balanced in the hand, and sharp enough to glide through cold dough cleanly every single time. No dragging, no hesitation marks. Just a clean cut.

Wire Monkey Handcrafted Bread Lames
You Might Also Enjoy
More recipes from our pantry that pair well with this bake.

Get More Recipes in Your Inbox
Join thousands of home bakers receiving weekly recipes, tips, and techniques to elevate your bread game.
No spam, ever. Unsubscribe anytime.
More from Baking Great Bread at Home
Tools, resources, and community to help you bake better bread

Crust & Crumb Academy
Go deeper into your craft. FREE courses, challenges, and real feedback. No gatekeeping. Perfection is not required.

Sourdough Starter Companion
Your AI-powered starter assistant. Track feedings, troubleshoot issues, and keep your starter thriving.

BakingGreatBread.com
Real bread for the rest of us

Baking Great Bread Blog
Recipes, tips, and stories from the bread journey

Recipe Converter
Convert sourdough recipes to yeast and back again

Crust & Crumb App
Your AI-powered baking assistant

Facebook Community
Join 50,000+ bakers sharing, learning, and supporting each other

Sourdough for the Rest of Us
Free beginner's guide to sourdough