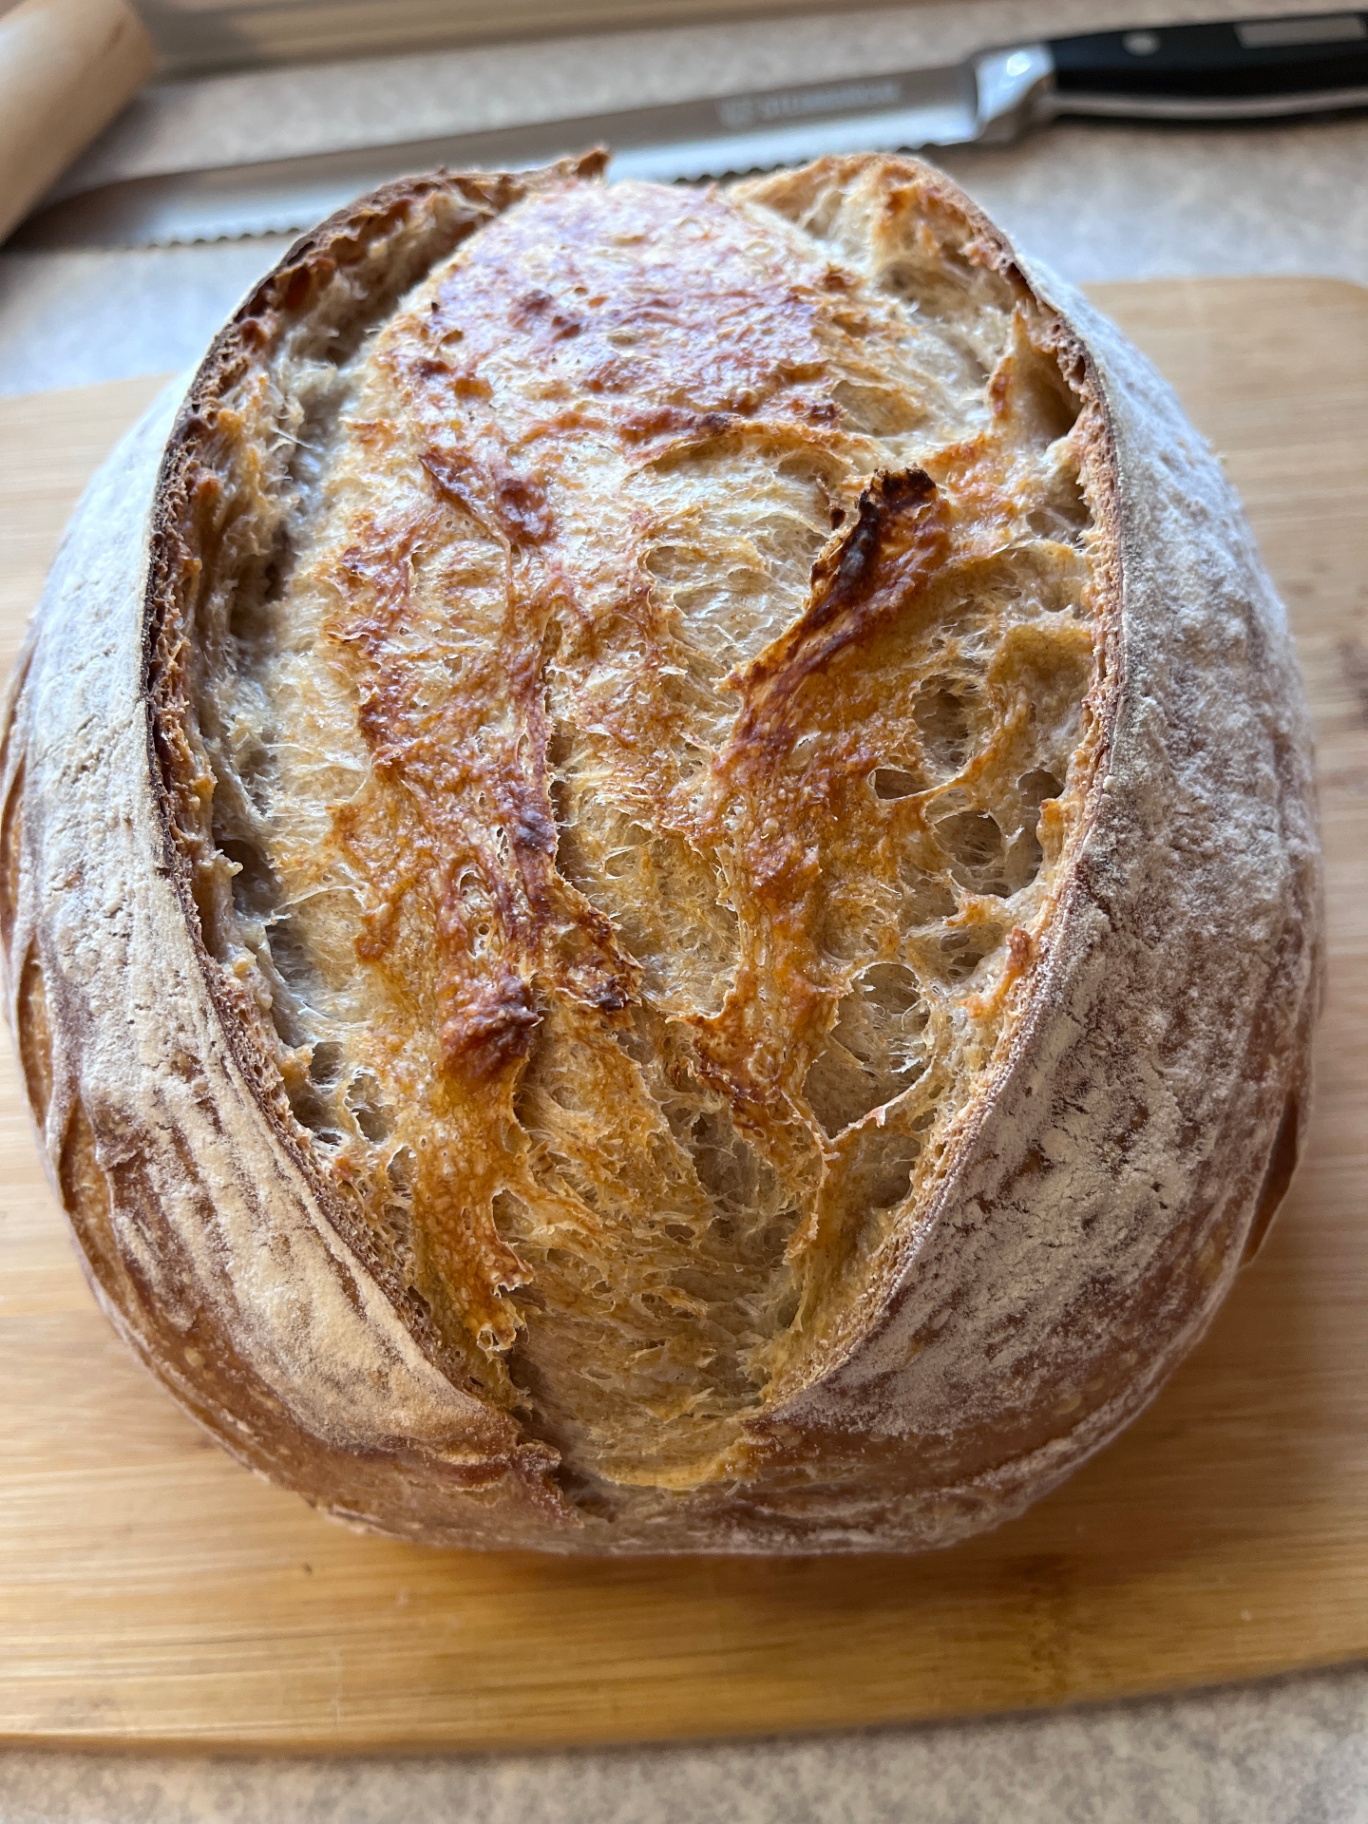
A Crusty, Golden Loaf with Mild Complexity
IntermediateClassic French Batard with PâteFermentée
by Henry Hunter Jr.
Pâte fermentée at its best: balanced flavor, excellent structure, forgiving timeline
Fermentation
12-24 hours
Bake Time
35-40 minutes
Yield
2 batards (approximately 450g each)

Perfection is not required
"Great bread isn't about perfect technique—it's about understanding the dough."— Henry Hunter Jr.
By Henry Hunter Jr., founder of Crust & Crumb Academy and Baking Great Bread at Home.
Authentic Flavor
A crusty, golden loaf with a soft, slightly open crumb and the kind of balanced wheat flavor that makes you want to eat half of it before it cools. This recipe showcases at its best: mild complexity, excellent structure, and a forgiving timeline that fits real life.
Equipment Needed
Ingredients
Pâte Fermentée (12-24 Hours Ahead)
This pre-ferment develops flavor while you sleep
Final Dough
Mixed with the fermented pâte fermentée
Pro Tip
Notice the final dough uses only 7g of salt instead of 10g (which would be 2% of 500g flour). That's because the pâte fermentée already contains 3g. Always account for salt that's already in your .
Day 1
Build the Pâte Fermentée
10 minutes active, then 12-24 hours fermentation
The is where mild complexity develops. During those 12-24 hours, the yeast produces organic acids and flavor compounds that straight-dough methods can't replicate.
Click each step to mark complete
Combine flour and water
Add the bread flour and room temperature water to a medium bowl. Mix with a fork or your hand until no dry flour remains. The mixture will be shaggy and rough.
Add salt and yeast
Sprinkle the salt and over the dough. Mix thoroughly until both are fully incorporated and the dough becomes smooth, about 2 minutes of working it with your hands.
Initial fermentation
Cover the bowl with plastic wrap or a damp towel. Let it sit at room temperature (70-75°F) for 1 hour. The dough will relax and just begin to show signs of activity.
Refrigerate
Transfer to the refrigerator. Ferment for at least 12 hours and up to 24 hours. The dough will rise slowly, develop flavor compounds, and be ready to use cold.
⏱ Wait Time
Let it ferment in the refrigerator while you sleep
Pro Tip
If you need to hold it longer than 24 hours, the pâte fermentée will still work at 36-48 hours but will be more acidic. Beyond 48 hours, freeze it. Frozen pâte fermentée keeps for 2 weeks. Thaw overnight in the refrigerator before using.
Precise Timers
Use these interactive timers to track your stages.
Room Temp Rest
Cold Ferment (min)
Day 2
Autolyse the Fresh Flour
20-30 minutes
hydrates the flour and begins development before you add the other ingredients. By autolysing only the fresh flour (not the pâte fermentée), you give the new flour time to absorb water without the fermented dough accelerating things.
Click each step to mark complete
Combine fresh flour and water
Add the fresh bread flour (350g) and cool water (230g) to your mixing bowl.
Mix until combined
Mix until no dry flour remains. The dough will be rough and shaggy.
Rest
Cover and let rest for 20-30 minutes.
⏱ Wait Time
Let the flour hydrate before adding remaining ingredients
Pro Tip
This rest is not optional. The flour hydrates and gluten begins developing without any work from you.
Precise Timers
Use these interactive timers to track your stages.
Autolyse Rest
Day 2
Incorporate Pâte Fermentée
10-15 minutes
Now you'll bring everything together. The cold will help keep your dough temperature in the ideal range.
Click each step to mark complete
Remove pâte fermentée from refrigerator
Take out the pâte fermentée and tear it into 6-8 pieces.
Add to autolysed dough
Add the torn pieces to the autolysed dough along with the salt (7g) and (3g).
Mix by machine
If using a stand mixer: Mix on low speed (speed 2) for 3 minutes to incorporate everything. Increase to medium speed (speed 4) and mix for 5-6 minutes until the dough is smooth, pulls away from the sides of the bowl, and passes the .
Mix by hand (alternative)
If mixing by hand: Squeeze and fold the dough in the bowl to incorporate the pâte fermentée, about 3-4 minutes. Turn onto your work surface and for 8-10 minutes until smooth and elastic.
Pro Tip
Target dough temperature: 75-78°F. If your dough is warmer, will be faster. If cooler, it will be slower. Adjust your expectations accordingly.
Precise Timers
Use these interactive timers to track your stages.
Low Speed Mix
Medium Speed Mix
Day 2
Bulk Fermentation
2-2.5 hours at 75-78°F
is where the dough builds strength and develops flavor. One fold at the midpoint is all you need.
Click each step to mark complete
Transfer to container
Transfer the dough to a lightly oiled container or bowl. Cover with plastic wrap or a damp towel.
First hour
Let ferment at room temperature until the dough shows signs of activity.
Fold at 1 hour
Wet your hands. Reach under one side of the dough and stretch it up, then fold it over the center. Rotate the container 90 degrees and repeat. Do this for all four sides. Flip the dough over so the seams are underneath. Cover and continue fermenting.
Continue rising
Let ferment until the dough has increased in volume by about 75% (not quite doubled).
⏱ Wait Time
One fold at the midpoint, then let it rise
Pro Tip
How to know it's ready: The dough will be noticeably larger, slightly domed on top, and will jiggle when you move the container. When you poke it gently, it should spring back slowly, leaving a slight indentation.
Precise Timers
Use these interactive timers to track your stages.
First Rise
Second Rise
Day 2
Divide and Pre-Shape
5 minutes active, then 15-20 minutes rest
Pre-shaping creates initial structure and allows the to relax before final shaping.
Click each step to mark complete
Turn out the dough
Flour your work surface lightly. Turn out the dough and divide it into two equal pieces using a . Each piece should be approximately 450g.
Pre-shape into rounds
Working with one piece, gently gather the edges toward the center, creating a rough round. Flip it seam-side down.
Build surface tension
Use your to drag the round toward you, creating surface tension on the outside.
Bench rest
Cover loosely with a towel or plastic. Let rest for 15-20 minutes (). This relaxes the gluten and makes final shaping easier.
⏱ Wait Time
Let the dough relax before final shaping
Pro Tip
Don't skip the bench rest. Trying to shape immediately will result in the dough fighting back and tearing.
Precise Timers
Use these interactive timers to track your stages.
Bench Rest
Shaping
Final Shape
The shape is forgiving and versatile. It scores beautifully, fits standard s or baking stones, and slices well for sandwiches or toast.
Batard (Oval Loaf)
The classic French shape with tapered ends. Yields beautiful slices perfect for sandwiches or toast.
RecommendedClick each step to mark complete
Flip the dough
Lightly flour your work surface. Working with one piece at a time, flip the dough over so the seam side faces up.
Press into rectangle
Gently press the dough into a rough rectangle, about 6 inches wide and 8 inches long.
First fold
Fold the top third down toward the center. Press gently to seal.
Second fold
Fold the bottom third up to meet the top edge. Press to seal.
Seal the seam
Starting from the center, use the heels of your hands to seal the seam, rocking the dough back and forth slightly to create tension.
Roll to shape
Roll the dough gently to even out the shape. It should be 8-10 inches long with tapered ends.
Place for proofing
Place each shaped batard seam-side up in a floured , or seam-side down on a floured or sheet of parchment. Cover loosely.
Proof Test: The : Gently press with a floured finger. The indentation should spring back slowly and mostly (but not completely) fill in. This typically takes 60-90 minutes at room temperature, or 8-14 hours refrigerated.
The Final Step
Score and Bake
Two methods, both excellent. The traps steam automatically. The stone/steel method uses a steam pan.
Baking Methods
Best for one loaf at a time. The trapped steam creates incredible and .
Equipment: Dutch oven with lid
Preheat Dutch oven
Place your in the oven and preheat to 475°F (245°C) for at least 45 minutes.
Transfer dough
Gently turn the loaf out onto parchment paper. If it proofed in a , flip it seam-side down.
Score the loaf
Using a or sharp razor blade, make one long slash down the center at a 30-45 degree angle, about ½ inch deep. Work quickly and confidently.
Load into Dutch oven
Carefully transfer the loaf (on its parchment) into the hot . Cover with the lid.
Bake covered
Bake covered for 20 minutes. The trapped steam does the work for you.
Bake uncovered
Remove the lid, reduce temperature to 450°F (230°C), and bake uncovered for 18-22 minutes more until deep golden brown.
Check temperature
Target internal temperature: 205-210°F (96-99°C). If you don't have a thermometer, the bread should sound hollow when tapped on the bottom.
Cool completely
Transfer to a wire . Let cool for at least 1 hour before slicing. The bread is still cooking internally during this time.
Nutrition Facts
Per 1 slice (about 55g) • 16 servings per recipe
* Values are estimates based on standard ingredients
Storage
Room Temperature
Keeps well for 2-3 days stored cut-side down on a cutting board, or wrapped in a clean towel. The crust will soften but you can refresh it in a 350°F oven for 5 minutes.
Frozen
Slice and freeze for longer storage. Toast frozen slices directly without thawing. Whole loaves freeze well for up to 3 months.
Your Feedback
Rate This Recipe
Loading ratings...
Troubleshooting
Baker's Notes
Common questions and solutions for perfect results
If you're serious about scoring, you need the right blade in your hand. Wire Monkey makes handcrafted bread lames from black walnut — built to last, balanced in the hand, and sharp enough to glide through cold dough cleanly every single time. No dragging, no hesitation marks. Just a clean cut.

Wire Monkey Handcrafted Bread Lames
You Might Also Enjoy
More recipes from our pantry that pair well with this bake.

Get More Recipes in Your Inbox
Join thousands of home bakers receiving weekly recipes, tips, and techniques to elevate your bread game.
No spam, ever. Unsubscribe anytime.
More from Baking Great Bread at Home
Tools, resources, and community to help you bake better bread

Crust & Crumb Academy
Go deeper into your craft. FREE courses, challenges, and real feedback. No gatekeeping. Perfection is not required.

Sourdough Starter Companion
Your AI-powered starter assistant. Track feedings, troubleshoot issues, and keep your starter thriving.

BakingGreatBread.com
Real bread for the rest of us

Baking Great Bread Blog
Recipes, tips, and stories from the bread journey

Recipe Converter
Convert sourdough recipes to yeast and back again

Crust & Crumb App
Your AI-powered baking assistant

Facebook Community
Join 50,000+ bakers sharing, learning, and supporting each other

Sourdough for the Rest of Us
Free beginner's guide to sourdough