Bakery-Quality Bread in Under 2 Hours
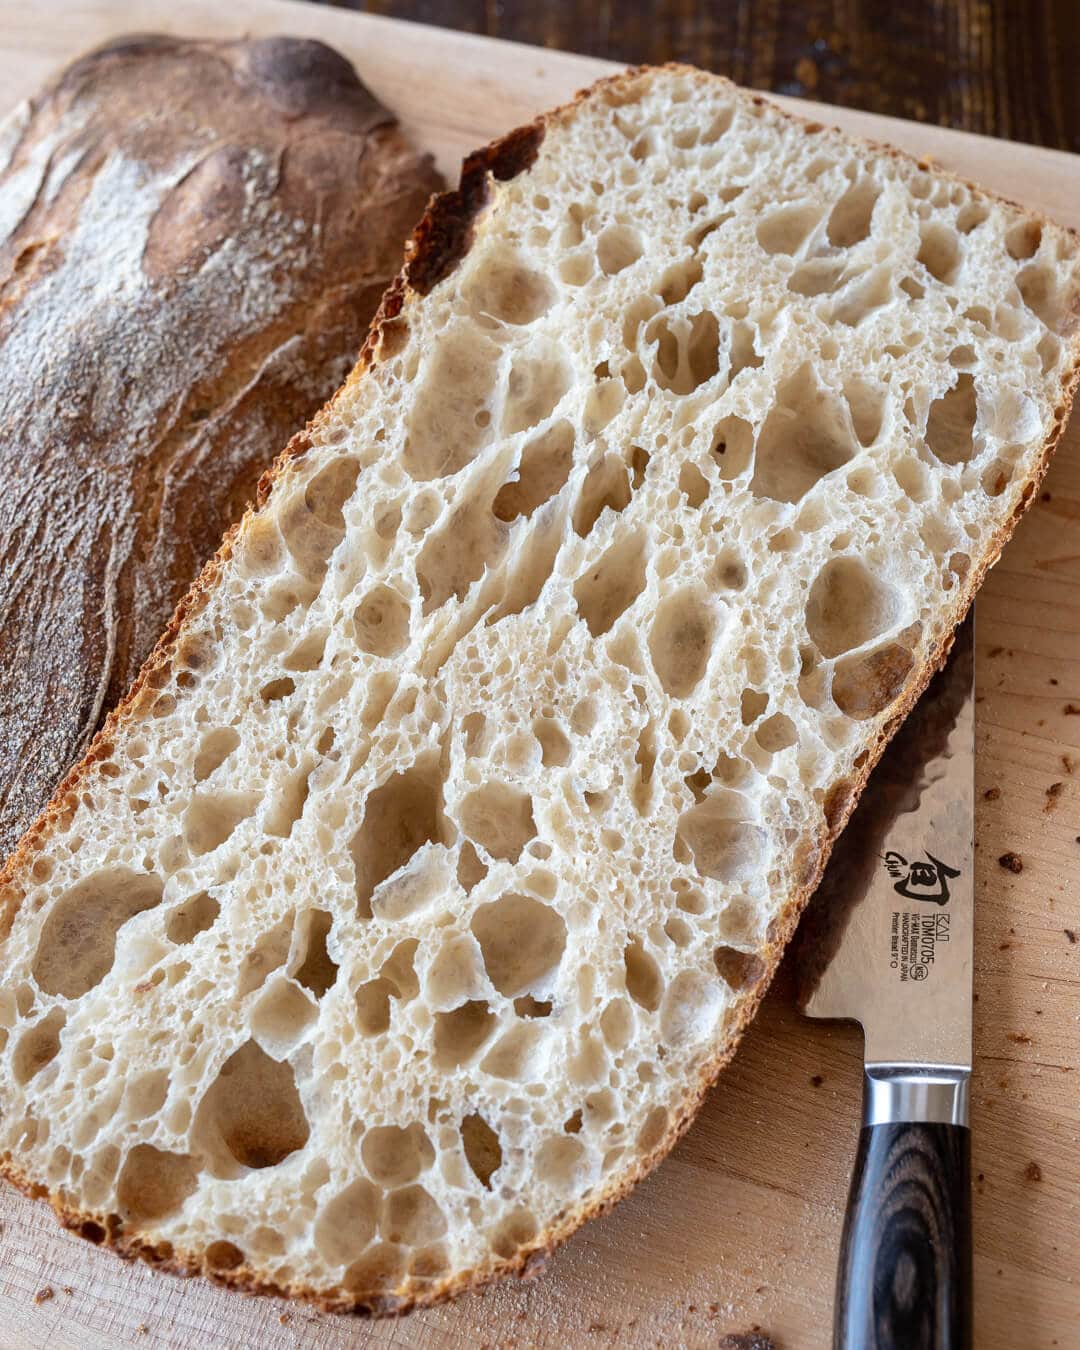
Intermediate"I Don't Have Time For All of That"Ciabatta
by Henry Hunter
When you need bread now, not tomorrow
Fermentation
1 hour
Bake Time
30-40 minutes
Yield
6-8 sandwich-sized rolls or 2 loaves

Perfection is not required
"Great bread isn't about perfect technique—it's about understanding the dough."— Henry Hunter
By Henry Hunter Jr., founder of Crust & Crumb Academy and Baking Great Bread at Home.
Authentic Flavor
When you don't have time for overnight ferments, this fast delivers. Wet dough, paddle attachment, and aggressive yeast get you bakery-quality bread in under 2 hours. The secret? Trust the wet dough, use the paddle (not the dough hook), and let steam do the heavy lifting for that incredible crust.
Equipment Needed
Ingredients
Dough
Everything goes in at once - no holding back
Pro Tip
This dough is extraordinarily wet. Your instinct will be to add more flour. Don't. Trust it. The flour stays on the outside during shaping.
Step 1
Mix the Dough
About 20 minutes total
Use the paddle attachment the whole time. Not the dough hook. The paddle has more surface area and can actually handle this wet dough.
Click each step to mark complete
Combine everything
Add all ingredients to the stand mixer bowl with the paddle attachment. Mix on low until no dry spots remain. It will look like thick batter. That's fine.
Rest the dough
Cover and walk away for 20-30 minutes. The flour is hydrating, the yeast is waking up, the is starting to organize itself.
Knead with paddle
Start on slow speed, then work up to speed 8-9 on a KitchenAid. Let it run for about 15 minutes. You'll know it's done when the dough pulls away from the bowl completely and forms a ball around the paddle.
⏱ Wait Time
Let the dough rest before kneading
Pro Tip
Watch your mixer - it's going to jump around on you. Put your hand on it if needed, but don't stop. Let it work.
Precise Timers
Use these interactive timers to track your stages.
Rest Before Kneading
Paddle Knead
Step 2
First Rise
30 minutes with one fold
You've got 10 grams of yeast in here. This thing is going to move fast. It will run away from you if you're not paying attention.
Click each step to mark complete
Transfer to oiled bowl
Use wet hands and a bowl scraper to separate the dough from the paddle. Dump it into a well-oiled bowl. Cover it.
Rise for 30 minutes
Set a timer. Don't walk away and forget about it.
One coil fold
Wet your hands, grab under the dough, lift it up, let it fold over itself. Rotate the bowl, do it again. Four times total. Done.
Go Straight to the Bench
Once you've completed all four folds, move directly to the next step. No additional rest needed here. The fold organized your gluten. The dough is ready to work with now.
⏱ Wait Time
Let the dough rise before folding
Pro Tip
Wet hands for sticky dough. If you're not wet, it's going to stick to you.
Precise Timers
Use these interactive timers to track your stages.
First Rise
Shaping
Shaping
The hard part of isn't the recipe. It's moving these loaves around. From the counter to the couche. That's where people mess up.
Ciabatta Rolls
Sandwich-sized pieces, perfect for filling
RecommendedClick each step to mark complete
Prepare your surface
Dump the dough onto a heavily floured surface. And I mean heavily. Unlike other recipes, in this case it doesn't matter. The flour stays on the outside.
Pat into rectangle
Pat it gently into a rectangle. Just even it out a little. Otherwise you'll get a bulge in the middle. Don't deflate it. Don't roll it. Just pat.
Cut into pieces
Use a to cut into sandwich-sized pieces. However big you want your rolls or loaves.
Transfer to couche
Use two bench scrapers, push in from both ends, squish the dough a little, place it down on your floured couche. Then pull your hands apart and the dough lays right where you want it. **Setting up your couche (or substitute):** Most home bakers don't have a linen couche. A heavy cotton tea towel or clean pillowcase works great. Lay it flat on a sheet pan, flour it liberally (this is the one time I'll tell you to go heavy), and create fabric ridges between each piece of dough so they proof without spreading into each other.
Final proof
Let proof for 20-30 minutes until puffy. Don't let them over-proof - watch them closely.
Proof Test: The dough should look puffy and have grown noticeably. Don't let it over-proof or you'll lose those beautiful holes.
From Couche to Oven
This is where most people lose their ciabatta. The dough is puffy, delicate, and wants to stick to everything. Here's how to move it without deflating all your hard work.
Watch this first
When the dough is proofed:
Click each step to mark complete
Prepare parchment
Have a sheet of parchment paper ready next to your couche.
Flour the tops
Flour the top of each piece of dough lightly.
Flip onto parchment
Use two s to get under one piece of dough. Slide them in from opposite ends, pinch slightly to lift, then flip the dough onto the parchment in one smooth motion. The floured side that was up is now down.
Work quickly
Work quickly but gently. Speed matters more than perfection here.
Transfer to oven
Once all pieces are on parchment, slide the entire parchment onto your preheated baking stone or sheet pan.
💡 Don't touch with your hands. Wet, sticky dough plus warm hands equals a mess. Let the bench scrapers do the work.
The Final Step
Baking
Steam is critical here. We don't have all that fermentation going on like we would with a biga or , so we need to help the crust along.
Baking Methods
The burst of steam creates that incredible crust
Equipment: Baking stone or sheet, metal pan for steam
Preheat with steam pan
Get your oven screaming hot at 475°F. Put a metal pan on the bottom rack for steam.
Create steam
Right before the loaves go in, pour a cup of hot water onto that hot pan. The steam bursts out. Put a towel over your oven window so you don't splash water on the glass and crack it.
Load the loaves
Slide the parchment with the loaves directly onto your preheated baking stone or sheet pan. Close the door quickly to trap the steam.
Bake until golden
Set a timer for 30 minutes, but check them at 25. They should be deep golden, crispy, hollow-sounding when you tap the bottom.
Cool and listen
Set them on a cooling rack. Listen for the clicking sounds as the crust hardens. That's the bread song. It means everything went right.
Nutrition Facts
Per 1 roll (about 125g) • 8 rolls servings per recipe
* Values are estimates based on standard ingredients; actual values vary by brands and portion size.
Storage
Room Temperature
Best eaten same day. The crust is at its crackliest right out of the oven.
Refrigerated
Up to 1 week, well wrapped.
Frozen
Freeze and refresh in a 350°F oven for 5 minutes when ready to eat.
Refresh
Warm individual slices in the microwave for 15-20 seconds, or in a 300°F (150°C) oven for 5-8 minutes.
💡 Don't refrigerate - it accelerates staling. Freeze if you need to store longer than a day.
Your Feedback
Rate This Recipe
Loading ratings...
Troubleshooting
Baker's Notes
Common questions and solutions for perfect results
Test Your Knowledge
How Much Do You Know About Ciabatta?
Put your baking knowledge to the test with this quick quiz


Scan to take the quiz

If you're serious about scoring, you need the right blade in your hand. Wire Monkey makes handcrafted bread lames from black walnut — built to last, balanced in the hand, and sharp enough to glide through cold dough cleanly every single time. No dragging, no hesitation marks. Just a clean cut.

Wire Monkey Handcrafted Bread Lames
You Might Also Enjoy
More recipes from our pantry that pair well with this bake.
Get More Recipes in Your Inbox
Join thousands of home bakers receiving weekly recipes, tips, and techniques to elevate your bread game.
No spam, ever. Unsubscribe anytime.
More from Baking Great Bread at Home
Tools, resources, and community to help you bake better bread

Crust & Crumb Academy
Go deeper into your craft. FREE courses, challenges, and real feedback. No gatekeeping. Perfection is not required.

Sourdough Starter Companion
Your AI-powered starter assistant. Track feedings, troubleshoot issues, and keep your starter thriving.

Fermentation Compass
Stop guessing when bulk fermentation is finished. Read your dough. Nail your bake.

BakingGreatBread.com
Real bread for the rest of us

Baking Great Bread Blog
Recipes, tips, and stories from the bread journey

Recipe Converter
Convert sourdough recipes to yeast and back again

Crust & Crumb App
Your AI-powered baking assistant

Facebook Community
Join 50,000+ bakers sharing, learning, and supporting each other

Sourdough for the Rest of Us
Free beginner's guide to sourdough