Naturally Leavened Bread Using Wild Yeast Water
IntermediateYour First Yeast WaterLoaf
by Henry Hunter Jr.
Rise Time
PT18H
Bake Time
PT45M
Yield
One artisan boule or batard

Perfection is not required
"Great bread isn't about perfect technique—it's about understanding the dough."— Henry Hunter Jr.
By Henry Hunter Jr., founder of Crust & Crumb Academy and Baking Great Bread at Home.
Authentic Bread Flavor
This recipe is different from anything else in the pantry, so let me explain what you're looking at. Yeast water is naturally leavened bread without sourdough. Instead of a flour-based starter, you're using fermented fruit water. You take fruit, add water, let wild yeast do its thing, and what develops is a bubbly, active culture capable of raising bread. Bakers have been doing this for centuries, long before commercial yeast existed. If you've never worked with yeast water before, here's what to expect. It's slower than commercial yeast. Plan for bulk fermentation times of 6-10 hours, not 1-2. It's milder than sourdough. You won't get tang. You'll get subtle complexity and gentle fruit notes instead. And it's more forgiving than a sourdough starter. Yeast water can sit in your fridge for a couple weeks without drama. It can be frozen. It can be dried. For bakers who don't bake every day, that flexibility matters. This recipe assumes you already have active yeast water ready to go. If you don't, or if you want to understand the full process from creating your culture to troubleshooting your bake, I've put together a complete free course called The Yeast Water Method at Crust & Crumb Academy. Seven modules covering everything. Start there if you're new to this. If you've got bubbling yeast water on your counter and you're ready to bake, this is your recipe. Your first loaf is data, not a performance. Did it rise? Did you get oven spring? Is it edible? That's success. Everything else is learning for next time. Let's make some bread.
Equipment Needed
For final proofing
Optional but recommended for checking doneness
Ingredients
Main Dough
Optional Training Wheels
For first-time insurance while your yeast water matures
Day 1
Autolyse
5 minutes active, 30-60 minutes rest
Hydrate the flour and jumpstart gluten development without effort. This passive rest makes the dough easier to work with.
Click each step to mark complete
Combine
Add , , and 50g water to a large mixing bowl.
Mix
Stir until no dry flour remains. The dough will look shaggy and rough. That's normal.
Rest
Cover with plastic wrap or a damp towel. Let sit for 30-60 minutes.
PT45M
Autolyse rest: 30-60 minutes
Pro Tip
Longer (up to 2 hours) can improve dough extensibility, especially with higher protein flours.
Day 1
Add Salt & Fat, Build Structure
10-15 minutes
Incorporate salt and fat, then develop the dough structure using your preferred method.
Click each step to mark complete
Add Salt & Fat
Sprinkle salt over the dough. Add olive oil or softened butter. Dimple into the dough with your fingers.
Incorporate
Squeeze the dough through your fingers, folding it over itself until salt and fat are fully mixed in.
Build Structure - Rubaud Method
Wet your hand. Scoop under the dough, stretch it up, slap it back down. Rotate bowl slightly, repeat. Continue 5-8 minutes until dough is smoother and more elastic. Best for wet doughs.
Alternative: Stand Mixer
Mix on medium-low speed for 6-8 minutes until dough clears the sides and forms a ball.
Alternative: Minimal Mix + Folds
Mix just until combined. You'll build strength through s during .
Transfer
Place dough in a clean, lightly oiled container or bowl. Cover.
Pro Tip
The dough may still feel slightly sticky. That's okay. It will strengthen during bulk fermentation.
Day 1
Bulk Fermentation
6-10 hours
The long wait. Wild yeast ferments the dough, creating flavor and rise. You'll do s during the first 2 hours, then leave it alone.
Click each step to mark complete
First Fold
30 minutes after bulk begins, perform a set of s. Wet your hand, grab one side of the dough, stretch it up (don't tear), fold it over to the opposite side. Rotate container 90°, repeat 4 times (all four sides).
Second Fold
30 minutes later, repeat .
Third Fold
30 minutes later, repeat .
Fourth Fold (Optional)
30 minutes later, one more set if dough still feels slack.
Rest
After folds are complete, leave dough undisturbed to ferment. Room temperature 70-75°F (21-24°C) is ideal.
PT8H
6-10 hours total bulk fermentation
Pro Tip
Read the dough, not the clock. Bulk is done when volume has increased 50-75%, surface is domed and puffy with visible bubbles, dough feels airy and light, and the shows slow spring-back leaving a slight indent.
Precise Timers
Use these interactive timers to track your stages.
First Fold
Second Fold
Third Fold
Fourth Fold
Day 1
Pre-Shape & Bench Rest
20-25 minutes
Gently organize the dough before final shaping. The relaxes gluten so final shaping is easier.
Click each step to mark complete
Turn Out
Lightly flour your work surface. Gently turn the dough out, being careful not to deflate it completely.
Pre-Shape
Using your , fold the dough over itself a few times. Shape into a rough round. Don't worry about perfection.
Bench Rest
Let the dough rest uncovered for 15-20 minutes.
PT20M
15-20 minute bench rest
Pro Tip
Don't skip the . If you try to final shape immediately, the dough will fight you and spring back.
Day 1
Final Shape
5-10 minutes
Create that translates into . The goal is a taut skin without tearing.
Click each step to mark complete
Flip
Turn the dough so the smooth side is down, rough side up.
Envelope Fold
Fold the bottom third up to center. Fold the top third down to center. Fold right side to center. Fold left side to center.
Flip & Tension
Turn dough over so seam is down. Cup your hands around the dough and drag it toward you on the counter. The friction creates . Rotate and repeat until surface is taut.
Transfer to Banneton
Generously flour a with rice flour (or line a bowl with a well-floured towel). Place dough seam-side UP in the banneton.
Pro Tip
If the dough tears, you've gone too far. Gentle but firm. You want tension, not destruction.
Day 1-2
Final Proof
2-4 hours (room temp) OR 8-14 hours (cold)
The final rise before baking. is recommended for better flavor, easier handling, and easier .
Click each step to mark complete
Option A - Room Temperature
Cover loosely with plastic wrap or a damp towel. Let proof at room temperature (70-75°F) for 2-4 hours. Check readiness with . Bake same day.
Option B - Cold Retard (Recommended)
Cover with plastic wrap. Place directly in refrigerator. Let proof overnight, 8-14 hours. Bake directly from cold the next morning (no need to warm up).
PT12H
8-14 hours cold retard (recommended) or 2-4 hours room temp
Pro Tip
The works here too. Press gently with floured finger. Slow spring-back leaving small indent = ready. Fast spring-back = needs more time. No spring-back = over-proofed (bake immediately).
Bake Day
Preheat
45-60 minutes
Get your oven and screaming hot. This is non-negotiable for good .
Click each step to mark complete
Position Rack
Place oven rack in lower third of oven.
Preheat
Set oven to 475°F (245°C) with inside (lid on).
Wait
Preheat for 45-60 minutes. Everything needs to be thoroughly hot.
PT50M
45-60 minute preheat
Pro Tip
Don't rush this. A properly preheated is the difference between good and flat bread.
Precise Timers
Use these interactive timers to track your stages.
Preheat
Shaping
Shaping Options
Choose your preferred shape based on your banneton and preference.
Boule (Round)
Classic round shape, recommended for beginners
RecommendedClick each step to mark complete
Flip
Flip dough so smooth side is down.
Envelope Fold
Fold bottom third up, top third down, right side in, left side in.
Flip & Tension
Flip seam-side down. Cup hands around dough and drag toward you to create tension.
Build Tension
Rotate and repeat until surface is taut.
Transfer
Place seam-side UP in round .
Batard (Oval)
Elongated oval shape
Click each step to mark complete
Flip
Flip dough so smooth side is down.
Fold
Fold bottom up about 2/3 of the way.
Seal
Fold top down to meet it. Seal seam by pressing gently.
Shape
Roll slightly to elongate and taper ends.
Transfer
Place seam-side UP in oval .
Proof Test: Press gently with floured finger. Ready = indent springs back slowly, leaving small impression. Under-proofed = springs back immediately. Over-proofed = indent stays, doesn't spring back.
Bake Day
Score & Bake
The moment of truth. Score for controlled expansion, then bake in two phases.
Step by Step
Prepare
Cut a piece of parchment paper. Turn proofed dough out onto parchment (seam-side now DOWN).
Score
Hold at 30-45° angle. Make swift, decisive cuts about ½ inch deep. Beginner patterns: single slash, cross, or square. Don't hesitate or saw.
Load
Carefully remove hot from oven. Remove lid. Lift dough by parchment edges and lower into Dutch oven. Replace lid.
Phase 1 - Steam Bake
Bake covered at 475°F (245°C) for 20 minutes. Trapped steam keeps crust flexible for maximum expansion.
Phase 2 - Crust Bake
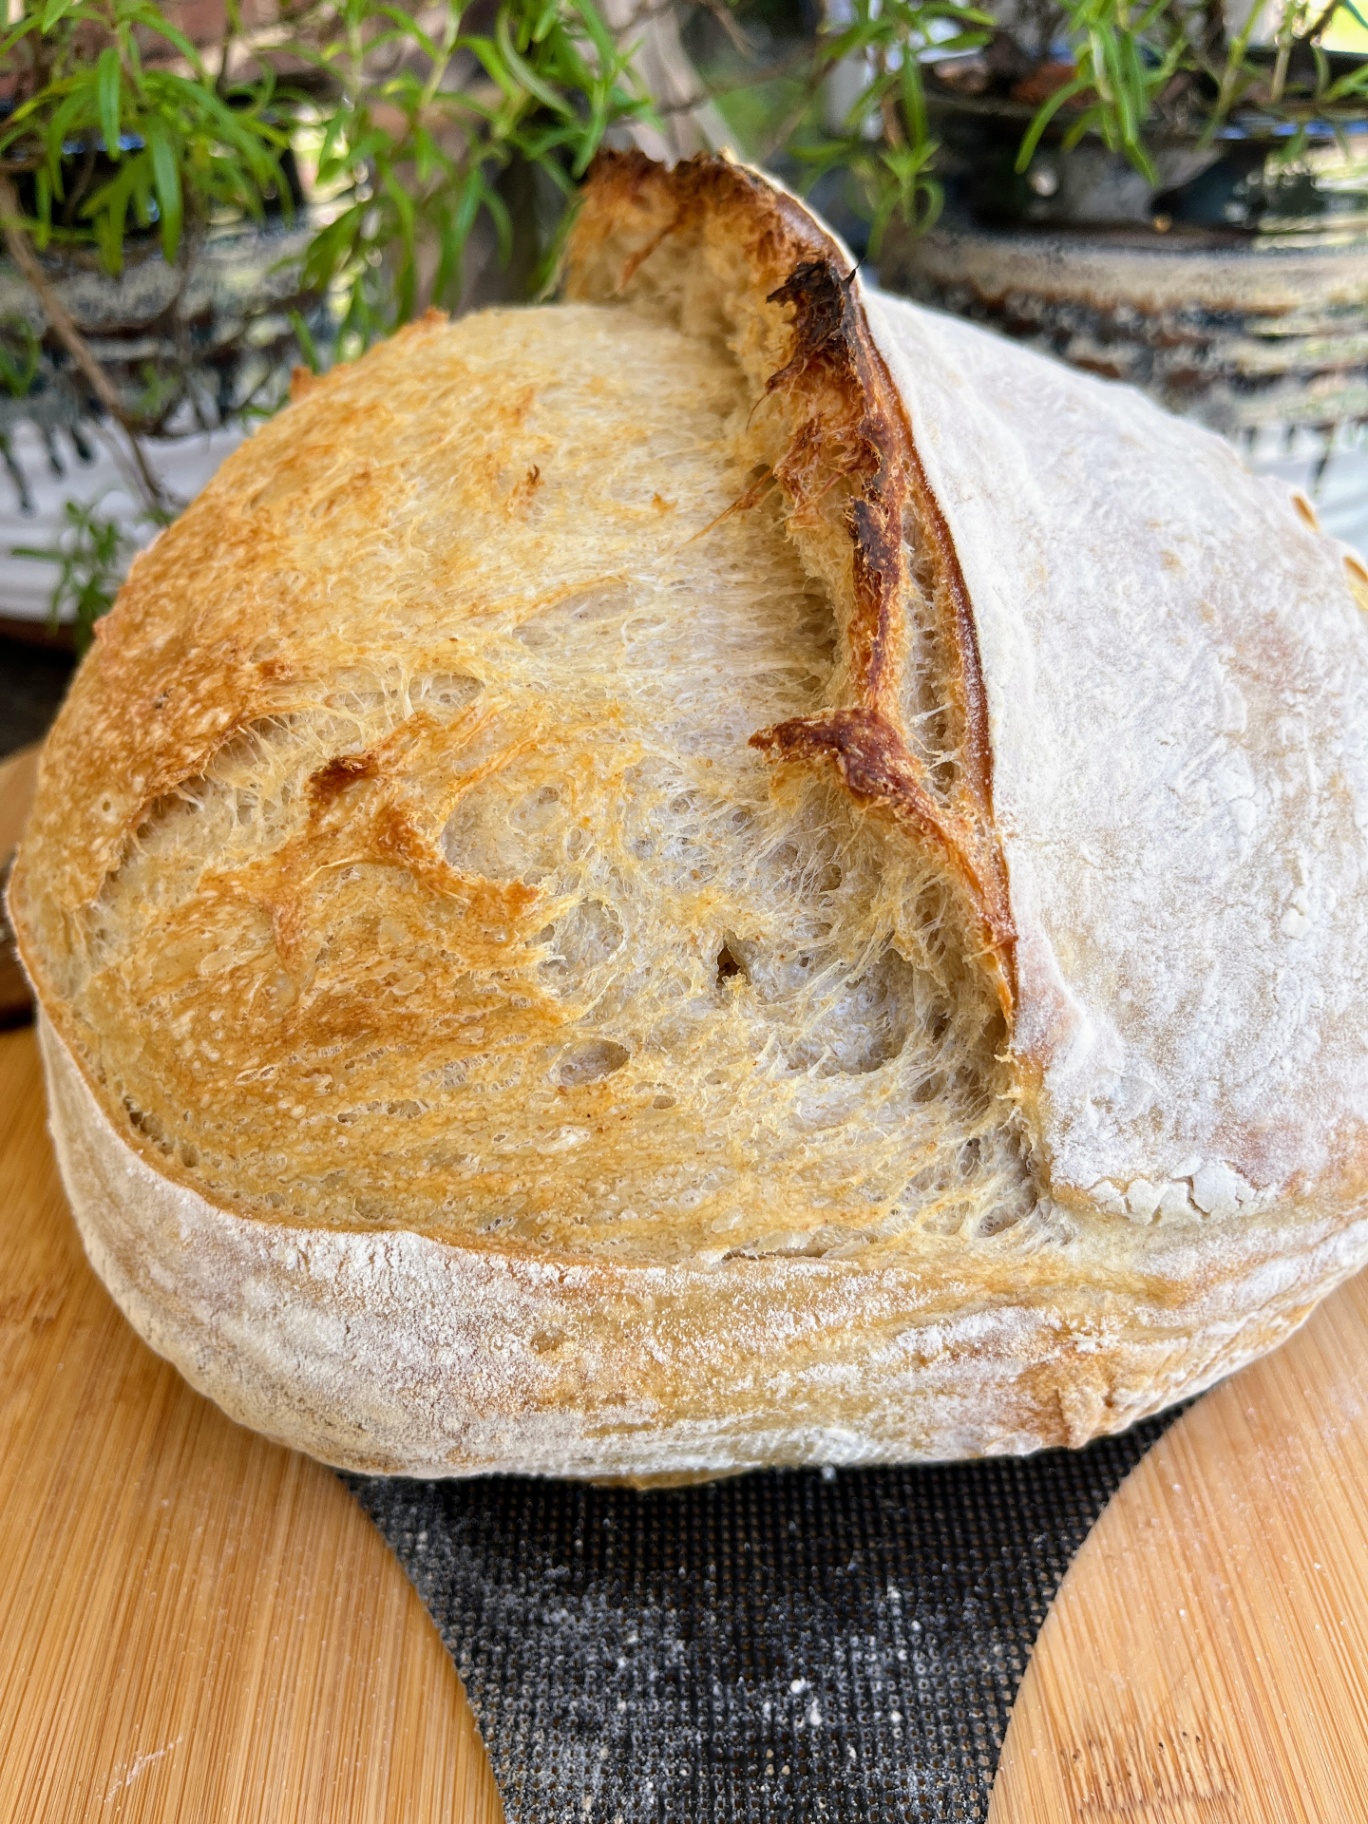
Remove lid. Lower temperature to 450°F (230°C). Bake uncovered for 20-25 minutes until deep golden brown.
Check Doneness
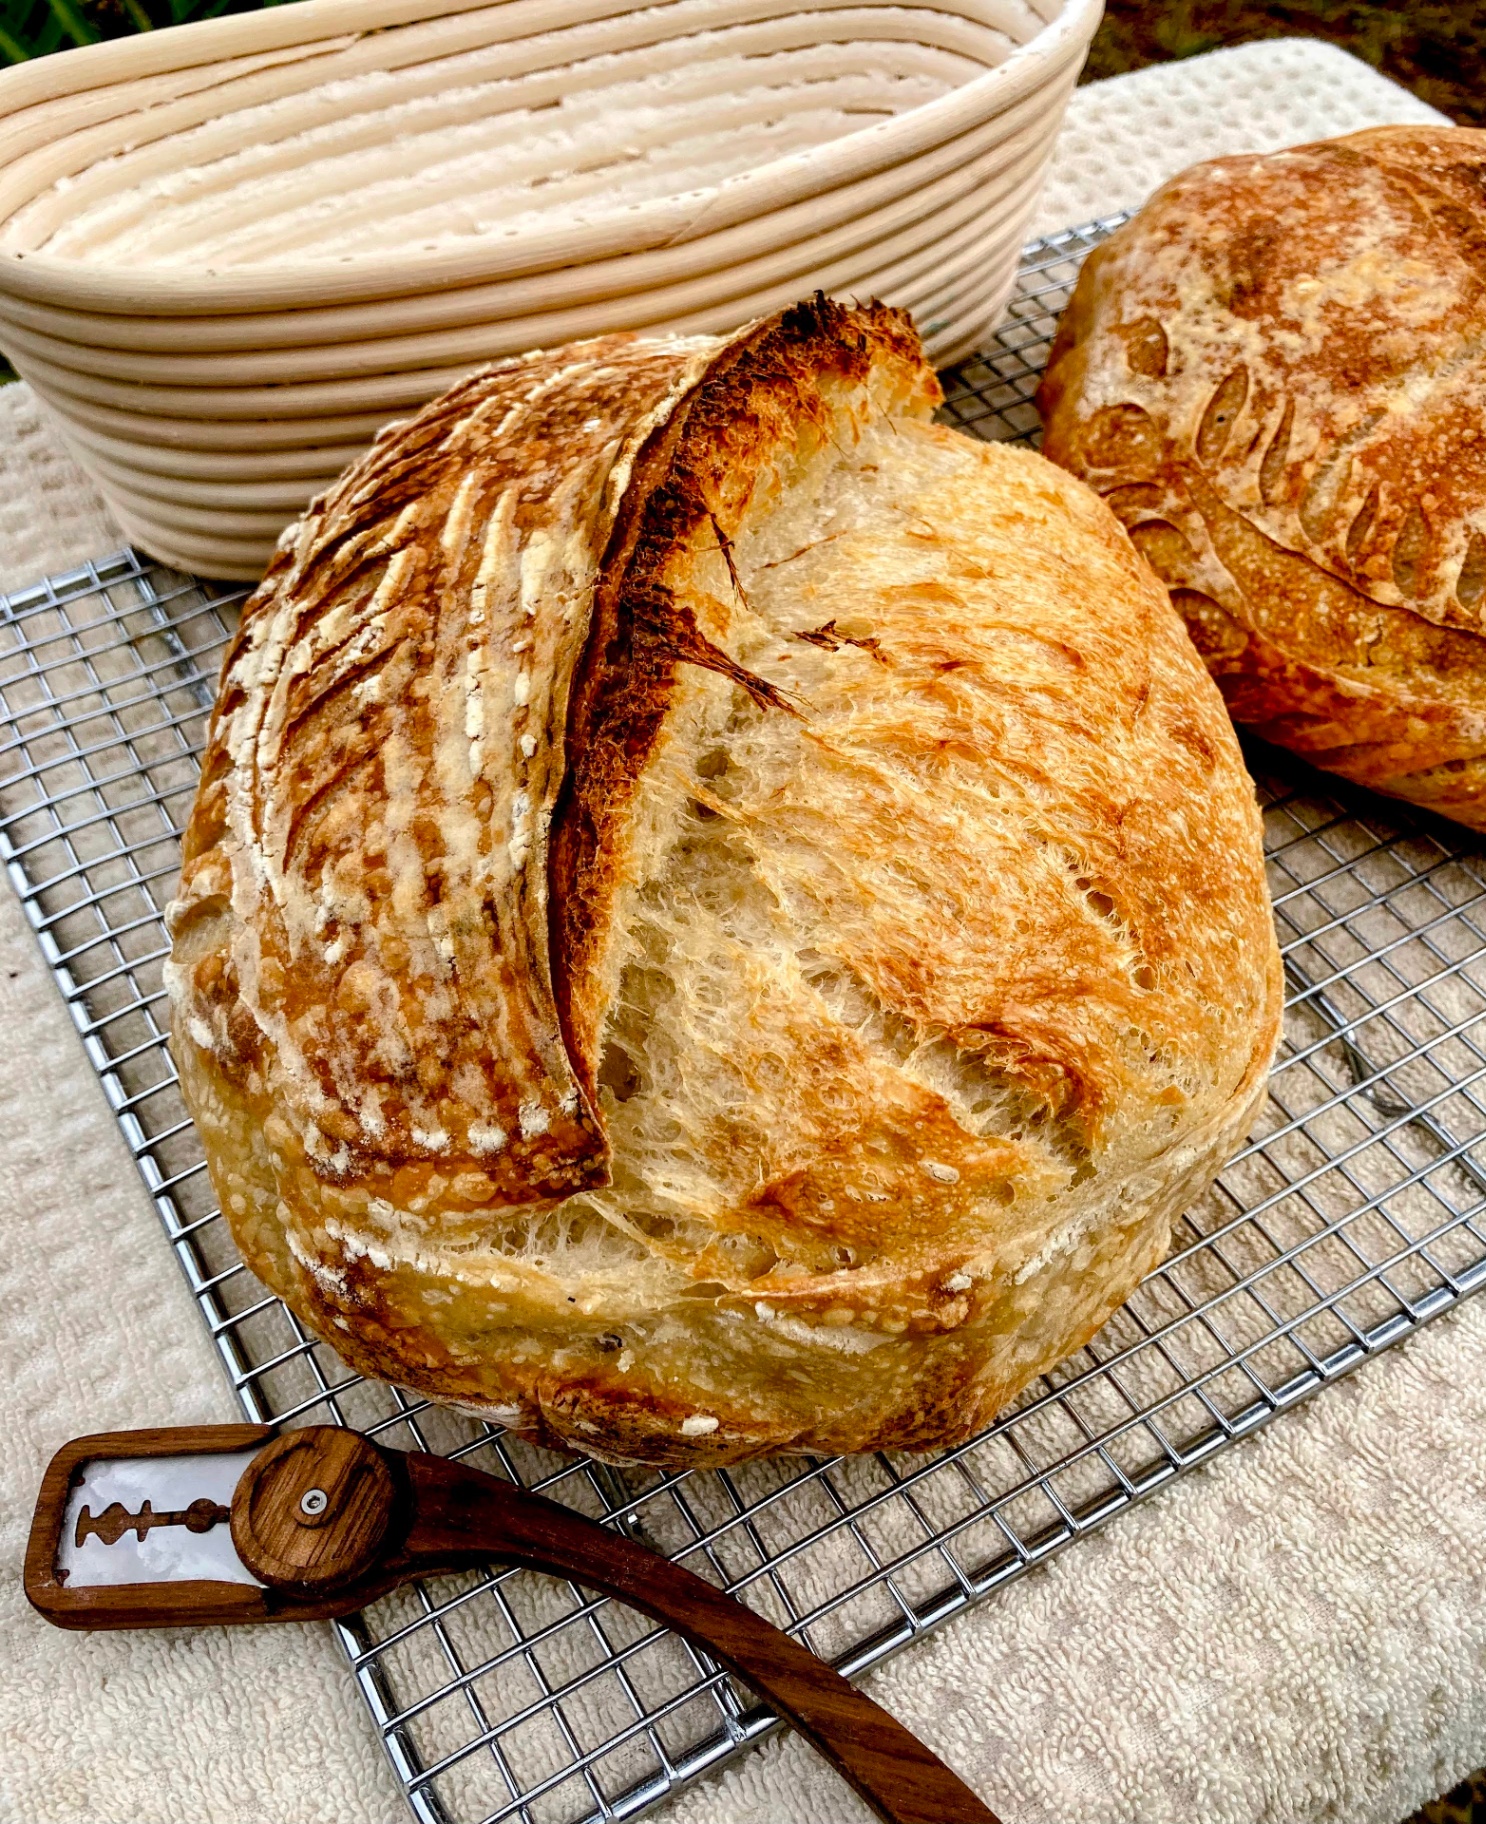
Internal temperature should read 205-210°F (96-99°C). Bottom should sound hollow when tapped.
Remove
Carefully lift bread out and transfer to wire cooling rack.
Phase 1 (Covered)
Phase 2 (Uncovered)
Don't fear the color. Deep golden brown, even with some dark spots on the ear, means flavor. Pale bread is under-baked bread.
Baking Methods
Best results with trapped steam for maximum oven spring
Equipment: Dutch oven with lid, Parchment paper
Preheat
Preheat inside oven for 45-60 minutes.
Phase 1
Covered, 475°F (245°C), 20 minutes.
Phase 2
Uncovered, 450°F (230°C), 20-25 minutes.
Total
40-45 minutes total bake time.
Bake Day
Cooling
1-2 hours
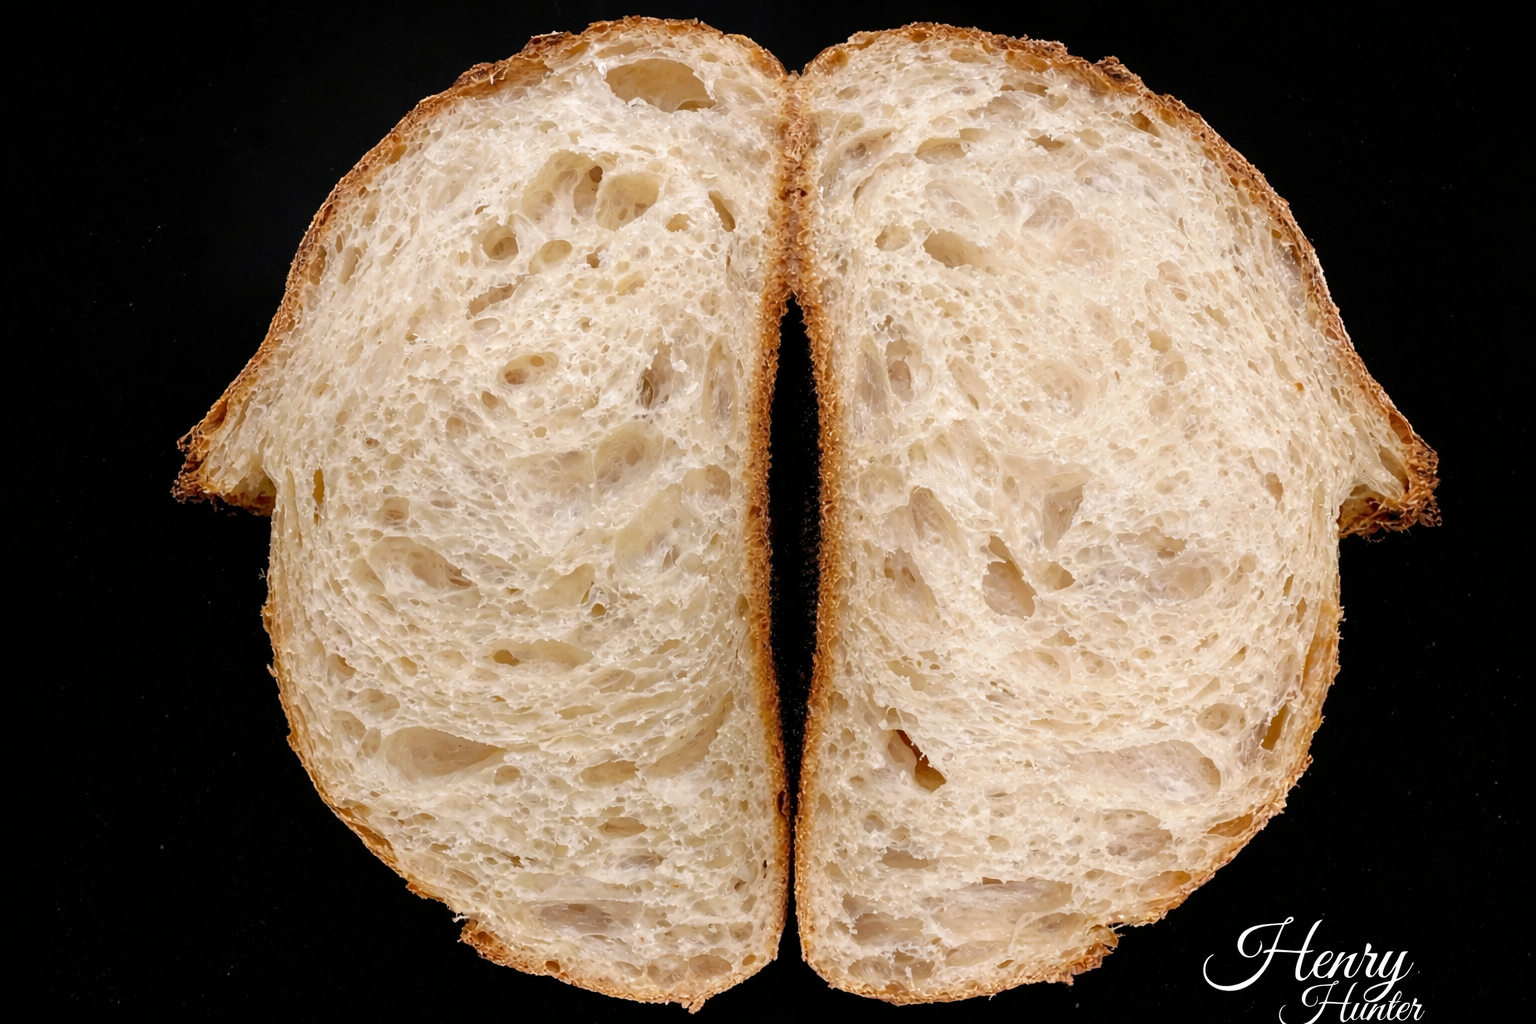
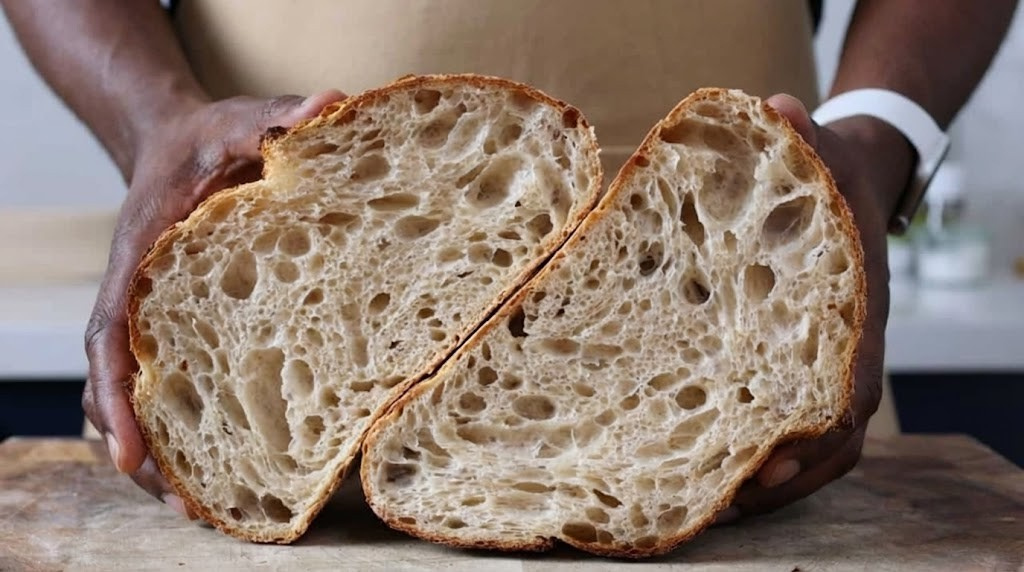
The hardest part. The bread is still cooking inside. Cutting too early ruins the .
Click each step to mark complete
Hands Off
Place loaf on wire cooling rack. Do not cut.
Listen
You'll hear the bread 'sing' as the crust crackles and contracts. That's moisture escaping.
Wait
Minimum 1 hour. Ideally 2 hours for full-size loaf.
Slice
Use a serrated knife. Let the knife do the work.
PT90M
1-2 hours cooling time
Pro Tip
Cutting too early releases steam, collapses structure, and creates a gummy interior. The bread is literally still baking internally. Wait.
Precise Timers
Use these interactive timers to track your stages.
Minimum Cool
Ideal Cool
Nutrition Facts
Per 1 slice (60g) • 12 servings per recipe
* Values are estimates based on standard ingredients
Your Feedback
Rate This Recipe
Loading ratings...
Troubleshooting
Baker's Notes
Common questions and solutions for perfect results
Temperature is the invisible ingredient. I use the Goldie and DoughBed from SourHouse to keep my starter and dough at the perfect temperature, every time.
SourHouse Temperature Control Products
You Might Also Enjoy
More recipes from our pantry that pair well with this bake.
Get More Recipes in Your Inbox
Join thousands of home bakers receiving weekly recipes, tips, and techniques to elevate your bread game.
No spam, ever. Unsubscribe anytime.
More from Baking Great Bread at Home
Tools, resources, and community to help you bake better bread

Crust & Crumb Academy
Go deeper into your craft. FREE courses, challenges, and real feedback. No gatekeeping. Perfection is not required.

Sourdough Starter Companion
Your AI-powered starter assistant. Track feedings, troubleshoot issues, and keep your starter thriving.

BakingGreatBread.com
Real bread for the rest of us

Baking Great Bread Blog
Recipes, tips, and stories from the bread journey

Recipe Converter
Convert sourdough recipes to yeast and back again

Crust & Crumb App
Your AI-powered baking assistant

Facebook Community
Join 50,000+ bakers sharing, learning, and supporting each other

Sourdough for the Rest of Us
Free beginner's guide to sourdough