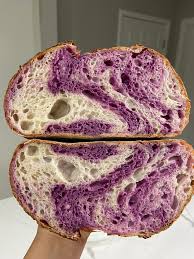
Naturally vivid. Nutty and sweet. A crumb reveal worth waiting for.
IntermediatePurple Sweet PotatoSourdough
by Henry Hunter Jr.
Color from the earth, not a bottle
Fermentation
5-8 hours bulk + 10-14 hours cold proof
Bake Time
45-50 minutes
Yield
One 900g boule or one 9x5 inch sandwich loaf

Perfection is not required
"Perfection is not required. Progress is."— Henry Hunter Jr.
By Henry Hunter Jr., founder of Crust & Crumb Academy and Baking Great Bread at Home.
Authentic Flavor
Henry developed this recipe to show bakers that natural color in bread isn't a gimmick. The purple comes from the same anthocyanins that make blueberries worth eating. The flavor is real. The color is real. And the crumb reveal never gets old.
Equipment Needed
For proofing the boule shape
For sandwich loaf version
For checking internal temperature
Ingredients
The Dough
This is a lean sourdough, not enriched. No butter, no eggs. The sweetness and moisture come entirely from the sweet potato.
12-13% protein preferred
Room temperature (75°F / 24°C)
At peak activity
Puree contributes ~105g moisture. If using powder, add 30g extra water.
For the Loaf Pan Version (optional additions)
If making the sandwich loaf version, these small additions make the crumb softer and more sliceable.
Prepare the Sweet Potato
This step takes 20-30 minutes and can be done the night before. The puree needs to be fully cooled before it goes into the dough.
Click each step to mark complete
Cook the potato
Scrub one medium purple sweet potato (about 200g whole). Steam for 20-25 minutes until completely tender when pierced. Steaming gives the most vivid color because boiling leaches the anthocyanins into the cooking water.
Peel and mash
Once cool enough to handle, peel and mash thoroughly until completely smooth. No lumps. Use a fork, potato ricer, or immersion blender. Weigh out 150g of puree.
Cool completely
The puree must be at room temperature or cooler before going into the dough. Hot puree kills starter. Spread it on a plate to cool faster, or refrigerate it overnight.
Pro Tip
Can't find fresh purple sweet potatoes? Ube (purple yam) works beautifully and is more widely available at Asian grocery stores. If using powder, brands like Suncore Foods are available online.
Verify Your Starter
This is a lean dough so fermentation moves predictably, but starter health still matters.
Click each step to mark complete
Float test
Drop a small spoonful of into a glass of water. If it floats or hovers, it's ready. If it sinks, give it another 1-2 hours.
Visual check
Your starter should be domed or just starting to fall, with bubbles visible throughout. It should smell active and tangy, not flat.
Mix and Autolyse
The gives the flour time to fully hydrate before we add the starter and salt. With the sweet potato in the mix, this rest period also allows the color to start distributing through the dough.
Click each step to mark complete
Combine flours and water
In a large bowl, combine the bread flour and whole wheat flour. Add the water and mix with your hands until no dry flour remains. The dough will look rough and shaggy.
Add the sweet potato puree
Add the cooled purple sweet potato puree (or whisk the powder into the water before adding flour if using powder). Mix until incorporated throughout. The dough will turn a striking purple-grey at this stage.
Cover and rest
Cover the bowl with a damp towel or plastic wrap and let rest for 45-60 minutes at room temperature.
⏱ Wait Time
45-60 minutes
Precise Timers
Use these interactive timers to track your stages.
Autolyse Rest
Add Starter and Salt
After the , the dough is more extensible and receptive to the starter. Adding salt at this stage gives the gluten a head start before the salt tightens it.
Click each step to mark complete
Add starter
Add the active to the autolysed dough. Use your fingers to squish and fold it in until fully incorporated, about 3-4 minutes of firm hand mixing.
Add salt
Sprinkle the salt evenly across the dough. Fold and squeeze to incorporate fully. Give it 2-3 minutes of active mixing.
Loaf pan option: add honey and oil
If making the sandwich loaf version, add the honey and olive oil now. Skip this step if making the artisan boule.
Rest 30 minutes
Cover and rest for 30 minutes before beginning the series.
Precise Timers
Use these interactive timers to track your stages.
Rest Before Folds
Bulk Fermentation
This is a lean dough so it behaves like a standard sourdough. Look for roughly 75-80% rise and a dough that feels noticeably lighter and more airy.
Click each step to mark complete
First set of stretch and folds
At 30 minutes, perform one set of . Wet your hand, grab one side, stretch up, fold over. Rotate 90 degrees and repeat. Four folds equals one set.
Second and third sets
Repeat a set of stretch and folds at 60 minutes and again at 90 minutes. After the third set, the dough should feel noticeably smoother and the purple color will be deepening.
Optional lamination for deeper color distribution
After the third set, you can do one pass instead of a fourth fold. Wet your work surface, stretch the dough into a thin rectangle, fold in thirds like a letter, then fold in thirds again. This distributes the color and adds significant dough strength.
Rest undisturbed
After all folds, let the dough rest undisturbed until bulk fermentation is done. Total bulk time at 75-78°F (24-26°C) is approximately 5-8 hours from when you added the starter. Watch the dough, not the clock.
⏱ Wait Time
5-8 hours
Precise Timers
Use these interactive timers to track your stages.
First Fold
Second Fold
Third Fold
Preshape and Bench Rest
A good preshape builds surface tension that gives you oven spring and a clean score line.
Click each step to mark complete
Preshape
Turn the dough onto a lightly floured surface. Using a bench scraper and your free hand, shape into a rough ball by folding the edges under and dragging it toward you to build tension. Don't deflate it.
Bench rest
Leave the preshaped dough uncovered on the counter for 20-30 minutes. It will relax and spread slightly.
⏱ Wait Time
20-30 minutes
Precise Timers
Use these interactive timers to track your stages.
Bench Rest
Final Shape and Cold Proof
Shape with confidence. The overnight gives this loaf its ear and bloom when baked.
Click each step to mark complete
Final shape for boule
Fold the dough in thirds, flip it over and use the bench scraper and your palm to drag it toward you, building a tight skin on the outside. Place seam side up in a well-floured banneton. Dust with rice flour.
Final shape for loaf pan
For a sandwich loaf: pat the dough gently into a rough rectangle. Fold the long sides to center, then roll from the short end into a tight log. Place seam side down in a greased 9x5 inch loaf pan.
Cold proof overnight
Cover the banneton with a clean shower cap or plastic bag. Refrigerate for 10-14 hours.
Pro Tip
Rice flour in the banneton is not optional. All-purpose flour can absorb moisture and cause the dough to stick and tear.
Shaping
Shape for the Reveal
Your choice determines what the final loaf looks like. The boule gives you the dramatic crumb shot. The loaf pan gives you clean slices for everyday eating.
Watch the Technique
Option 1
Click each step to mark complete
Option 2
Click each step to mark complete
The Final Step
Bake
Bake straight from the refrigerator. Cold dough holds its shape better when you it.
Step by Step
Preheat with Dutch oven
Place your Dutch oven (lid on) in the oven and preheat to 500°F (260°C) for at least 45-60 minutes.
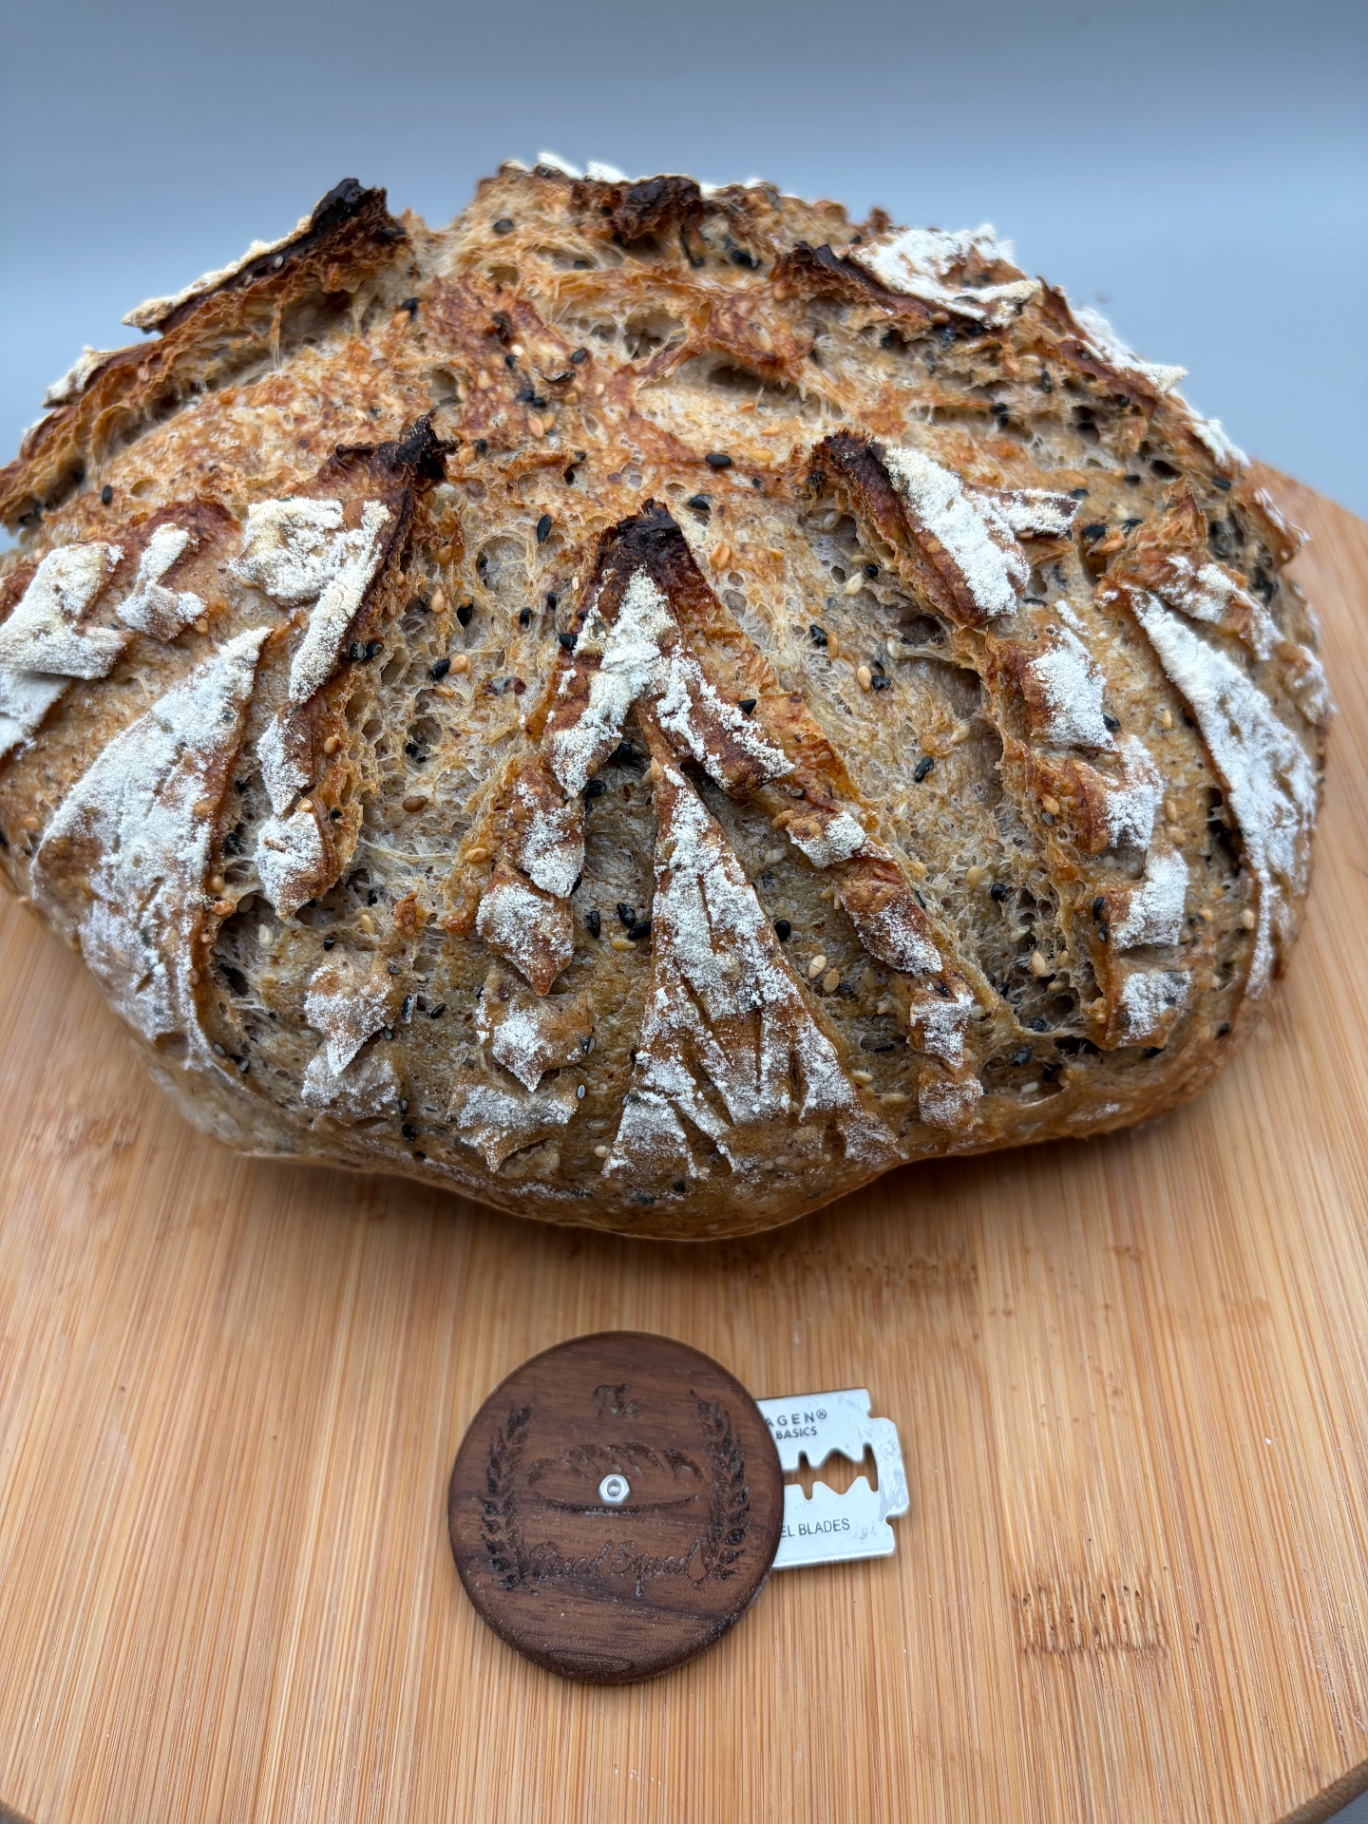
Score the dough
Remove the cold dough from the banneton onto parchment paper. Score quickly and confidently with a or razor blade at a 30-45 degree angle. One clean ear cut works perfectly.
Bake covered
Carefully lower the dough on the parchment into the hot Dutch oven. Lid on. Bake at 500°F (260°C) for 20 minutes.
Bake uncovered
Remove the lid and reduce to 450°F (232°C). Bake for an additional 20-25 minutes until the internal temperature reads 205-210°F (96-99°C).
Cool completely
Remove the loaf and cool on a wire rack for a minimum of 2 hours before cutting. The sweet potato starch holds moisture. Cutting early results in a gummy interior.
Preheat Dutch Oven
Bake Covered
Bake Uncovered
Cool
Baking Methods
High heat, trapped steam, then an uncovered finish.
Preheat
Place Dutch oven in cold oven. Preheat to 500°F (260°C) for 45-60 minutes.
Score
the loaf with a sharp blade or at a 30-45° angle.
Bake Covered
Bake covered for 20 minutes to trap steam.
Bake Uncovered
Remove lid. Reduce to 450°F (232°C). Bake 20-25 minutes until deep caramelized crust.
Cool
Cool on wire rack for at least 2 hours before slicing. The sweet potato starch needs time to set.
Nutrition Facts
Per 1 slice (75g) • servings per recipe
* Values are estimates based on standard ingredients
Storage
Room Temperature
3-5 days. Purple sweet potato breads stale very slowly due to the potato starch. Store cut side down on a wooden board or in a bread bag.
Refrigerated
Not recommended, causes staling
Frozen
Up to 3 months. Slice before freezing. The color holds well.
Refresh
Toast slices directly from frozen or warm at 350°F (175°C) for 10-12 minutes.
Your Feedback
Rate This Recipe
Loading ratings...
Troubleshooting
Baker's Notes
Common questions and solutions for perfect results
If you're serious about scoring, you need the right blade in your hand. Wire Monkey makes handcrafted bread lames from black walnut — built to last, balanced in the hand, and sharp enough to glide through cold dough cleanly every single time. No dragging, no hesitation marks. Just a clean cut.

Wire Monkey Handcrafted Bread Lames
You Might Also Enjoy
More recipes from our pantry that pair well with this bake.
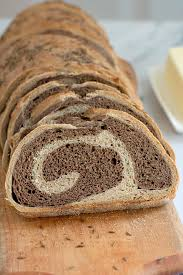
Marble Rye Bread (Sourdough) | Baking Great Bread at Home

Marbled Bread (Sourdough)
Buckwheat Sourdough Bread
Foolproof Whole Wheat Seeded Sourdough
Get More Recipes in Your Inbox
Join thousands of home bakers receiving weekly recipes, tips, and techniques to elevate your bread game.
No spam, ever. Unsubscribe anytime.
More from Baking Great Bread at Home
Tools, resources, and community to help you bake better bread

Crust & Crumb Academy
Go deeper into your craft. FREE courses, challenges, and real feedback. No gatekeeping. Perfection is not required.

Sourdough Starter Companion
Your AI-powered starter assistant. Track feedings, troubleshoot issues, and keep your starter thriving.

BakingGreatBread.com
Real bread for the rest of us

Baking Great Bread Blog
Recipes, tips, and stories from the bread journey

Recipe Converter
Convert sourdough recipes to yeast and back again

Crust & Crumb App
Your AI-powered baking assistant

Facebook Community
Join 50,000+ bakers sharing, learning, and supporting each other

Sourdough for the Rest of Us
Free beginner's guide to sourdough