The Classic Deli Swirl, Made at Home
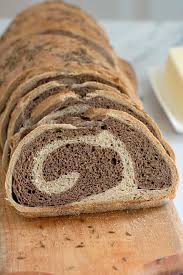
IntermediateMarble Rye Bread(Yeasted)
by Henry Hunter Jr.
Light rye and dark rye, rolled into one beautiful loaf
Bake Time
40-45 minutes
Yield
One 9x5 inch loaf, about 12-14 slices

Perfection is not required
"Perfection is not required. Progress is."— Henry Hunter Jr.
By Henry Hunter Jr., founder of Crust & Crumb Academy and Baking Great Bread at Home.
Authentic Flavor
Henry developed this marble rye to bring the deli classic into your home kitchen. Two doughs, one swirl, no mysteries.
Ingredients
Light Rye Dough
Dark Rye Dough
Non-negotiable. Natural cocoa is more acidic and can interfere with yeast.
Egg Wash
Finishing (Optional)
Day 1
Mix the Light Rye Dough
You're building two separate doughs that will ferment simultaneously and come together during . Start with the light dough.
Click each step to mark complete
Bloom yeast
In the bowl of your stand mixer, whisk together the warm water, honey, and instant yeast. Let sit 5 minutes until slightly foamy.
Add flour, salt, and caraway
Add bread flour, rye flour, salt, and caraway seeds. Mix on low until a shaggy dough forms, about 2 minutes. Increase to medium and knead 5-6 minutes. The dough will be stickier than a pure wheat dough. That's the rye flour and its doing their job.
Add butter
Add softened butter and knead 2 more minutes until incorporated. Transfer to a lightly oiled bowl and cover while you make the dark dough.
Pro Tip
Rye dough won't pass the the way an enriched wheat dough will. The gluten structure is different. Look for a dough that's smooth, slightly tacky, and holds its shape when you cup it in your hands.
Day 1
Mix the Dark Rye Dough
Same process as the light dough with two additions: molasses for flavor and depth, and Dutch process cocoa for color. The cocoa absorbs moisture, so this dough gets a small amount of additional water.
Click each step to mark complete
Bloom yeast with molasses
Whisk warm water, molasses, honey, and instant yeast in your mixer bowl. Rest 5 minutes.
Add dry ingredients
Add bread flour, rye flour, cocoa powder, salt, and caraway seeds. Mix on low until shaggy, then medium for 5-6 minutes.
Adjust and add butter
Add the additional 10g warm water and knead 1 minute. The dark dough should feel very close in consistency to the light dough. Add softened butter and knead 2 more minutes. Transfer to a second oiled bowl and cover.
Pro Tip
Dutch process cocoa is non-negotiable here. Natural cocoa is more acidic and can interfere with yeast activity. Dutch process is alkalized, giving you a darker, more stable color without affecting the rise.
Day 1
Bulk Fermentation
Both doughs ferment simultaneously. They should grow at roughly the same rate since the formulas are nearly identical. You're watching both bowls.
Click each step to mark complete
Cover and rest
Cover both bowls and place in a warm spot, 70-75°F (21-24°C).
Check at 45 minutes
Both doughs should be showing some puff and growth. Not doubled yet.
Check at 90 minutes
Both doughs should be roughly doubled and feel light and airy when you gently press the surface. The light dough may rise slightly faster than the dark.
⏱ Wait Time
1-1.5 hours
Pro Tip
If one dough is rising faster than the other, move the slower one to a slightly warmer spot. You want them at roughly the same stage when you start laminating. Laminating an over-fermented dough with an under-fermented one creates uneven texture in the finished loaf.
Precise Timers
Use these interactive timers to track your stages.
Bulk Fermentation
Day 1
Divide and Laminate
This is where the marble happens. The technique is identical to the enriched marbled bread: roll, stack, press, roll into a log. Rye dough is stickier and less elastic, which actually makes it easier to work with. It won't snap back under the rolling pin.
Click each step to mark complete
Turn out both doughs
Lightly flour your surface. Turn out the light dough and gently deflate. Turn out the dark dough separately.
Divide each dough in half
You should have 4 pieces total, 2 light and 2 dark, roughly 215g each.
Roll each piece
Roll each piece to a 10x8 inch rectangle. Match the sizes as closely as you can. Keep flour minimal between the layers.
Stack alternating colors
Place one dark rectangle on your surface. Lay one light on top. Press firmly to remove air pockets. Add the second dark. Press. Add the second light on top. Press.
Roll into a log
Starting from the short end, roll the stacked dough into a tight log. Apply steady, even pressure. Pinch the seam closed.
Pan seam down
Transfer to a well-greased 9x5 inch loaf pan, seam side down.
Pro Tip
The alternating stack order (dark-light-dark-light) gives you the classic equal swirl rings on the cut face. If you want a dark exterior crust, place a light layer on top of the stack before rolling.
Day 1
Final Proof
The loaf proofs in the pan until it crowns about 1 inch above the rim. Rye doughs don't rise as dramatically as pure wheat doughs, but they will get there.
Click each step to mark complete
Cover loosely
Cover with plastic wrap or a damp towel.
Proof at room temperature
Let rise until the loaf crowns 1 inch above the rim of the pan, 45-60 minutes.
Preheat oven
Preheat oven to 375°F (190°C) during the last 20 minutes of proofing.
⏱ Wait Time
45-60 minutes
Precise Timers
Use these interactive timers to track your stages.
Final Proof
Shaping
The Marble Lamination
Stack alternating layers of light and dark rye, then roll into a tight log for even swirl rings.
Classic Marble Swirl (Loaf Pan)
Stack-and-roll into a 9x5 pan. Best for sandwich use and the clearest swirl cross-section.
RecommendedClick each step to mark complete
Roll flat
Roll each piece to a 10x8 inch rectangle.
Stack alternating
Dark-light-dark-light. Press firmly between each layer.
Roll tight
Roll from short end into a tight log. Pinch the seam.
Pan seam down
Place seam side down in greased 9x5 loaf pan.
Braided Marble Rye
Divide each dough into 3 ropes and braid alternating colors for a different visual.
Click each step to mark complete
Roll ropes
Roll each portion into a 12-inch rope.
Alternate and braid
Alternate light and dark ropes and braid together.
Bake on sheet pan
375°F (190°C) for 35-40 minutes.
Day 1
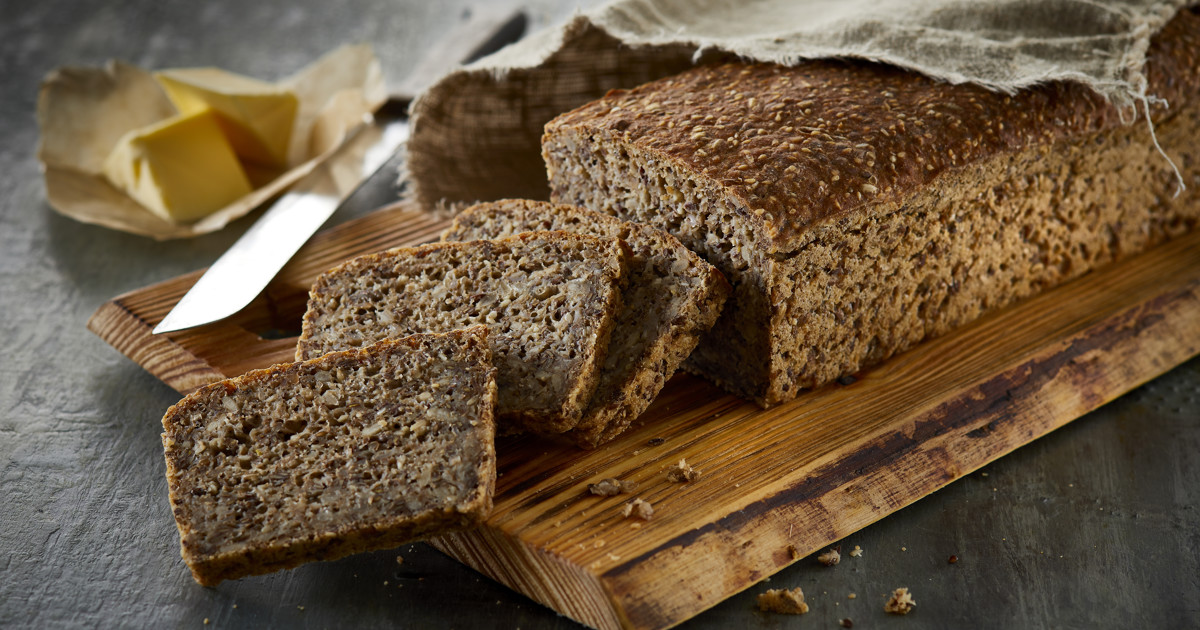
Egg Wash and Bake
The egg wash gives the rye crust its characteristic deep brown shine. Three diagonal slashes across the top allow steam to escape without tearing the loaf unevenly.
Step by Step
Egg wash
Whisk together the egg and water. Brush gently across the top of the proofed loaf.
Score
Using a sharp knife or , make 3 diagonal slashes across the top of the loaf, about ½ inch deep.
Add caraway topping (optional)
Sprinkle remaining caraway seeds over the egg-washed top.
Bake covered
Place in the preheated 375°F (190°C) oven. Tent loosely with foil for the first 15 minutes to protect the crust from over-browning while the interior finishes setting.
Remove foil and finish
After 15 minutes, remove the foil and bake an additional 25-30 minutes until deeply golden and internal temperature reads 195-200°F (90-93°C).
Cool completely
Remove from pan immediately. Cool on a wire rack for a minimum of 1 hour. Rye bread needs the full cooling period. The starch structure is still setting as it cools. Cutting early means a gummy interior.
Baking Methods
9x5 inch loaf pan gives you the classic deli marble rye shape.
Equipment: 9x5 inch loaf pan
Preheat
Preheat oven to 375°F (190°C) for at least 20 minutes.
Egg wash and score
Brush with egg wash. Score 3 diagonal slashes ½ inch deep.
Bake covered
Tent with foil, bake 15 minutes.
Bake uncovered
Remove foil. Bake 25-30 minutes more until 195-200°F (90-93°C).
Cool completely
Remove from pan immediately. Cool 1 hour minimum.
Nutrition Facts
Per 1 slice (~65g) • 13 servings per recipe
* Values are estimates based on standard ingredients
Storage
Room Temperature
3-4 days wrapped in a bread bag or beeswax wrap. Rye bread improves on day 2 as the crumb firms and the flavor develops.
Frozen
Up to 3 months. Slice before freezing.
Refresh
Toast directly from frozen or warm at 325°F (165°C) for 8-10 minutes.
Your Feedback
Rate This Recipe
Loading ratings...
Troubleshooting
Baker's Notes
Common questions and solutions for perfect results
If you're serious about scoring, you need the right blade in your hand. Wire Monkey makes handcrafted bread lames from black walnut — built to last, balanced in the hand, and sharp enough to glide through cold dough cleanly every single time. No dragging, no hesitation marks. Just a clean cut.

Wire Monkey Handcrafted Bread Lames
You Might Also Enjoy
More recipes from our pantry that pair well with this bake.


Get More Recipes in Your Inbox
Join thousands of home bakers receiving weekly recipes, tips, and techniques to elevate your bread game.
No spam, ever. Unsubscribe anytime.
More from Baking Great Bread at Home
Tools, resources, and community to help you bake better bread

Crust & Crumb Academy
Go deeper into your craft. FREE courses, challenges, and real feedback. No gatekeeping. Perfection is not required.

Sourdough Starter Companion
Your AI-powered starter assistant. Track feedings, troubleshoot issues, and keep your starter thriving.

BakingGreatBread.com
Real bread for the rest of us

Baking Great Bread Blog
Recipes, tips, and stories from the bread journey

Recipe Converter
Convert sourdough recipes to yeast and back again

Crust & Crumb App
Your AI-powered baking assistant

Facebook Community
Join 50,000+ bakers sharing, learning, and supporting each other

Sourdough for the Rest of Us
Free beginner's guide to sourdough