No Sourdough Required
IntermediateDanish RyeBread
by Henry Hunter Jr.
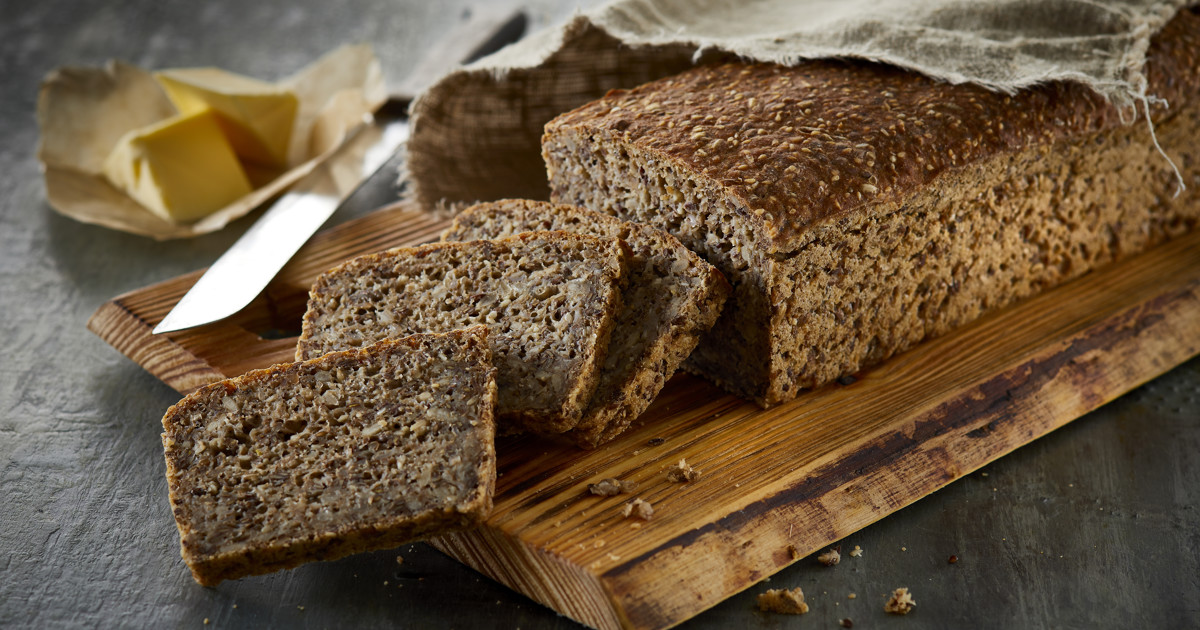
Dense, seeded loaf with deep malty flavor – perfect for smørrebrød
Fermentation
24 hours
Bake Time
1 hour 30 minutes
Yield
1 large loaf (about 16 slices)

Perfection is not required
"This is bread you eat with intention. Slice it thin, top it well, and appreciate what 27 hours of patience can give you."— Henry Hunter Jr.
By Henry Hunter Jr., founder of Crust & Crumb Academy and Baking Great Bread at Home.
Authentic Flavor
Real Danish rye bread without the sourdough fuss. This dense, seeded loaf uses and a long, slow rise to develop serious flavor. Perfect for smørrebrød, it keeps for days and slices thin like the bakery stuff.
Equipment Needed
Ingredients
Liquid Base
Leavening & Flavor
Grains & Seeds
For the Pan
Build the Liquid Base
Click each step to mark complete
Combine liquids
In a large mixing bowl, combine the cold water, buttermilk, and dark beer. Sprinkle the over the surface and stir until it dissolves completely. This only takes a minute.
Precise Timers
Use these interactive timers to track your stages.
Mix Liquids
Mix the Dough
Click each step to mark complete
Add dry ingredients
Add the molasses, salt, cracked rye kernels, flaxseeds, sunflower seeds, and rye flour to the bowl.
Mix thoroughly
Stir everything together with a sturdy wooden spoon or use a stand mixer with a dough hook. The dough will be thick, sticky, and more like a wet batter than traditional bread dough. or mix for about 10 minutes until everything is fully incorporated and uniform.
Precise Timers
Use these interactive timers to track your stages.
Mix Dough
Prepare the Pan
Click each step to mark complete
Oil and seed the pan
Lightly oil a large loaf pan (9x5 inch works well, or a traditional Pullman pan). Pour your poppy seeds or sesame seeds into the pan and roll them around to coat the bottom and sides evenly. Dump out any excess seeds and save them for topping.
Fill and Top the Loaf
Click each step to mark complete
Fill the pan
Scrape the dough into your prepared pan and smooth the top with a wet spatula or the back of a spoon.
Add seed topping
Sprinkle the remaining seeds over the surface and press them gently into the dough.
The Long Fermentation
Click each step to mark complete
Cover and rest
Cover the pan loosely with a damp kitchen towel or plastic wrap. Let it sit at room temperature (around 68-72°F / 20-22°C) for 24 hours.
Precise Timers
Use these interactive timers to track your stages.
Long Fermentation
Shaping
Shape the Loaf
This is a no-knead pan bread, so shaping is minimal.
Loaf Pan
Click each step to mark complete
Oil and seed the pan
Lightly oil a large loaf pan (9x5 inch works well, or a traditional Pullman pan). Pour your poppy seeds or sesame seeds into the pan and roll them around to coat the bottom and sides evenly.
Fill the pan
Scrape the dough into your prepared pan and smooth the top with a wet spatula or the back of a spoon.
Add seed topping
Sprinkle the remaining seeds over the surface and press them gently into the dough.
The Final Step
Bake Low and Slow
Rye bread is packed with moisture and dense grains. It needs time to cook all the way through.
Step by Step
Preheat oven
Preheat your oven to 350°F (175°C).
Bake
Place the loaf on the center rack and bake for 1 hour and 30 minutes. The top should be dark brown and crusty. If you have an instant-read thermometer, the internal temperature should hit 200-205°F (93-96°C).
Preheat
Bake
Baking Methods
Bake on the center rack for 1 hour and 30 minutes until dark brown and crusty.
Equipment: 9x5 inch loaf pan
Preheat oven
Preheat your oven to 350°F (175°C).
Bake
Place the loaf on the center rack and bake for 1 hour and 30 minutes. The top should be dark brown and crusty.
Check temperature
Internal temperature should hit 200-205°F (93-96°C).
Rest in pan
Remove from oven and let sit in the pan for 10 minutes.
Cool completely
Turn out onto a wire rack and cool completely, at least 3-4 hours. Slicing it warm will give you gummy slices.
Cool Completely
Click each step to mark complete
Rest in pan
Remove the loaf from the oven and let it sit in the pan for 10 minutes.
Cool on rack
Turn it out onto a wire rack and let it cool completely, at least 3-4 hours. Slicing it warm will give you gummy, compressed slices.
Precise Timers
Use these interactive timers to track your stages.
Rest in Pan
Cool Completely
Nutrition Facts
Per 1 slice (1/16 of loaf) • servings per recipe
* Values are estimates based on standard ingredients
Storage
Room Temperature
Wrap tightly in a towel or plastic wrap. Keeps up to 1 week at room temperature—it actually improves after a day or two.
Frozen
Slice before freezing. Freeze for up to 3 months. Toast frozen slices directly.
Your Feedback
Rate This Recipe
Loading ratings...
Troubleshooting
Baker's Notes
Common questions and solutions for perfect results
If you're serious about scoring, you need the right blade in your hand. Wire Monkey makes handcrafted bread lames from black walnut — built to last, balanced in the hand, and sharp enough to glide through cold dough cleanly every single time. No dragging, no hesitation marks. Just a clean cut.

Wire Monkey Handcrafted Bread Lames
You Might Also Enjoy
More recipes from our pantry that pair well with this bake.


Get More Recipes in Your Inbox
Join thousands of home bakers receiving weekly recipes, tips, and techniques to elevate your bread game.
No spam, ever. Unsubscribe anytime.
More from Baking Great Bread at Home
Tools, resources, and community to help you bake better bread

Crust & Crumb Academy
Go deeper into your craft. FREE courses, challenges, and real feedback. No gatekeeping. Perfection is not required.

Sourdough Starter Companion
Your AI-powered starter assistant. Track feedings, troubleshoot issues, and keep your starter thriving.

BakingGreatBread.com
Real bread for the rest of us

Baking Great Bread Blog
Recipes, tips, and stories from the bread journey

Recipe Converter
Convert sourdough recipes to yeast and back again

Crust & Crumb App
Your AI-powered baking assistant

Facebook Community
Join 50,000+ bakers sharing, learning, and supporting each other

Sourdough for the Rest of Us
Free beginner's guide to sourdough