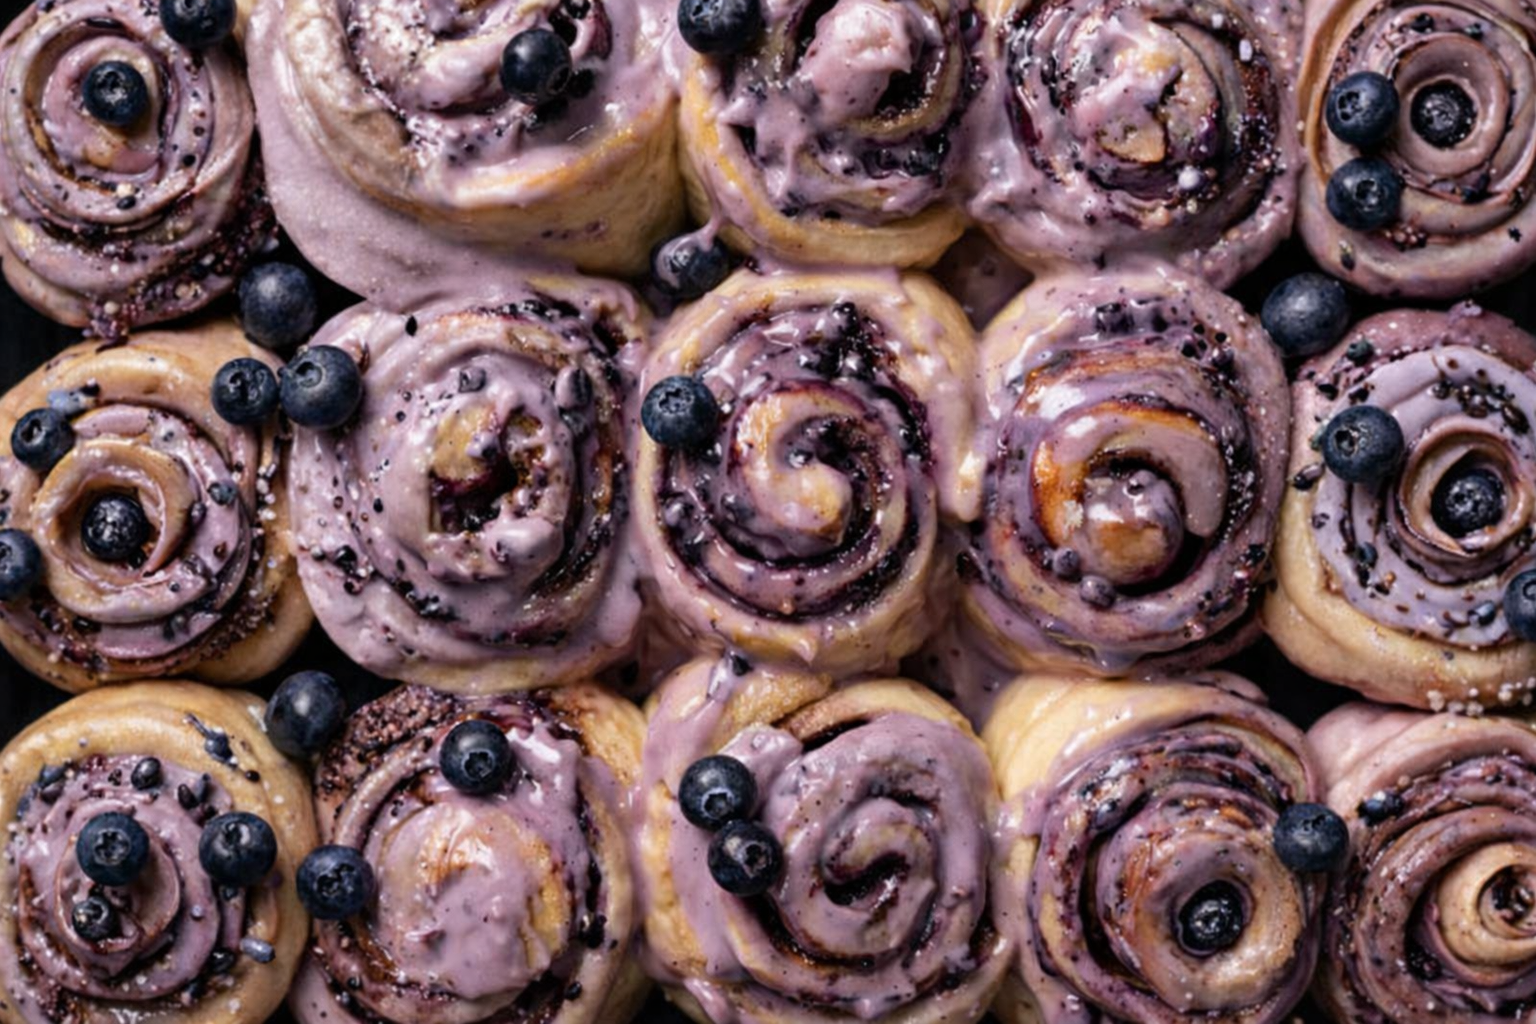
With Swirled Cream Cheese Frosting
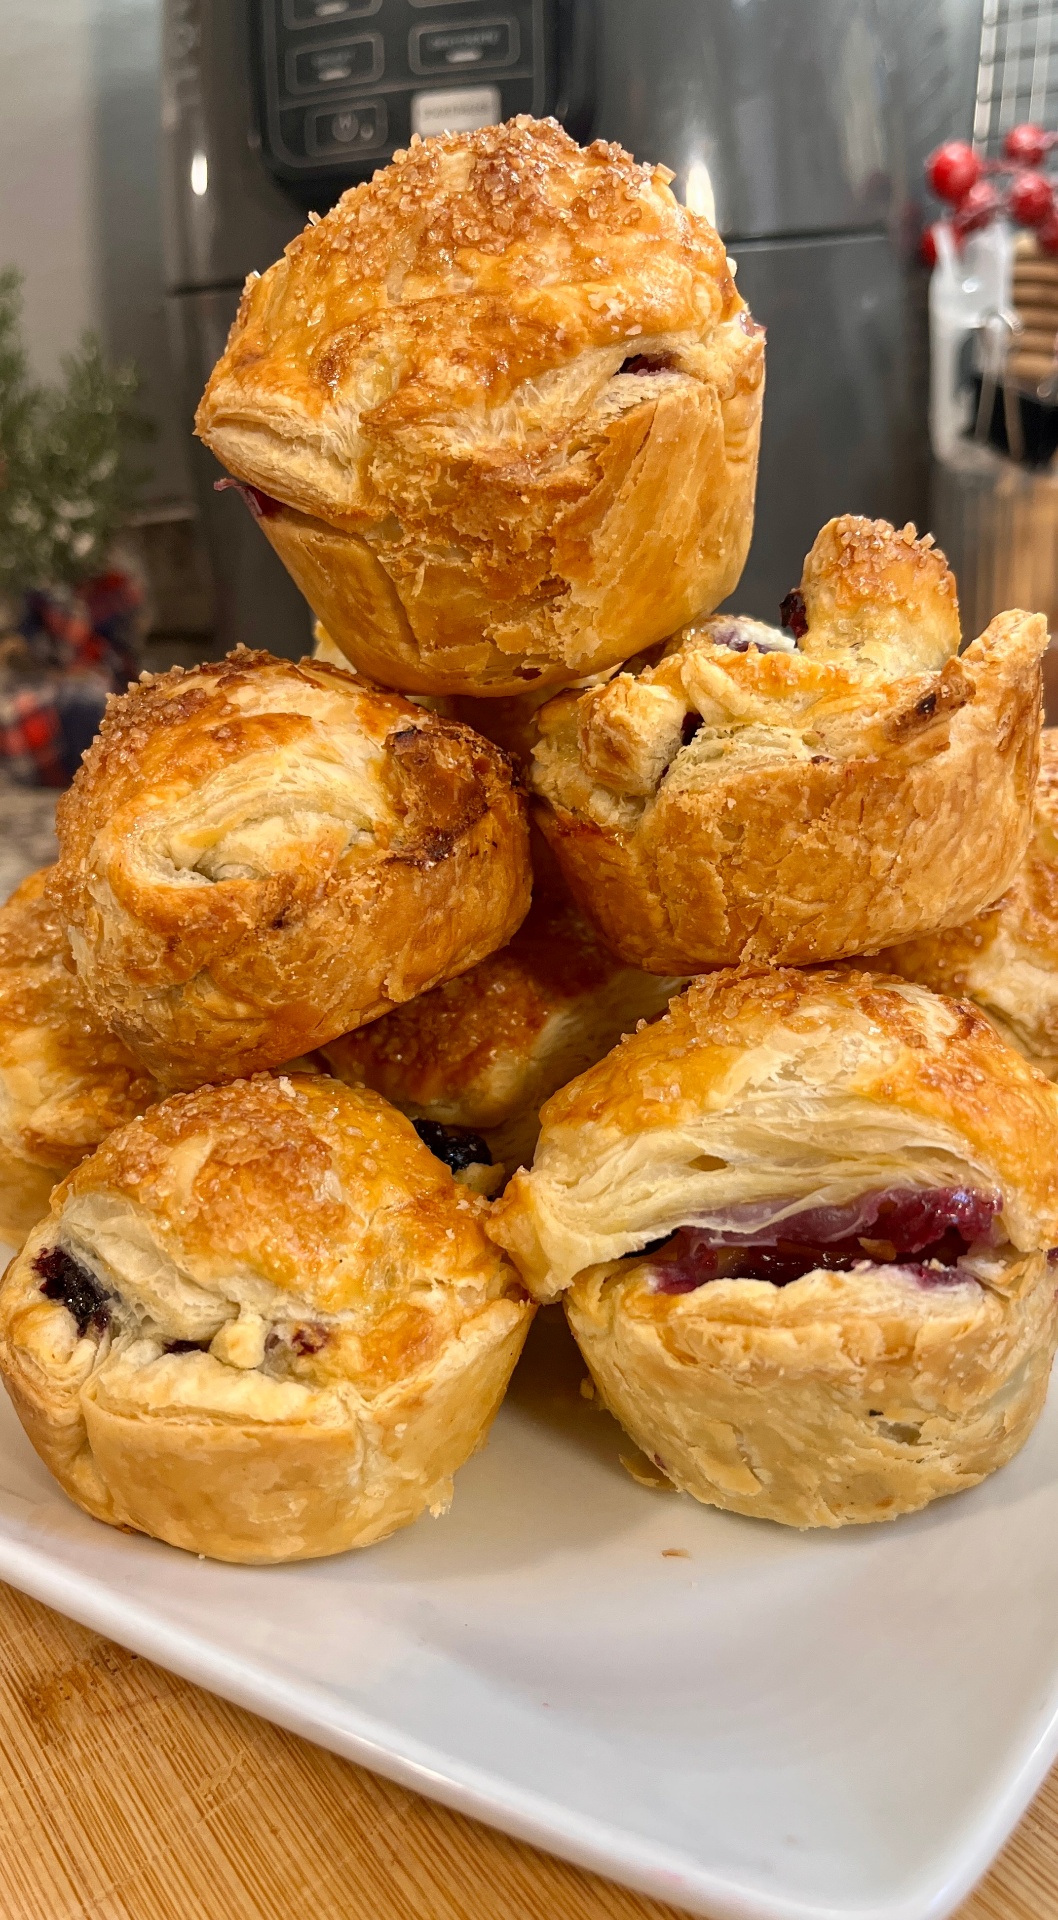
IntermediateHenry's Decadent Blueberry CinnamonRolls
by Henry Hunter Jr.
Rich, soft rolls with jammy blueberries, toasted walnuts, and tangy cream cheese frosting.
Fermentation
2-2.5 hours
Bake Time
28-35 minutes
Yield
9 large rolls

Perfection is not required
"Great bread isn't about perfect technique—it's about understanding the dough."— Henry Hunter Jr.
By Henry Hunter Jr., founder of Crust & Crumb Academy and Baking Great Bread at Home.
Authentic Bread Flavor
These blueberry cinnamon rolls are built for balance. Soft, enriched dough. Real fruit flavor from preserves and fresh berries. Toasted walnuts for depth. Enough sweetness to feel indulgent, but not so much that you're wiped out after one roll. The secret ingredient? A whisper of banana extract that brightens everything without tasting like banana.
Equipment Needed
Ingredients
Dough (Wet Ingredients)
Building a rich, brioche-style foundation
Dough (Dry Ingredients)
The structure of your rolls
Blueberry Cinnamon Filling
The jammy, spiced heart of each roll
Swirled Cream Cheese Frosting
Tangy frosting with a blueberry swirl
For Brushing
Adds shine and richness
Pro Tip
Banana extract is the secret here. Use ½ to 1 teaspoon max. It doesn't taste like banana. It just brightens the dough and rounds out the sweetness. If you don't have it, increase vanilla to 1 teaspoon total.
Phase 1
Mix the Dough
15 minutes active
Build a rich, brioche-style dough that's easy to roll and holds the filling without tearing.
Watch the Technique
Watch the full process from start to finish
Click each step to mark complete
Combine dry ingredients
Add flour and to one side of a large bowl. Add sugar and salt to the opposite side. This keeps the salt from killing the yeast before mixing.
Add wet ingredients
Pour in warm milk, eggs, melted butter, banana extract, and vanilla extract. Stir with a wooden spoon or dough whisk until a shaggy dough forms.
Knead the dough
Transfer to a stand mixer with dough hook. 6-8 minutes on medium speed until smooth, elastic, and slightly tacky. By hand, this takes 8-10 minutes.
Windowpane test
Stretch a small piece of dough using the . It should stretch thin enough to see light through without tearing. If it tears, knead another 2 minutes.
Pro Tip
The dough should be soft and slightly sticky but pull away from the bowl cleanly. Don't add extra flour unless absolutely necessary.
Precise Timers
Use these interactive timers to track your stages.
Kneading
Phase 2
Bulk Fermentation
60-90 minutes
Let the dough rise until doubled. This develops flavor and makes the dough easier to roll.
Click each step to mark complete
Butter a bowl
Coat a large bowl with softened butter.
Shape into ball
Form the dough into a smooth ball and place seam-side down in the bowl.
Cover and rise
Cover with plastic wrap or a damp towel. Let rise at room temperature (75-78°F) until doubled, about 60-90 minutes.
⏱ Wait Time
Let dough double in size
Pro Tip
: Press a floured finger into the dough. If the indent springs back slowly, it's ready. If it springs back fast, give it more time.
Precise Timers
Use these interactive timers to track your stages.
Bulk Rise Check
Phase 3
Prepare the Filling
10 minutes
Toast the walnuts, prep the blueberries, and mix the cinnamon sugar while the dough rises.
Click each step to mark complete
Toast walnuts
Add walnuts to a dry skillet over medium heat. Stir frequently for 3-4 minutes until fragrant and lightly golden. The transforms them. Transfer to a plate to cool, then roughly chop.
Mix cinnamon sugar
In a small bowl, combine brown sugar, cinnamon, salt, lemon zest, and 2 drops of vanilla extract. Mix well.
Prep blueberries
If using fresh berries, toss them with cornstarch in a small bowl. This prevents bleeding and sliding. If using frozen, do not thaw. Add them straight from the freezer.
Soften butter
Make sure the 85g of butter for the filling is very soft, almost spreadable like mayonnaise.
Pro Tip
Toasting walnuts isn't optional if you want depth. Heat drives off moisture and triggers s, turning something flat into something aromatic.
Precise Timers
Use these interactive timers to track your stages.
Toast Walnuts
Phase 4
Roll and Fill
15 minutes
Roll the dough, layer the filling, and load it with blueberries and walnuts.
Click each step to mark complete
Punch down and roll
Gently deflate the dough. On a lightly floured surface, roll into a 16x20-inch rectangle, about ¼-inch thick.
Spread butter
Using an offset spatula or the back of a spoon, spread the softened butter edge to edge. Don't leave bare spots.
Add preserves
Dollop blueberry preserves in small spoonfuls across the butter. Use the back of the spoon to swipe it around. It doesn't need to be perfectly even.
Sprinkle cinnamon sugar
Distribute the cinnamon sugar mixture evenly over the entire surface.
Add blueberries and walnuts
Scatter the cornstarch-coated blueberries and toasted walnuts evenly across the dough.
Pro Tip
Leave a ½-inch border along one long edge bare. This gives you a clean seam when you roll.
Phase 5
Shape the Rolls
10 minutes
Roll tightly, slice evenly, and arrange for baking.
Click each step to mark complete
Roll tightly
Starting from the long edge closest to you, roll the dough away from you into a tight log. Use both hands and keep even pressure. When you reach the bare edge, pinch the seam to seal.
Trim the ends
Cut off about 1 inch from each end. These pieces are uneven and can be baked separately as baker's treats.
Cut into 9 rolls
Using a sharp knife or unflavored dental floss, cut the log into 9 equal pieces, about 2 inches each.
Arrange in pan
Butter a 9x13-inch baking pan. Place larger rolls around the edges (where they get more heat) and smaller ones in the center. Leave a little space between each roll.
Pro Tip
Dental floss gives cleaner cuts than a knife. Slide it under the log, cross the ends over the top, and pull through.
Phase 6
Second Rise (Proof)
45-75 minutes or overnight
Let the rolls puff up before baking. This is where they get soft and pillowy.
Click each step to mark complete
Cover the pan
Loosely cover with plastic wrap or a clean kitchen towel.
Rise until puffy
Let rise at room temperature for 45-75 minutes. Rolls should look puffy and have expanded to nearly touch each other.
Optional overnight rise
Cover tightly and refrigerate overnight (8-12 hours). In the morning, remove from fridge and let sit at room temperature for 30-45 minutes before baking.
⏱ Wait Time
Let rolls puff until nearly touching
Pro Tip
The overnight method develops more flavor and lets you bake fresh in the morning. Just pull them out while the oven preheats.
Precise Timers
Use these interactive timers to track your stages.
Proof Check
Shaping
Shaping Options
Choose the classic pan method or make individual rolls.
Classic Pan Rolls
Cut log into 9 equal pieces and arrange in 9x13-inch pan (3 rows of 3). Rolls bake together and pull apart.
RecommendedClick each step to mark complete
Cut and arrange
Cut the log into 9 equal pieces. Place larger rolls around the edges and smaller ones in the center.
Individual Rolls
Cut log into 12 smaller pieces. Place in greased muffin tin or on parchment-lined sheet. Leave 2 inches between each roll. Bake 22-25 minutes.
Click each step to mark complete
Cut smaller
Cut the log into 12 smaller pieces for individual servings with crispier edges.
Proof Test: Rolls are fully when you press a floured finger gently into the side and the indent springs back slowly but doesn't fill completely.
Phase 7
Bake
Bake until golden and cooked through. The cream brush adds shine and richness.
Step by Step
Preheat oven
Heat to 350°F (175°C). Position rack in center.
Brush with cream
Just before baking, brush the tops of the rolls with heavy cream. This promotes browning and adds richness.
Bake
Bake 28-35 minutes until the tops are golden brown and the internal temperature reaches 190°F (88°C).
Cool briefly
Let rolls cool in the pan for 10 minutes before frosting. This lets them set but stay warm enough to melt the frosting slightly.
Bake
Cool
If the tops brown too quickly, tent loosely with foil for the last 10 minutes.
Baking Methods
The classic method for soft, pull-apart rolls.
Equipment: 9x13-inch baking pan, pastry brush
Preheat
Preheat oven to 350°F (175°C).
Brush with cream
Brush rolls with heavy cream for shine and browning.
Bake
Bake 28-35 minutes until golden.
Check temperature
Internal temp should reach 190°F (88°C).
Cool
Let cool 10 minutes before frosting.
Phase 8
Make the Frosting
5 minutes
Tangy cream cheese frosting with a blueberry swirl for visual and flavor contrast.
Click each step to mark complete
Beat cream cheese and butter
In a medium bowl, beat softened cream cheese and butter together until smooth, about 2 minutes.
Add powdered sugar
Sift in powdered sugar. Beat on low until combined, then increase speed and beat until fluffy.
Add cream and extract
Add 2 tablespoons heavy cream and vanilla (or banana) extract. Beat until smooth. Add more cream if needed for spreading consistency.
Swirl in preserves
Dollop 2 teaspoons of blueberry preserves on top. Use a knife or toothpick to gently swirl. Do not overmix. You want visible purple streaks, not uniform color.
Pro Tip
Swirl lightly for contrast. If you mix too much, you'll lose the marbled effect.
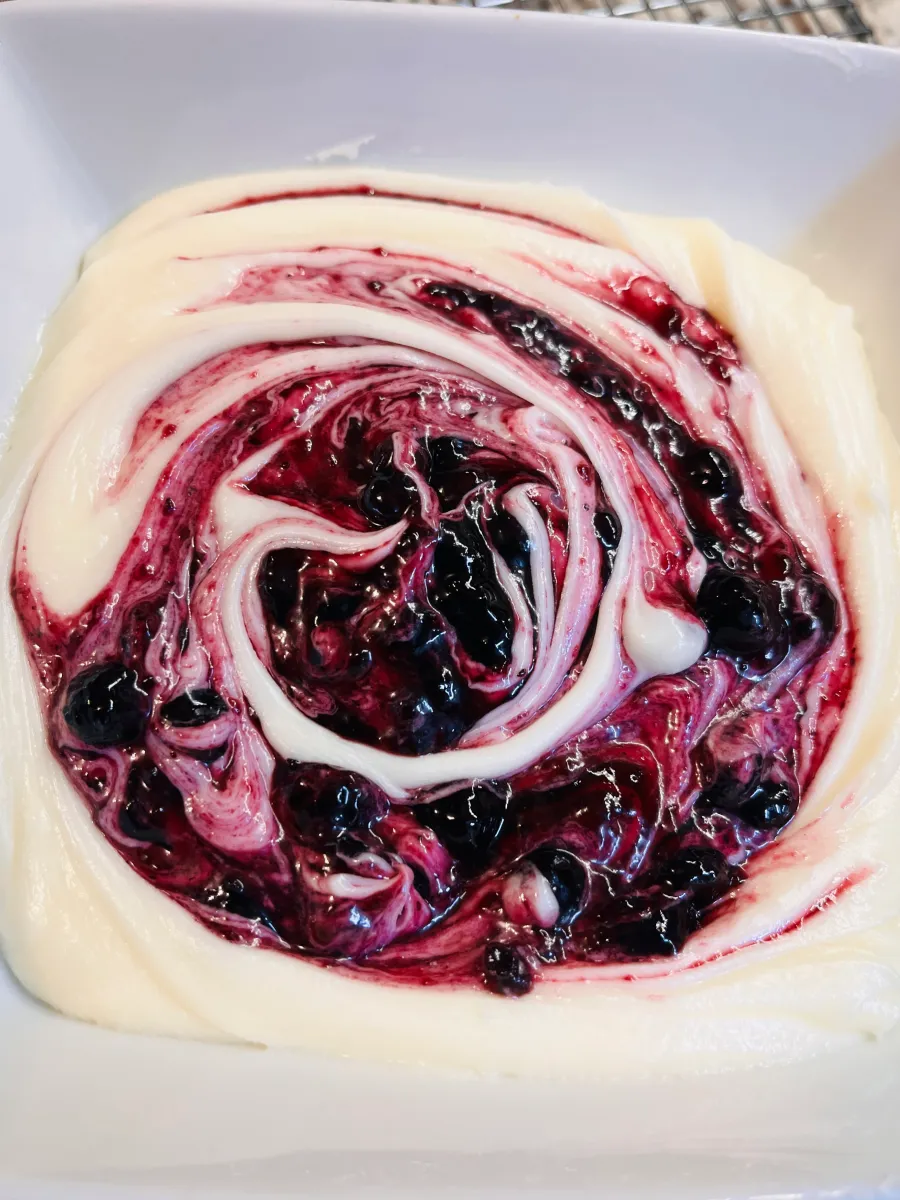
The perfect marbled swirl effect
Phase 9
Frost and Serve
5 minutes
Spread frosting over warm rolls so it melts into the layers.
Click each step to mark complete
Frost while warm
Spread or dollop the swirled frosting over the warm rolls. Let some melt into the crevices.
Serve immediately
These are best eaten warm. Leftovers can be stored covered at room temperature for 2 days or refrigerated for up to 5 days. Reheat in microwave for 15-20 seconds.
Pro Tip
For extra indulgence, scatter a few fresh blueberries on top of the frosting before serving.
Nutrition Facts
Per 1 roll • 9 servings per recipe
* Values are estimates based on standard ingredients
Storage
Room Temperature
2 days in an airtight container or covered with plastic wrap.
Frozen
Freeze unfrosted rolls up to 2 months. Thaw overnight in refrigerator, warm in oven at 300°F for 10 minutes, then frost.
💡 Cream cheese frosting firms up when cold. Microwave individual rolls 15-20 seconds to rewarm. For the whole pan, cover with foil and warm at 300°F for 10-15 minutes.
Your Feedback
Rate This Recipe
Loading ratings...
Troubleshooting
Baker's Notes
Common questions and solutions for perfect results
You Might Also Enjoy
More recipes from our pantry that pair well with this bake.

Get More Recipes in Your Inbox
Join thousands of home bakers receiving weekly recipes, tips, and techniques to elevate your bread game.
No spam, ever. Unsubscribe anytime.
More from Baking Great Bread at Home
Tools, resources, and community to help you bake better bread

Crust & Crumb Academy
Go deeper into your craft. FREE courses, challenges, and real feedback. No gatekeeping. Perfection is not required.

Sourdough Starter Companion
Your AI-powered starter assistant. Track feedings, troubleshoot issues, and keep your starter thriving.

BakingGreatBread.com
Real bread for the rest of us

Baking Great Bread Blog
Recipes, tips, and stories from the bread journey

Recipe Converter
Convert sourdough recipes to yeast and back again

Crust & Crumb App
Your AI-powered baking assistant

Facebook Community
Join 50,000+ bakers sharing, learning, and supporting each other

Sourdough for the Rest of Us
Free beginner's guide to sourdough