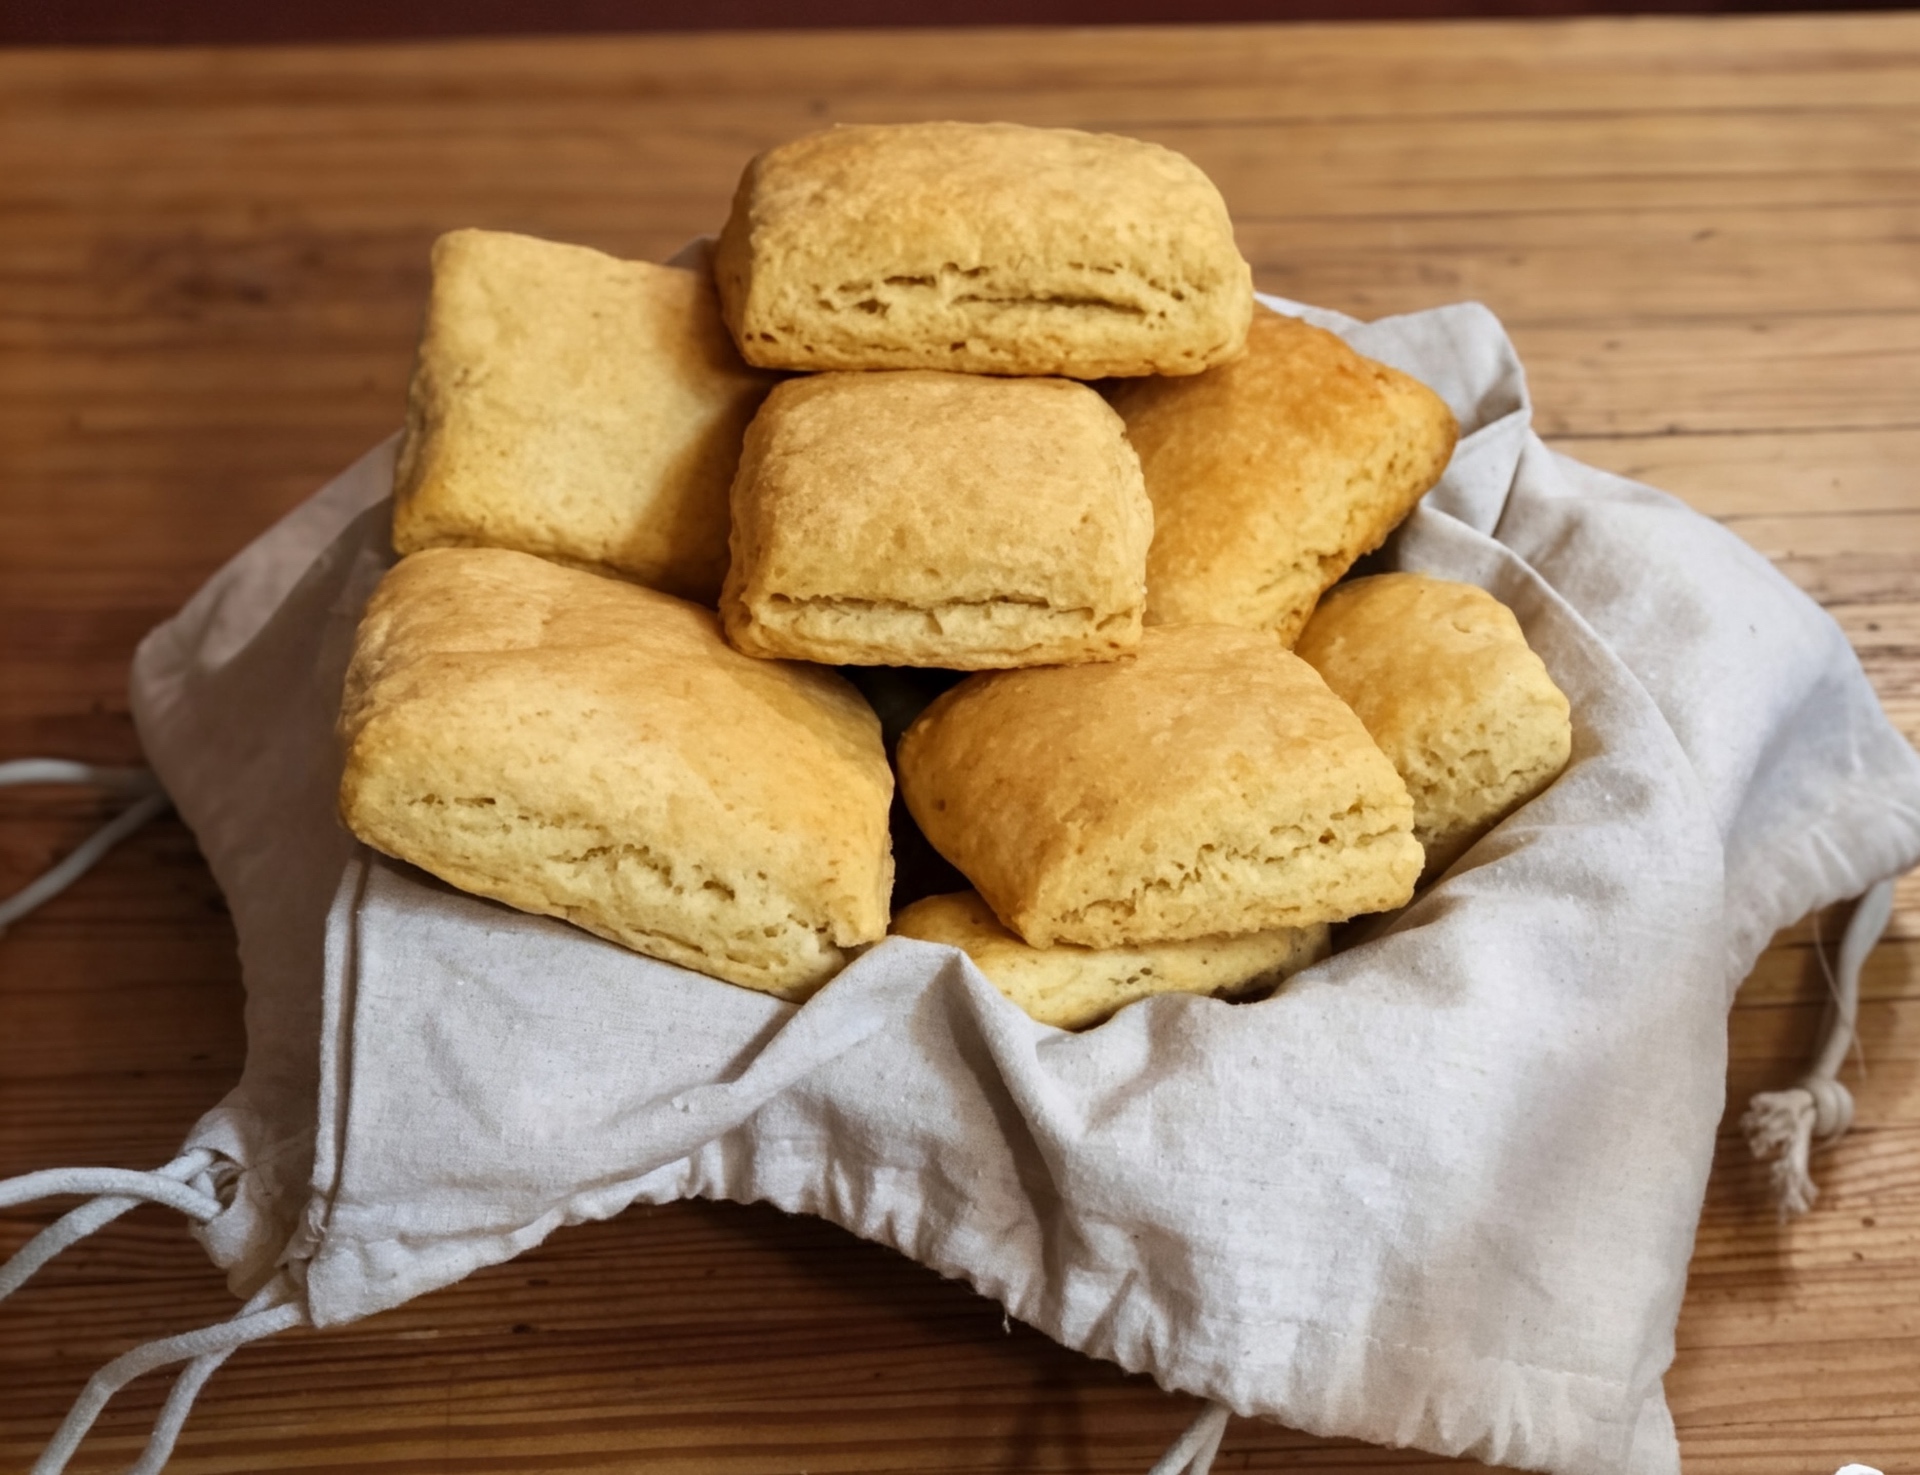
Tall, flaky, pull-apart biscuits the old-fashioned way
BeginnerSouthern ButtermilkBiscuits
by Henry Hunter Jr.
Flaky layers, golden tops, real buttermilk.
Bake Time
13-15 minutes
Yield
8 to 10 biscuits depending on cutter size


Perfection is not required
"Perfection is not required. Progress is."— Henry Hunter Jr.
By Henry Hunter Jr., founder of Crust & Crumb Academy and Baking Great Bread at Home.
Authentic Flavor
I spent years chasing the perfect biscuit and eventually realized the secret isn't a magic ingredient. It's cold butter, minimal handling, and high heat. This recipe does all three.
Equipment Needed
Ingredients
The Dough
Finishing
Pro Tip
White Lily flour is made from soft winter wheat and produces a more tender biscuit. If you can find it, use it. If not, regular all-purpose works great.
Prep
Freeze and Grate the Butter
Cold butter is the secret to flaky biscuits. The frozen grated butter creates tiny pockets throughout the dough that steam open in the oven, building those pull-apart layers.
Click each step to mark complete
Freeze the butter
Place the stick of butter in the freezer at least 30 minutes before you start. You want it rock solid. While you're at it, put your buttermilk in the freezer for 10 minutes too. Cold everything is the rule here.
Grate the butter
Using the large holes on a box grater, grate the frozen butter directly into the dry ingredients bowl or onto a plate. Work fast. The goal is to keep the butter from warming up. If it starts to feel soft, stick the whole thing back in the freezer for 5 minutes.
Even distribution
Grating creates dozens of tiny butter ribbons instead of a few large chunks. That means flaky layers everywhere in the biscuit, not just where the chunks happened to land.
Speed
The less you handle biscuit dough, the better. Grated butter incorporates in seconds with a quick toss, no pastry cutter required.
The Takeaway
Freeze your butter the night before. This one step separates good biscuits from great ones.
Mix
Mix the Dough
Biscuit dough comes together fast. The moment everything is hydrated, you stop. Overworking the dough develops and gives you tough, dense biscuits instead of tender, flaky ones.
Click each step to mark complete
Whisk the dry ingredients
In a large bowl, whisk together the flour, baking powder, salt, and baking soda until combined.
Toss in the grated butter
Add the grated frozen butter to the dry ingredients. Use your fingers to quickly toss and separate any clumps. The mixture should look like coarse crumbs with some flat butter flakes. Takes about 30 seconds.
Add the buttermilk
Pour in the cold buttermilk and stir with a wooden spoon or rubber spatula just until the dough comes together into a shaggy mass. It will look rough and uneven. That's correct. Stop stirring the moment you don't see dry flour.
Pro Tip
If the dough looks too dry and won't come together, add 1 tablespoon of buttermilk at a time. If it's sticky and wet, lightly flour your hands before the next step. Don't add more flour to the bowl.
Laminate
Fold and Turn for Layers
This is the technique that builds those tall, pull-apart layers. You're going to fold and pat the dough 8 times. Each fold creates a new layer. Don't rush it and don't overwork it.
Click each step to mark complete
Turn out the dough
Lightly flour a clean work surface. Turn the dough out and use your hands to gently bring it together into a rough rectangle about 1 inch thick. Don't knead. Just press and pat.
Fold and turn 8 times
Pat the dough into a rough rectangle. Fold it in half from top to bottom, then pat it back down to 1 inch thick. Rotate the dough a quarter turn. Repeat this fold, pat, and turn process for a total of 8 folds. You're building layers, not developing gluten. Light hands the whole way.
Pat to final thickness
After 8 folds, pat the dough into a 1-inch-thick round or rectangle. Don't roll it with a rolling pin. Pressing straight down keeps the layers intact.
The science of lamination
Each fold literally stacks layers of dough and butter on top of each other. When those butter layers hit a hot oven, the water in the butter turns to steam and puffs the layers apart. Eight folds gives you hundreds of distinct layers in a finished biscuit.
The Takeaway
Think of it like a quick croissant. You're not mixing, you're stacking.
Cut
Cut the Biscuits
How you cut matters as much as how you mix. One wrong move seals the edges and kills the rise.
Click each step to mark complete
Cut straight down, no twisting
Flour a 2.5-inch round cutter or use a sharp knife to cut squares. Press straight down through the dough and lift straight up. Do not twist the cutter. Twisting seals the cut edges together and prevents the biscuits from rising. Flour the cutter between cuts.
Place biscuits touching
Arrange the biscuits on a parchment-lined baking sheet or in a cast iron skillet so they are just touching each other. When biscuits touch, they support each other and rise up instead of spreading out. This is how you get tall biscuits.
Reshape and cut scraps once
Gather the dough scraps, press them together gently, and cut one more round of biscuits. Don't overwork the scraps. The biscuits from the second cut will be slightly less tender, but still good.
Brush with buttermilk
Brush the tops of the biscuits with the remaining buttermilk. This helps them brown evenly.
Pro Tip
For extra tall biscuits, place a second biscuit on top of the first before baking. Stack-baked biscuits come out dramatic and impressive.
Bake
Bake and Finish
High heat is what makes biscuits work. The oven needs to be fully preheated before the biscuits go in.
Step by Step
Preheat the oven
Preheat your oven to 450°F (230°C). Don't rush this. Let the oven sit at temperature for at least 10 minutes before baking.
Bake until golden
Bake for 13 to 15 minutes until the tops are golden brown. Watch for color, not just time. Every oven is different. You want a deep golden brown, not pale yellow.
Butter immediately
Pull the biscuits from the oven and immediately brush the tops with melted butter. This is not optional. That final butter pass is what gives them that glossy, rich finish.
Oven Preheat
Bake Time
Baking Methods
Parchment-lined sheet pan gives you flaky edges on every side.
Equipment: Parchment-lined baking sheet
Preheat
Preheat oven to 450°F (230°C) with rack in the center position.
Arrange biscuits touching
Place biscuits on the lined sheet so they just touch each other.
Bake 13 to 15 minutes
Bake until tops are deep golden brown. Brush with melted butter immediately after pulling from the oven.
"Don't open the oven for the first 10 minutes. You'll release the steam that's building those layers."
Nutrition Facts
Per 1 biscuit • 9 servings per recipe
* Values are estimates based on standard ingredients
Storage
Room Temperature
2 days in an airtight container. Biscuits are best the day they're baked.
Frozen
Up to 3 months. Freeze unbaked biscuits on a sheet pan, then transfer to a bag. Bake from frozen.
Refresh
Warm at 350°F (175°C) for 5 to 8 minutes or split and toast cut-side down in a skillet with butter.
Your Feedback
Rate This Recipe
Loading ratings...
Troubleshooting
Baker's Notes
Common questions and solutions for perfect results
If you're serious about scoring, you need the right blade in your hand. Wire Monkey makes handcrafted bread lames from black walnut — built to last, balanced in the hand, and sharp enough to glide through cold dough cleanly every single time. No dragging, no hesitation marks. Just a clean cut.

Wire Monkey Handcrafted Bread Lames
You Might Also Enjoy
More recipes from our pantry that pair well with this bake.
Get More Recipes in Your Inbox
Join thousands of home bakers receiving weekly recipes, tips, and techniques to elevate your bread game.
No spam, ever. Unsubscribe anytime.
More from Baking Great Bread at Home
Tools, resources, and community to help you bake better bread

Crust & Crumb Academy
Go deeper into your craft. FREE courses, challenges, and real feedback. No gatekeeping. Perfection is not required.

Sourdough Starter Companion
Your AI-powered starter assistant. Track feedings, troubleshoot issues, and keep your starter thriving.

BakingGreatBread.com
Real bread for the rest of us

Baking Great Bread Blog
Recipes, tips, and stories from the bread journey

Recipe Converter
Convert sourdough recipes to yeast and back again

Crust & Crumb App
Your AI-powered baking assistant

Facebook Community
Join 50,000+ bakers sharing, learning, and supporting each other

Sourdough for the Rest of Us
Free beginner's guide to sourdough