Soft, Buttery & Ready in Under an Hour
BeginnerQuick Yeasted GarlicKnots
by Henry Hunter
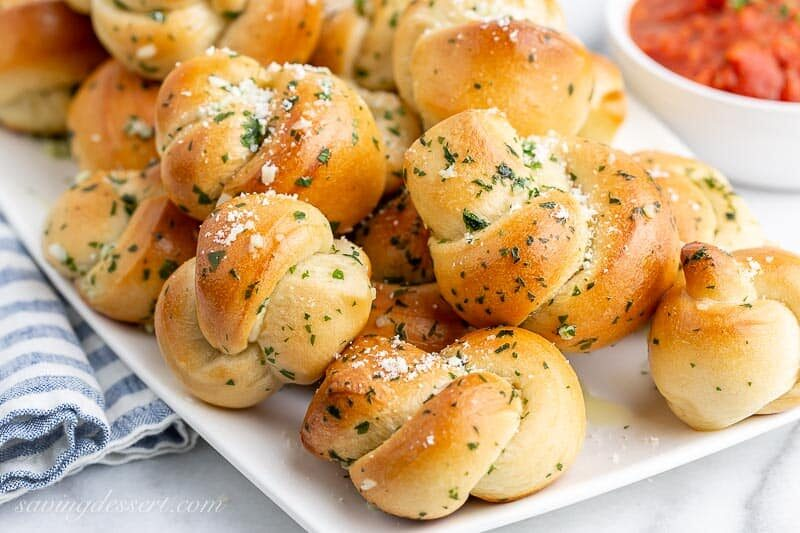
Pillowy garlic knots drenched in herb butter, quick enough for a weeknight, impressive enough for company.
Rise Time
20 minutes
Bake Time
12-14 minutes
Yield
12-14 garlic knots

Perfection is not required
"Great bread isn't about perfect technique—it's about understanding the dough."— Henry Hunter
By Henry Hunter Jr., founder of Crust & Crumb Academy and Baking Great Bread at Home.
Authentic Flavor
Soft, pillowy garlic knots with a double garlic herb butter finish. Easy beginner recipe ready in under an hour.
Ingredients
Quick Dough
Garlic Herb Butter
Pro Tip
The higher amount of yeast is intentional. More yeast = faster rise. Since we're not developing complex flavor through long fermentation, the garlic herb butter does the flavor work. Speed is the goal here.
Day 1
Make the Dough
10 minutes active
A quick pizza-style dough with garlic powder built right in. The olive oil keeps it pliable and easy to shape.
Click each step to mark complete
Activate the Yeast
In the bowl of a stand mixer (or large bowl), combine warm water, , and sugar. Stir gently and let sit for 3-5 minutes until it starts to foam.
Add Wet Ingredients
Pour in the olive oil and salt. Stir briefly.
Add Flour and
Add the flour and garlic powder. Using the dough hook on low speed, mix until a shaggy dough forms. Increase to medium speed and for 4-5 minutes until smooth and slightly tacky. By hand: stir with a wooden spoon until combined, then on a lightly floured surface for 6-8 minutes.
Check the Dough
It should be soft, smooth, and barely tacky. Not sticky, not dry. It should pull away from the sides of the bowl cleanly.
Precise Timers
Use these interactive timers to track your stages.
Yeast Bloom
Knead
Day 1
Rest & Shape
15 minutes
A short rest, then shape the knots. If you can tie a shoelace, you can tie a garlic knot.
Click each step to mark complete
Quick Rest
Cover the dough in the mixing bowl with plastic wrap or a damp towel. Let it rest for 10 minutes. It won't fully double, and it doesn't need to. You just want it to relax.
Prep the Pan
Line a large baking sheet with parchment paper. Preheat oven to 400°F (200°C).
Divide the Dough
Turn the dough out onto a lightly floured surface. Using a or knife, divide into 12-14 equal pieces (about 40-45g each).
Roll Into Ropes
Roll each piece between your palms and the counter into a 7-8 inch rope.
Tie the Knots
Take one rope and form a loose loop. Pull one end through the loop (just like tying a single knot). Tuck the loose ends underneath. Place seam-side down on the prepared baking sheet.
Second Rest
Arrange knots about 1½ inches apart on the baking sheet. Cover loosely and let rest for 10 minutes while the oven finishes preheating.
⏱ Wait Time
10 minutes
Precise Timers
Use these interactive timers to track your stages.
Dough Rest
Shaped Rest
Shaping
Shaping Options
Three ways to shape your garlic knots depending on how you want to serve them.
Classic Tied Knot
The classic pizzeria shape. Individual portions, easy to grab.
RecommendedClick each step to mark complete
Roll Rope
Roll each piece into a 7-8 inch rope.
Form Loop
Form a loose loop and pull one end through.
Tuck Ends
Tuck loose ends underneath.
Arrange
Place seam-side down on baking sheet.
Simple Twist
Even simpler than a knot. Quick and elegant.
Click each step to mark complete
Roll Rope
Roll each piece into a 6-inch rope.
Twist
Twist once in the center.
Arrange
Place flat on baking sheet.
Pull-Apart Cluster
Pack into a dish for tear-and-share format. Great for parties.
Click each step to mark complete
Shape Balls
Roll pieces into small balls (skip the rope step).
Pack Tight
Arrange in a 9x13 baking dish or cast iron skillet, touching each other.
Bake
Brush with butter, bake, and serve as pull-apart knots.
Proof Test: After the 10-minute shaped rest, press lightly. The dough should feel slightly puffy and give a little. It won't be fully doubled, and that's fine. The will do the rest.
Day 1
Make the Garlic Herb Butter
5 minutes
This is where the flavor lives. Fresh garlic, herbs, butter, a hit of Parmesan. Make enough to brush before AND after baking.
Click each step to mark complete
Melt and Infuse
In a small saucepan over medium-low heat, melt the butter. Add the minced garlic and cook for 1-2 minutes, stirring constantly, until fragrant but not browned. You want the garlic soft and aromatic, not crispy.
Add Seasonings
Remove from heat. Stir in the Italian seasoning, garlic salt, parsley, and Parmesan (if using).
Divide (Mentally)
You'll use about half the butter before baking and the rest after. Don't use it all at once.
Precise Timers
Use these interactive timers to track your stages.
Garlic Infusion
Day 1
Bake & Butter (Again)
Brush before baking for color and flavor penetration. Brush after baking for that glossy, irresistible finish.
Step by Step
First Butter
Brush each rested knot with about half the garlic herb butter. Get it on the top and sides.
Bake
Place the baking sheet on the center rack. Bake for 12-14 minutes until the knots are golden brown on top and lightly firm when pressed.
Second Butter
As soon as the knots come out of the oven, brush generously with the remaining garlic herb butter. If you have extra Parmesan, sprinkle it on now while the butter is still wet.
Serve Immediately
These are at their absolute peak within 15 minutes of coming out of the oven.
Bake
Cool
Baking Methods
Individual knots on parchment-lined sheet. Even browning, easy to grab.
Equipment: Half sheet pan, parchment paper
Preheat
Preheat oven to 400°F (200°C).
Brush
Brush knots with garlic herb butter.
Bake
Bake 12-14 minutes until golden brown.
Butter Again
Brush with remaining butter immediately. Serve with marinara for dipping.
Nutrition Facts
Per 1 knot • 12 servings per recipe
* Values are estimates based on standard ingredients; actual values vary by brands and portion size.
Storage
Room Temperature
2-3 days in an airtight container, though they're best same-day.
Refrigerated
Do not refrigerate. Freeze what you won't eat within a day or two. The fridge dries them out.
Frozen
Up to 2 months. Cool completely before freezing in an airtight bag. Reheat at 350°F (175°C) for 8-10 minutes, then brush with fresh garlic herb butter.
Refresh
350°F (175°C) oven for 5-7 minutes. Brush with a little extra butter after reheating for best results. Microwave works for 15-20 seconds but won't re-crisp the outside.
Your Feedback
Rate This Recipe
Loading ratings...
Troubleshooting
Baker's Notes
Common questions and solutions for perfect results

If you're serious about scoring, you need the right blade in your hand. Wire Monkey makes handcrafted bread lames from black walnut — built to last, balanced in the hand, and sharp enough to glide through cold dough cleanly every single time. No dragging, no hesitation marks. Just a clean cut.

Wire Monkey Handcrafted Bread Lames
You Might Also Enjoy
More recipes from our pantry that pair well with this bake.
Get More Recipes in Your Inbox
Join thousands of home bakers receiving weekly recipes, tips, and techniques to elevate your bread game.
No spam, ever. Unsubscribe anytime.
More from Baking Great Bread at Home
Tools, resources, and community to help you bake better bread

Crust & Crumb Academy
Go deeper into your craft. FREE courses, challenges, and real feedback. No gatekeeping. Perfection is not required.

Sourdough Starter Companion
Your AI-powered starter assistant. Track feedings, troubleshoot issues, and keep your starter thriving.

Fermentation Compass
Stop guessing when bulk fermentation is finished. Read your dough. Nail your bake.

BakingGreatBread.com
Real bread for the rest of us

Baking Great Bread Blog
Recipes, tips, and stories from the bread journey

Recipe Converter
Convert sourdough recipes to yeast and back again

Crust & Crumb App
Your AI-powered baking assistant

Facebook Community
Join 50,000+ bakers sharing, learning, and supporting each other

Sourdough for the Rest of Us
Free beginner's guide to sourdough