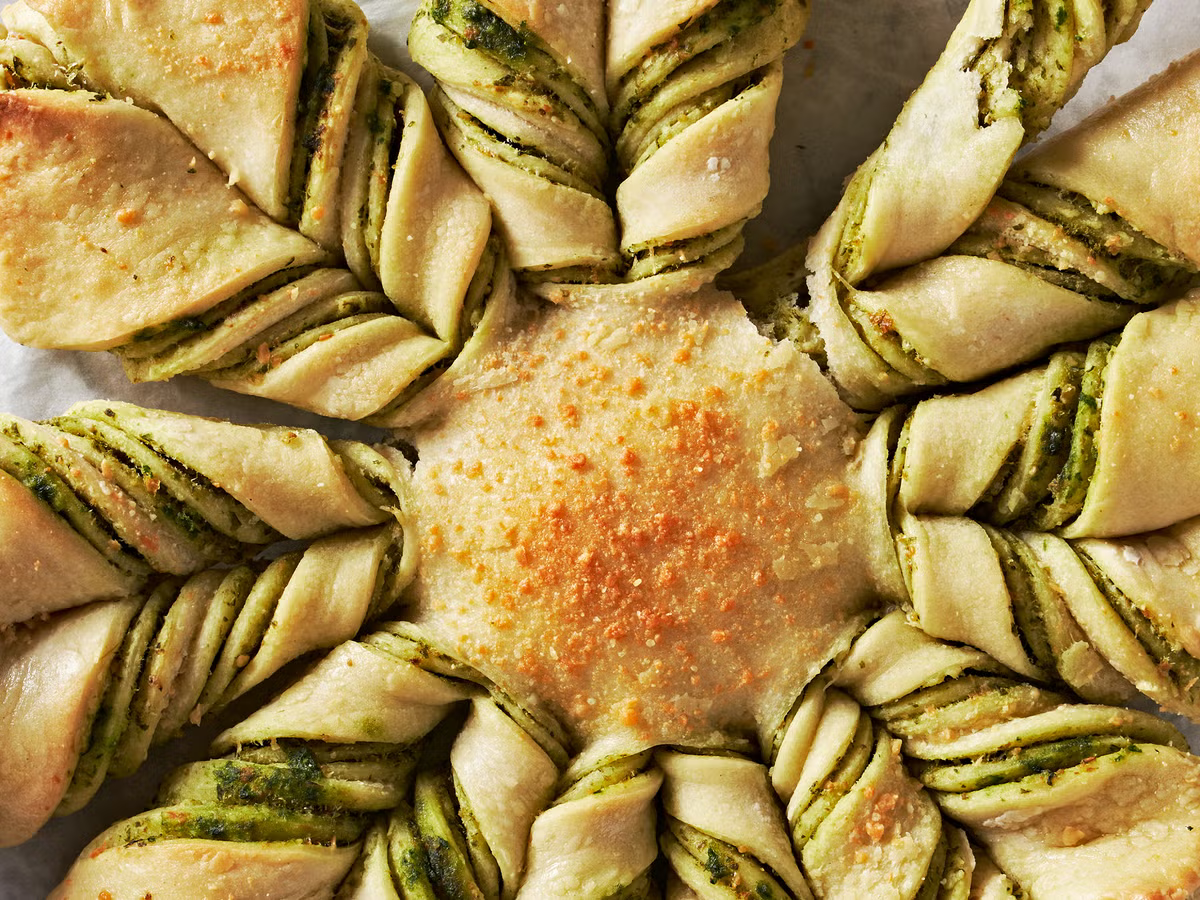
Spanakopita-Inspired Pull-Apart with Sourdough Depth
IntermediateSourdough Savory StarBread
by Henry Hunter Jr.
Looks like hours of work. It wasn't.
Fermentation
8-12 hours (levain) + 4-5 hours (bulk)
Bake Time
25-30 minutes
Yield
Serves 8-10

Perfection is not required
"Perfection is not required. Progress is."— Henry Hunter Jr.
By Henry Hunter Jr., founder of Crust & Crumb Academy and Baking Great Bread at Home.
Authentic Flavor
Henry Hunter Jr. is the founder of Baking Great Bread at Home and Crust & Crumb Academy. He learned to bake bread from Herr Sherman, a German baker, during military service, and has been teaching others ever since.
Equipment Needed
Ingredients
Levain (Night Before)
Build this the evening before bake day. It should double and be bubbly by morning.
The Dough
A soft, enriched dough with milk, butter, and egg. We mix the flour, milk, and levain first to start gluten development before the fat goes in.
The Filling
A spanakopita-inspired filling that's creamy, salty, and packed with flavor. The secret is getting every drop of moisture out of the spinach.
Finish
Pro Tip
Total flour is 360g (50g in the levain + 10g from starter + 300g in the final dough). Effective hydration is ~67% when you account for the water content of milk (87%), egg (75%), and butter (15%). The dough should feel soft and smooth, not sticky.
Night Before
Build the Levain
The provides the rise and flavor for this enriched dough. Because butter, sugar, and eggs slow down fermentation, we use a moderate inoculation rate to give the starter enough power without over-acidifying the dough.
Click each step to mark complete
Mix the Levain
In a clean jar or small bowl, combine the starter, flour, and water. Mix until no dry flour remains. Cover loosely and let rest at room temperature (70-75°F / 21-24°C) overnight.
Check Readiness
The levain is ready when it has doubled in size, is domed on top, and looks bubbly throughout. A small spoonful should float in water (). If your kitchen is cool, this may take up to 12 hours.
⏱ Wait Time
8-12 hours
Pro Tip
If your kitchen runs cold (below 68°F), use warm water (closer to 85°F) and find a warm spot. The top of the fridge or inside the oven with just the light on works well.
Precise Timers
Use these interactive timers to track your stages.
Levain Ferment
Morning
Mix the Dough
We mix the flour, milk, and levain first to start gluten development, then add the enrichments. This order matters. Fat coats flour proteins and prevents gluten from forming, so we want a head start before the butter goes in.
Click each step to mark complete
Combine Flour, Milk, and Levain
In the bowl of a stand mixer (or a large mixing bowl), combine the bread flour, warm milk, and levain. Mix on low with the dough hook for 2 minutes until a shaggy dough forms. Let rest 20 minutes. This short rest gives the flour time to hydrate before we add the fat.
Add Egg, Sugar, and Salt
Add the egg, sugar, and salt. Mix on low for 2 minutes until incorporated, then increase to medium and knead for 5 minutes. The dough should start pulling away from the sides of the bowl.
Incorporate Butter
With the mixer on medium-low, add the softened butter one tablespoon at a time. Wait until each piece is mostly absorbed before adding the next. Once all the butter is in, increase to medium and knead for 6-8 minutes until the dough is smooth, elastic, and pulls cleanly from the bowl. It should be soft and slightly tacky but not sticky. By hand: knead on a lightly floured surface for 12-15 minutes total after adding butter.
Pro Tip
The dough will look like a disaster when you first add the butter. That's normal. Keep mixing. It comes together.
Precise Timers
Use these interactive timers to track your stages.
Initial Mix
Rest (Hydration)
Knead with Enrichments
Knead with Butter
Bulk Fermentation
for enriched sourdough takes longer than lean doughs. The butter and sugar slow the yeast down, which is actually a good thing. More time means more flavor development.
Click each step to mark complete
First Rise with Folds
Shape the dough into a ball and place in a lightly greased bowl. Cover with plastic wrap or a damp towel. Perform 3 sets of at 45-minute intervals during the first 2 hours. After the folds, leave the dough undisturbed.
Monitor the Rise
Let the dough ferment at room temperature (75-78°F / 24-26°C) until it has risen 60-80% and looks puffy and airy. This typically takes 4-5 hours total (including fold time), but trust the dough, not the clock. In a cool kitchen, it may take 6 hours. Do not wait for doubling. You need this dough rollable, not blown out.
⏱ Wait Time
4-5 hours
Pro Tip
Don't rush the bulk. Under-fermented enriched dough will be dense and heavy after baking. You want it light and airy before you start rolling it out. But don't overshoot either. This dough needs to be rolled into thin 12-inch circles, so stop at 60-80% rise.
It Won't Look Like Lean Sourdough
Enriched doughs don't dome as dramatically as lean doughs. The butter keeps things softer and more relaxed. Look for a 60-80% rise, visible bubbles along the sides of the bowl, and a smooth, pillowy surface. If the dough looks flat and dense with no bubbles, it needs more time. If it's domed and wobbly with large bubbles, you're at the upper edge. For star bread specifically, err on the side of slightly under rather than over. You still need to roll this thin.
The Takeaway
Trust the visual cues over the clock. Puffy and airy means ready. Doubled means too far for this recipe.
Precise Timers
Use these interactive timers to track your stages.
First Fold
Second Fold
Third Fold
Chill the Dough
Cold dough rolls cleaner and twists sharper. Don't skip this step.
Click each step to mark complete
Refrigerate Before Shaping
Once bulk fermentation is complete, cover the bowl tightly and refrigerate for 30-45 minutes. You want the dough firm enough to roll thin without sticking, but not so cold that it fights you. The butter in this dough firms up quickly in the fridge, which is exactly what makes shaping easier.
⏱ Wait Time
30-45 minutes
Pro Tip
If your kitchen is above 78°F (26°C), go the full 45 minutes. If it's cooler, 30 minutes is enough.
Precise Timers
Use these interactive timers to track your stages.
Chill Dough
Make the Filling
During the last hour of bulk fermentation
Make the filling during the last hour of so it has time to cool completely. Hot filling will melt into the dough layers and make shaping impossible.
Click each step to mark complete
Wilt the Spinach
Heat olive oil in a large skillet over medium heat. Add garlic and cook 30 seconds until fragrant. Add spinach in batches, tossing until fully wilted. Season lightly with kosher salt and black pepper.
Drain and Chop
Transfer to a colander and press out every bit of moisture. This step matters. Wet filling ruins the layers. Let cool to room temperature, then roughly chop.
Combine the Filling
In a bowl, combine the drained spinach, feta, mozzarella, cream cheese, and red pepper flakes. Mix until it holds together as a spreadable paste. Taste and adjust seasoning.
Pro Tip
You want a spreadable paste, not chunky. Too thick and the dough won't twist cleanly. If it feels loose, add a little more cream cheese to bind it.
Shape the Star
Four circles of dough, three layers of filling, 16 cuts, 8 twists. It's easier than it sounds. If your dough feels warm and sticky, pop it back in the fridge for 10 minutes before cutting.
Click each step to mark complete
Divide the Dough
Turn the dough onto a lightly floured surface. Divide into 4 equal pieces (roughly 150-160g each). Shape each into a ball, cover with a towel, and rest for 10 minutes.
Roll the Circles
On a lightly floured surface, roll each piece into a 12-inch circle. They don't need to be perfect, but keep them close to the same size.
Stack and Fill
Place the first circle on a parchment-lined baking sheet or round pizza pan. Divide the filling into 3 equal portions. Spread one portion over the first circle, leaving a 1-inch border. Stack the second circle on top. Spread another portion. Repeat with the third circle and remaining filling. Place the fourth circle on top with no filling.
Mark the Center
Place a small bowl or glass (about 3 inches wide) in the center of the dough stack and press lightly to mark a circle. Do not cut through. This is your guide for the cuts.
Cut the Strips
Using a sharp knife or bench scraper, cut the dough outside the center circle into 16 equal strips. Cut from the edge of the center circle to the outer edge. The easiest way: cut into quarters first, then each quarter in half (8 strips), then each strip in half again (16 strips).
Twist the Points
Take two adjacent strips and twist them away from each other (outward) twice, then pinch the ends together to form a point. Repeat around the entire circle until you have 8 points.
Remove the Guide
Carefully remove the guide bowl. You should have a sunflower-star shape with a clear center and 8 twisted points.
Pro Tip
Work quickly once you start the assembly so the layers don't stick together before you cut. If the dough softens up too much during shaping, pop the whole assembly back in the fridge for 10 minutes before cutting.
Cut into 16 strips, then twist pairs outward to form 8 points
Shaping
Shape the Star
Four circles of dough, three layers of filling, 16 cuts, 8 twists.
Star Bread
The classic pull-apart star shape with visible filling between the twisted points.
RecommendedClick each step to mark complete
Divide
Cut dough into 4 equal pieces (~150-160g each). Shape into balls, rest 10 minutes covered.
Roll
Roll each piece into a 12-inch circle on a lightly floured surface.
Stack and Fill
Layer: dough, filling, dough, filling, dough, filling, dough (no filling on top). Leave 1-inch border on each filling layer.
Mark Center
Press a 3-inch bowl or glass into the center to mark (don't cut through).
Cut 16 Strips
Cut from center circle to outer edge: quarters first, then halves of each quarter, then halves again.
Twist
Take 2 adjacent strips, twist outward twice, pinch ends together. Repeat for 8 points.
Proof Test: After shaping, the star should proof 30-45 minutes (up to 60 for sourdough) until slightly puffed. The dough between the twists should look relaxed and pillowy. Don't wait for it to double. The star shape has so much surface area that it proofs faster than you'd expect.
The Final Step
Proof and Bake
The star shape has a lot of surface area, so it proofs faster than you might expect. Don't walk away for two hours. Check it at 30 minutes.
Step by Step
Final Proof
Cover loosely with plastic wrap and let proof for 30-45 minutes until slightly puffed. Because sourdough moves slower than instant yeast, you may need up to 60 minutes. The dough should look relaxed and pillowy, not dramatically risen.
Preheat
Preheat your oven to 375°F (190°C) with a rack in the center position.
Egg Wash
Whisk the egg and milk together for the egg wash. Brush gently over the entire surface of the star, getting into the twists.
Add Sesame Seeds
Scatter black sesame seeds over the center circle only. This creates a dramatic contrast against the golden egg-washed dough.
Bake
Bake for 25-30 minutes until deep golden brown. The layers should be set and the filling visible between the twists. If the top is browning too fast, tent loosely with foil after 20 minutes.
Cool and Serve
Let cool on the pan for 15 minutes before serving. Pull-apart style, right from the center. The cheese should still be warm and stretchy.
Final Proof
Preheat Oven
Bake
Cool Before Serving
Baking Methods
Bake on a parchment-lined baking sheet or round pizza pan.
Equipment: Parchment-lined baking sheet or round pizza pan
Preheat
Preheat oven to 375°F (190°C) with a rack in the center position.
Egg Wash
Brush entire surface with egg wash (1 egg + 1 tbsp milk). Get into the twists.
Sesame Seeds
Scatter black sesame seeds over the center circle only.
Bake
Bake 25-30 minutes until deep golden brown. Filling should be bubbling between the twists. Tent with foil if browning too fast after 20 minutes.
Cool
Let cool on the pan for 15 minutes. Serve pull-apart style.
Nutrition Facts
Per 1 slice (1/8 of star) • 8 servings per recipe
* Values are estimates based on standard ingredients
Storage
Room Temperature
2-3 days wrapped in foil or stored in an airtight container
Refrigerated
Up to 5 days. Reheat uncovered at 325°F (163°C) for 10 minutes.
Frozen
Up to 2 months. Wrap tightly in plastic wrap and foil. Thaw overnight in the fridge, then reheat.
Refresh
Warm at 325°F (163°C) for 10-12 minutes until the cheese is melty again.
Your Feedback
Rate This Recipe
Loading ratings...
Troubleshooting
Baker's Notes
Common questions and solutions for perfect results
If you're serious about scoring, you need the right blade in your hand. Wire Monkey makes handcrafted bread lames from black walnut — built to last, balanced in the hand, and sharp enough to glide through cold dough cleanly every single time. No dragging, no hesitation marks. Just a clean cut.

Wire Monkey Handcrafted Bread Lames
You Might Also Enjoy
More recipes from our pantry that pair well with this bake.

Get More Recipes in Your Inbox
Join thousands of home bakers receiving weekly recipes, tips, and techniques to elevate your bread game.
No spam, ever. Unsubscribe anytime.
More from Baking Great Bread at Home
Tools, resources, and community to help you bake better bread

Crust & Crumb Academy
Go deeper into your craft. FREE courses, challenges, and real feedback. No gatekeeping. Perfection is not required.

Sourdough Starter Companion
Your AI-powered starter assistant. Track feedings, troubleshoot issues, and keep your starter thriving.

BakingGreatBread.com
Real bread for the rest of us

Baking Great Bread Blog
Recipes, tips, and stories from the bread journey

Recipe Converter
Convert sourdough recipes to yeast and back again

Crust & Crumb App
Your AI-powered baking assistant

Facebook Community
Join 50,000+ bakers sharing, learning, and supporting each other

Sourdough for the Rest of Us
Free beginner's guide to sourdough