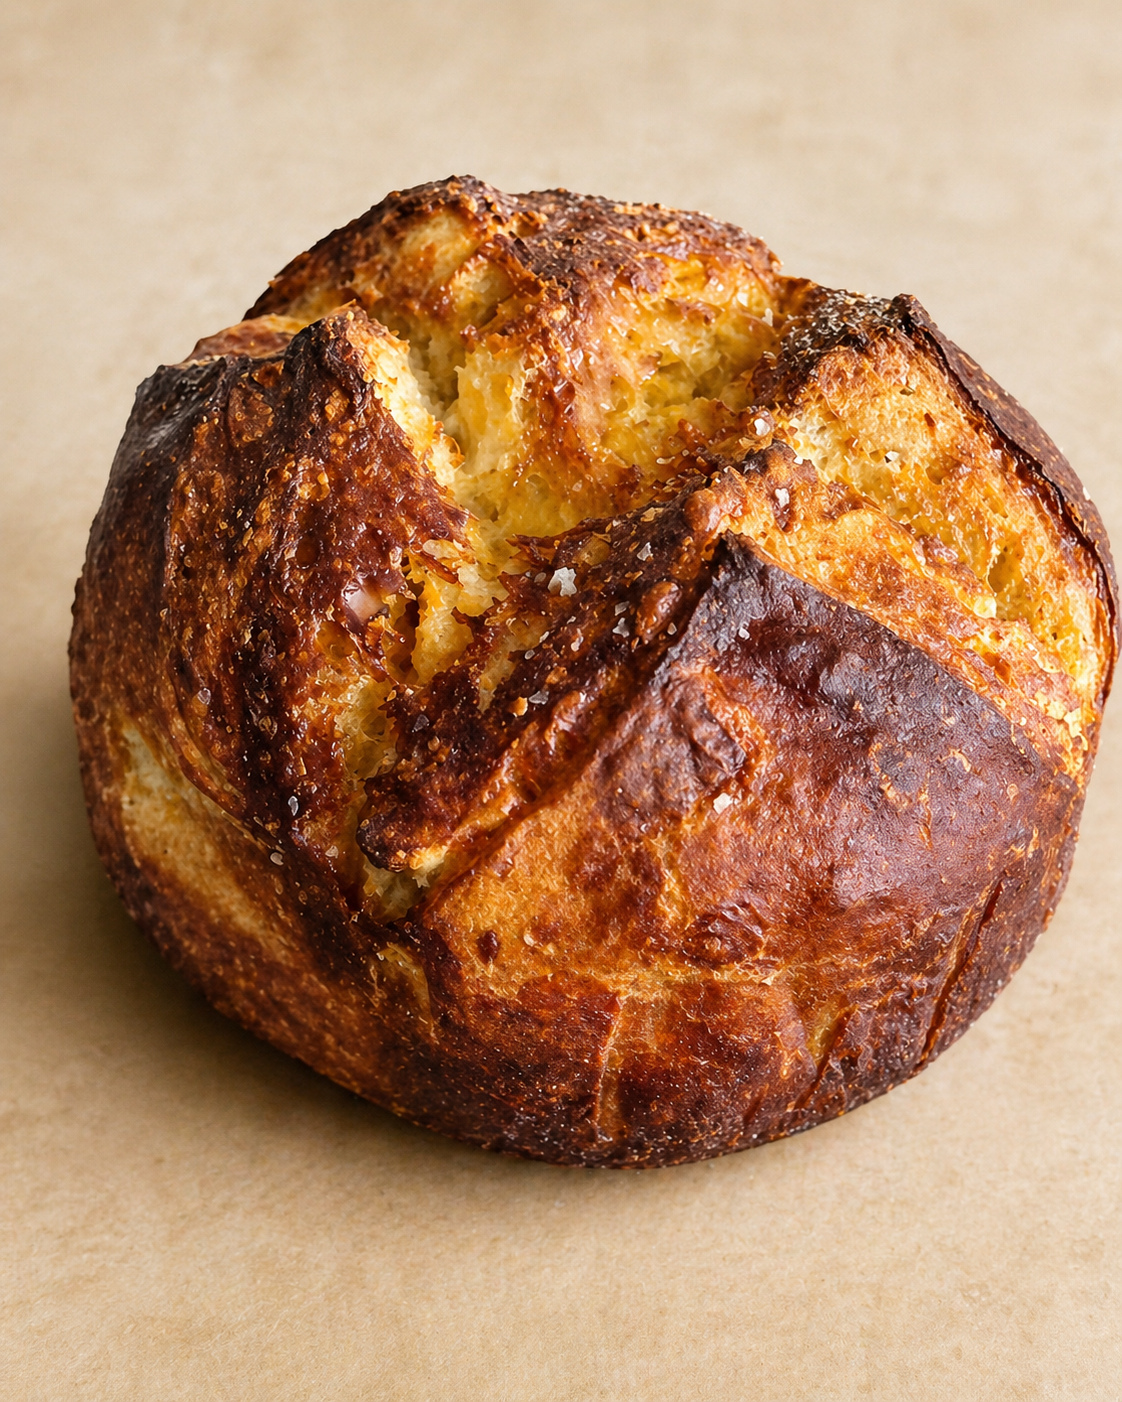
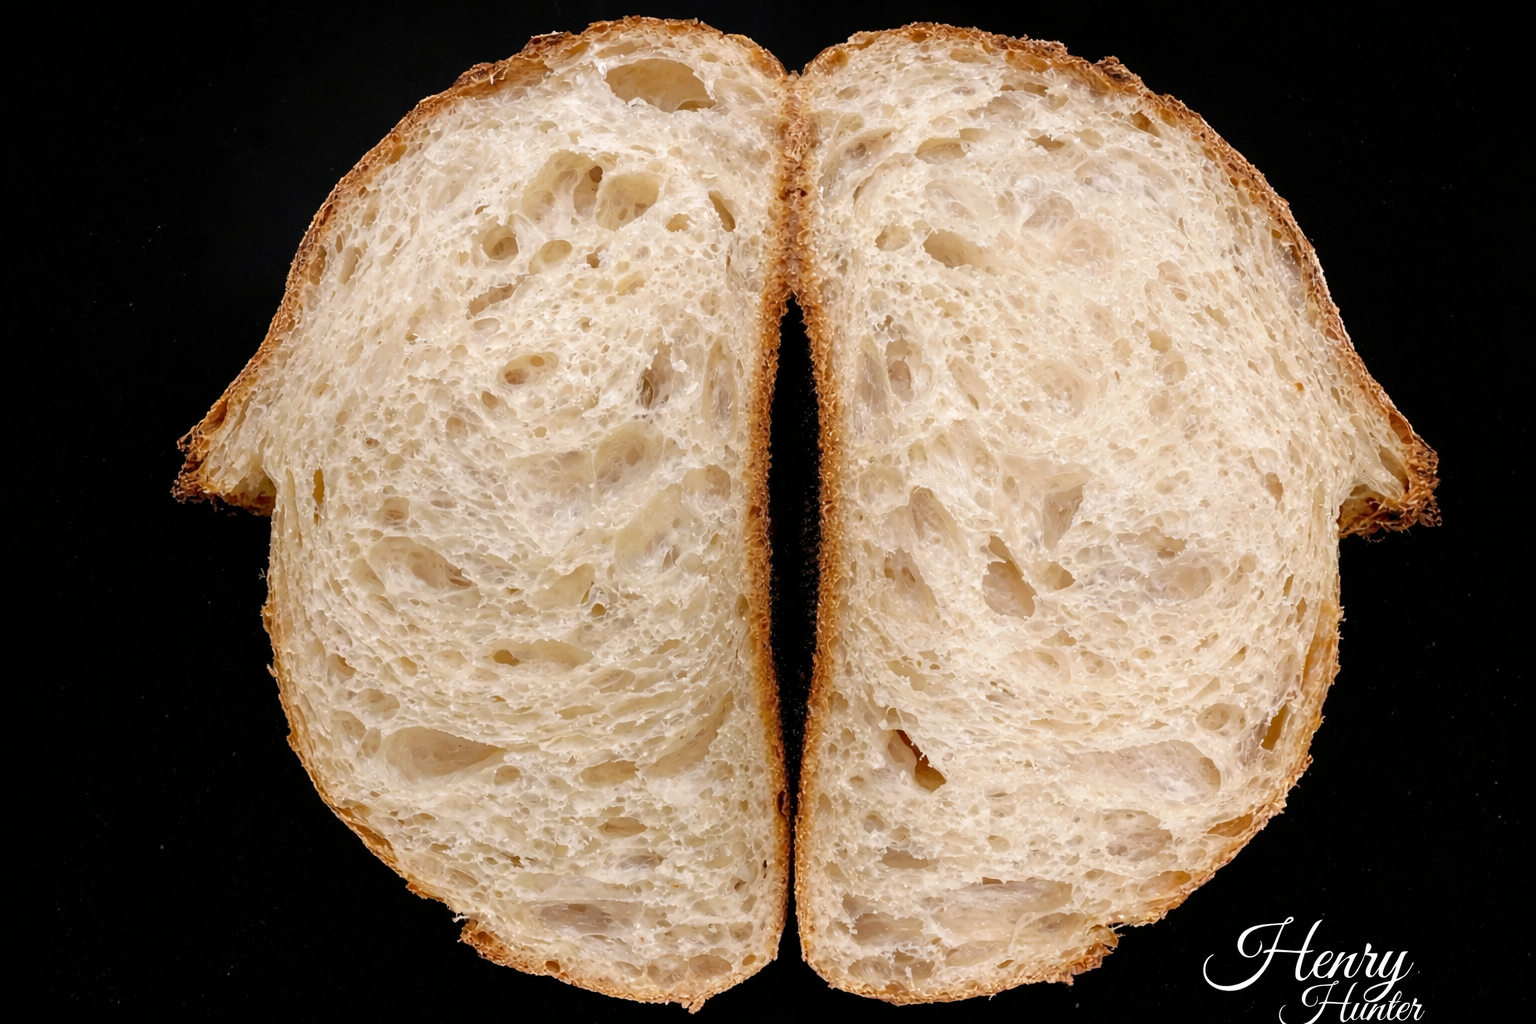
A boil-and-bake sourdough loaf with a deep mahogany pretzel crust
IntermediateSourdough PretzelLoaf
by Henry Hunter Jr.
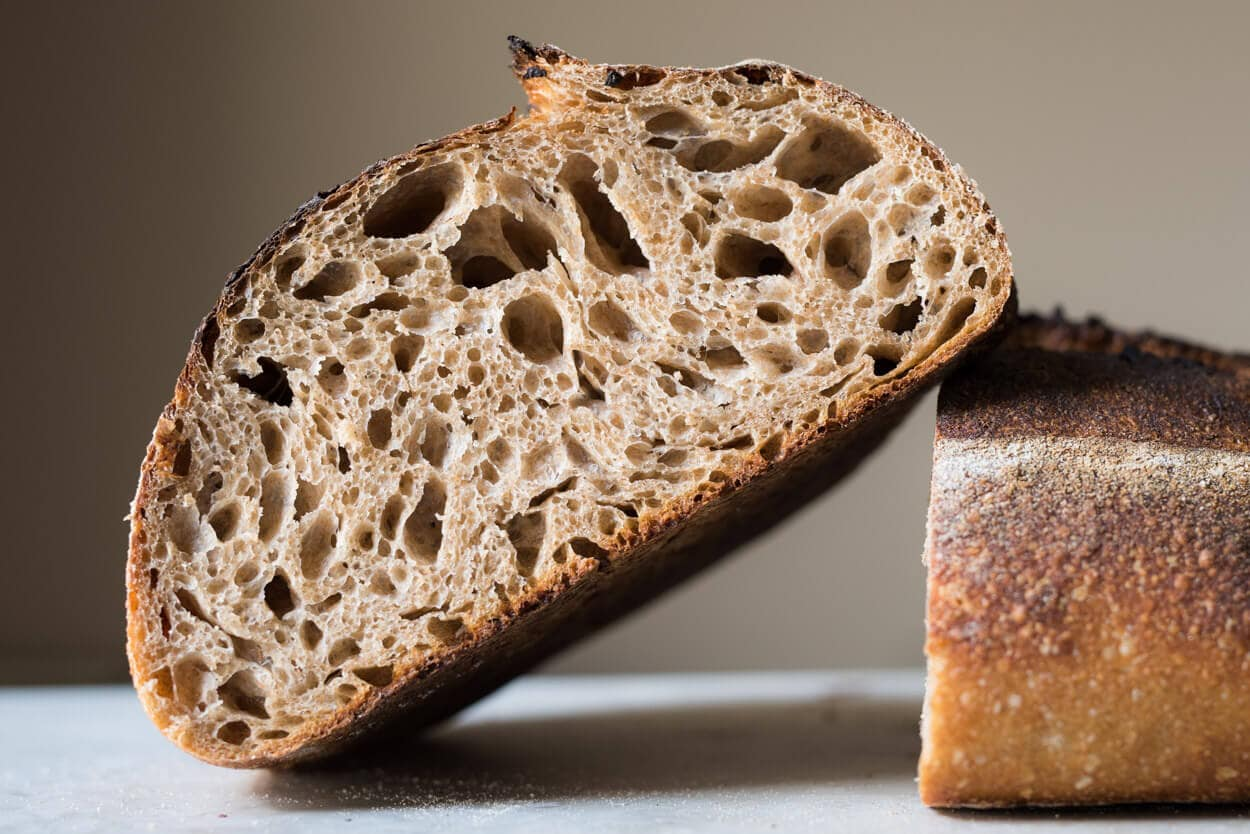
Pretzel crust outside. Sourdough crumb inside.
Fermentation
5-7 hours bulk + 12-16 hour cold retard
Bake Time
55-60 minutes
Yield
Serves 8-10

Perfection is not required
"Great bread isn't about perfect technique—it's about understanding the dough."— Henry Hunter Jr.
By Henry Hunter Jr., founder of Crust & Crumb Academy and Baking Great Bread at Home.
Authentic Flavor
This recipe came to the Academy through Candi Brown-McGriff, who baked it for the community in late April 2026 with a mild cheddar inclusion and a Maldon salt finish. Her bake was clean enough to teach from. We've kept her method intact and added the structure you'd expect from a Recipe Pantry entry. Credit where credit is due.
Equipment Needed
Ingredients
The Dough
The Bath
For the Bake
The Finish
Pro Tip
This recipe runs lower in hydration on purpose. The dough needs to be firm enough to hold its shape through the boil. Don't push the water higher.
Step 1
Mix and Fermentolyse
Start by dissolving the into the water, then mix in the flour and let it rest. This is a , a combined autolyse and fermentation that builds flavor and starts gluten development before the salt goes in.
Click each step to mark complete
Dissolve the starter
Combine the and water in a large bowl. Whisk with a or spoon until the water turns milky and the starter is fully dissolved.
Add the flours
Add both flours to the starter mixture. Start mixing with a whisk to wet the flour, then switch to your hands using a clawing motion. Mix for 7 minutes until no dry flour remains and the dough comes together as a shaggy mass.
Cover and rest
Cover the bowl and rest the dough for 1 hour at room temperature.
⏱ Wait Time
1 hour
Pro Tip
The clawing motion at the end of mixing pulls flour up from the bottom of the bowl. Don't skip it. Dry pockets at this stage cause uneven fermentation later.
Step 2
Add the Salt
After the fermentolyse, the salt goes in. The salt tightens the dough, slows fermentation slightly, and adds the flavor backbone every loaf needs.
Click each step to mark complete
Dimple in the salt
Wet your hands lightly. Sprinkle the salt evenly over the dough and dimple it in for 1 minute, pressing your fingertips through the dough to distribute it.
Incorporate fully
Use the method (lifting and squeezing the dough rhythmically with one hand) for 2-3 minutes to fully incorporate the salt. If Rubaud feels awkward, do a set of stretch and folds instead until the salt is fully absorbed.
Cover and rest
Cover and rest 30 minutes.
⏱ Wait Time
30 minutes
Step 3
Build Strength
Three rounds of folds with rests in between. This is where the dough goes from shaggy to strong, smooth, and ready to hold its shape through bulk fermentation.
Click each step to mark complete
10 slap and folds
Turn the dough out onto a clean counter. Perform 10 repetitions to tighten the gluten. Return to the bowl, cover, rest 30 minutes.
First set of stretch and folds
In the bowl, perform 2 sets of (lift one side, stretch up, fold over center, repeat 4 times around the bowl). Cover, rest 30 minutes.
Second set of stretch and folds
Perform 2 more sets of stretch and folds. Cover, then leave the dough undisturbed for the .
Pro Tip
After the second set of stretch and folds the dough should feel smooth and slightly elastic. If it still feels slack, do one more set before walking away.
Precise Timers
Use these interactive timers to track your stages.
First rest
Second rest
Step 4
Bulk Fermentation
The dough now needs time to ferment and rise. Aim for a 75% increase in volume, not a full double. This is the lower end of bulk because the cold retard will continue developing the dough overnight.
Click each step to mark complete
Watch the dough, not the clock
Cover the bowl and let it sit at 78°F (26°C) until the dough has risen by 75%. At 78°F this typically takes 3-6 hours. Cooler kitchens take longer, warmer kitchens move faster. Mark the dough level on the bowl with tape so you can track progress accurately.
Look for these signs
When ready: the dough will be smooth and domed on top, increased in volume by about 75%, and a finger indent will spring back slowly. At this lower hydration the dough won't get jiggly or foamy the way higher-hydration sourdough does. You may see a few bubbles on the surface, but don't wait for a heavily bubbled top. Trust the volume increase. Don't push past 75% rise. Overproofed dough won't survive the boil.
⏱ Wait Time
3-6 hours
Pro Tip
If your kitchen runs cold, build a proofer: a microwave with a cup of just-boiled water inside holds about 78°F for hours.
Step 5
Pre-shape, Shape, and Cold Retard
After bulk, the dough gets pre-shaped, rested, and final shaped into a tight boule. Then it goes into the fridge to develop flavor overnight and firm up enough to handle the boil.
Click each step to mark complete
Pre-shape
Turn the dough out onto a lightly floured surface. Use a to round it into a loose ball. Cover with a damp towel and rest 15 minutes.
Laminate and shape
Lightly flour the top of the dough, flip it onto the counter, and gently stretch it into a rectangle. Fold the edges into the center to build tension, then flip seam-side down and shape into a tight boule using the bench scraper to drag and rotate the dough on the counter.
Into the banneton
Flour your banneton generously. Flip the boule seam-side up into the banneton. Pinch any open seams closed.
Cold retard
Cover the banneton with a plastic bag or shower cap. Refrigerate for 12-16 hours. The cold develops flavor and firms the dough so it holds its shape during the boil.
⏱ Wait Time
12-16 hours
Step 6
The Alkaline Bath
This is the step that makes the loaf a pretzel. The baking soda creates an alkaline bath that gelatinizes the surface starches, which then bake into the deep mahogany crust pretzels are known for. Move quickly and stay focused. The dough only spends 60 seconds in the water total.
Click each step to mark complete
Boil the water and preheat the Dutch oven
Bring 5 quarts of water to a rolling boil in a large stock pot. Preheat your (with lid) in the oven to 450°F (232°C) at the same time. The Dutch oven needs at least 30 minutes to come up to temperature.
Prepare two pieces of parchment
You need two pieces of parchment, each doing a different job: the BREAD SLING and the DUTCH OVEN LINER. Cut the bread sling first: a square of parchment large enough to fit under the loaf with extra on the sides for handles. Cut the Dutch oven liner second: a smaller piece that fits the bottom of your Dutch oven. Set the liner inside the preheated Dutch oven now (carefully, lid back on after) so it's ready when the loaf is.
Score the loaf on the sling
Take the banneton out of the fridge. Flip the loaf onto the bread sling (NOT the Dutch oven liner). the top with a : a single slash, a cross, or a square pattern all work well. Don't score deeper than ¼ inch. Pretzel-bath dough doesn't bloom the way regular sourdough does.
Add the baking soda to the boil
Once the water is boiling, slowly pour the ½ cup of baking soda into the pot. The water will fizz and rise dramatically. Wait for the foam to settle before adding the dough. Splashes from this water will bleach fabric and irritate skin, so move carefully.
Boil 60 seconds total on the sling
Lower the loaf into the pot using the bread sling, with the loaf still ON the sling. The loaf and sling will float together. Set a timer for 30 seconds. After 30 seconds, use a slotted spoon or spider to flip the loaf (still on the sling) and boil another 30 seconds on the second side. 60 seconds total. No longer.
Lift out and drip briefly
Lift the loaf out using the bread sling. Let it drip for a few seconds. The surface will look slightly wet and slick. That's exactly right. Keep the loaf on the sling. It goes into the Dutch oven on this same sling.
Pro Tip
Hot baking soda water is no joke. Wear long sleeves, keep a towel nearby, and keep kids and pets out of the kitchen for this step.
Precise Timers
Use these interactive timers to track your stages.
First side boil
Second side boil
Shaping
Shape and Variation Options
The base recipe is a plain pretzel boule. Two variations are documented below, both inspired by community bakers who pushed the recipe further.
Candi's Cheddar Method
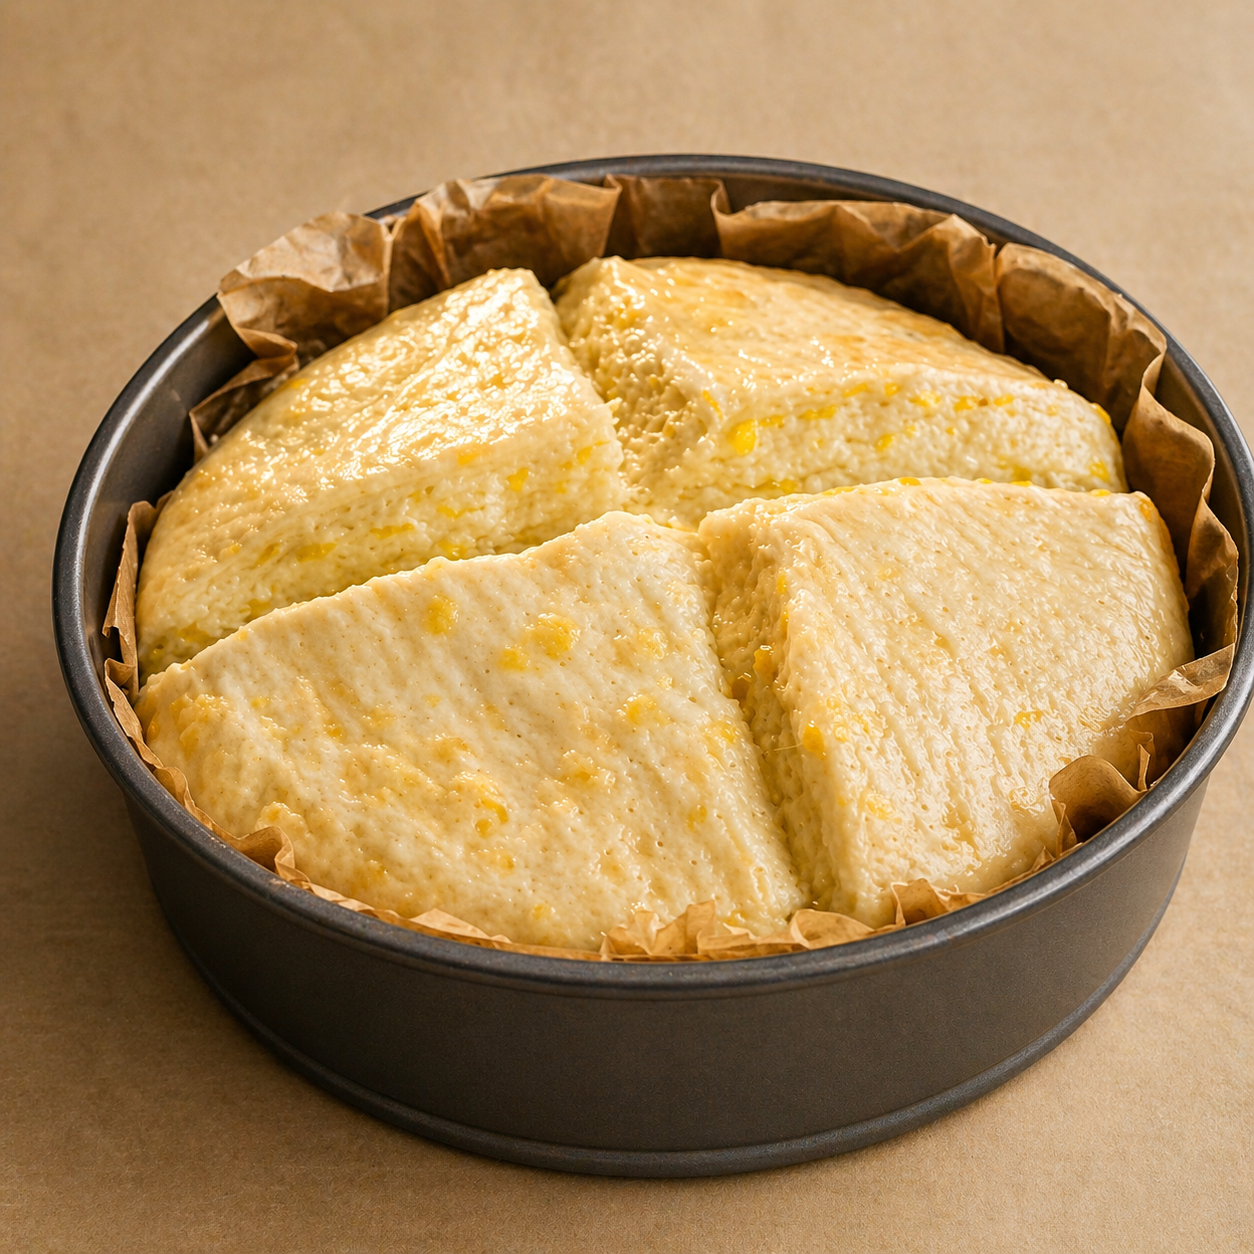
If you're going for the cheddar version, the cheese goes in during the SECOND set of stretch and folds, not at shaping. Scatter 100g (1 cup) of shredded cheddar across the dough, then complete the folds. Some cheese will end up near or at the surface by the time you shape, and that's exactly what you want. Those exposed bits caramelize through the score lines during the boil and bake.
Plain Pretzel Boule
The base recipe as written. Butter and Maldon salt finish.
RecommendedClick each step to mark complete
Follow the base recipe
No additions or substitutions. The pretzel crust and the open sourdough crumb do all the talking.
Cheddar-Stuffed (Candi's Version)
This is the version Candi Brown-McGriff baked when she introduced the recipe to the Academy. The cheese caramelizes through the score lines for a finish that looks like it came out of a German bakery.
Click each step to mark complete
Add shredded cheese during the second stretch and fold
During the second set of stretch and folds in the strength-building phase, scatter 100g (1 cup) of shredded mild or sharp cheddar cheese across the dough. As you complete the folds, the cheese gets distributed throughout the dough rather than layered. This is Candi's actual method and it produces the caramelized cheese-through-the-score-lines finish you see in her bake.
Shape carefully
Shape into a tight boule. Some cheese will be visible near the surface and that's fine. During the boil and bake, exposed cheese caramelizes into the crust, which is what gives this loaf its signature look.
Boil and bake as written
Follow the boil and bake steps as written. The cheese will bubble through any score lines. That's the point.
Everything Topped
Press everything bagel seasoning onto the surface right after the butter wash, while it's still tacky.
Click each step to mark complete
Skip the Maldon salt
After buttering, sprinkle 2 tablespoons of everything bagel seasoning across the top of the loaf instead of flake salt. The seasoning blend already contains salt.
Press lightly
Press the seasoning gently into the butter so it adheres. Cool as written.
Step 7
Bake
The loaf goes straight from the boil into the preheated Dutch oven. Speed matters here. The wet, alkalized surface needs immediate high heat to set the crust.
Step by Step
Add ice cubes to the Dutch oven
Open the preheated Dutch oven. The pre-cut Dutch oven liner should already be in the bottom. Drop 4-5 ice cubes around the edges of the liner (NOT directly on the parchment surface where the loaf will sit). The ice cubes will sit on the hot Dutch oven floor and generate steam during the bake. Even though the loaf is wet from the boil, this extra steam helps oven spring at this lower hydration.
Transfer the loaf to the Dutch oven
Lift the bread sling (with the boiled loaf still on it) and lower the entire sling into the Dutch oven, on top of the liner. The loaf bakes on the sling. The liner underneath separates the loaf from the ice cubes so the cubes can melt and steam without soaking the bottom of the loaf. Cover with the lid immediately.
Bake covered
Bake at 450°F (232°C) for 30 minutes with the lid on.
Rotate and continue
After 30 minutes, rotate the Dutch oven 180 degrees. Bake another 25 minutes covered, or until the loaf reaches an internal temperature of 205-210°F (96-99°C). Total bake time runs 55-60 minutes depending on your oven.
Verify doneness
Use an instant-read thermometer pushed into the side of the loaf. Don't rely on color alone. The pretzel finish makes the crust look done long before the interior is.
Covered bake
Continue covered
The ice cube technique was Candi's call. The wet boiled surface alone doesn't generate enough steam in a covered Dutch oven for proper oven spring at this hydration. A few ice cubes on the hot Dutch oven floor (kept off the loaf by the parchment liner) make a real difference in how the loaf opens up during the bake.
Baking Methods
The only method recommended for this recipe. The post-boil dough needs trapped heat and steam to set the crust properly.
Equipment: Dutch oven with lid, preheated to 450°F (232°C) for 30+ minutes
Preheat with liner
Preheat the Dutch oven (with lid on) at 450°F (232°C) for at least 30 minutes. Place a parchment liner in the bottom of the Dutch oven during the preheat or just before transfer.
Add ice cubes
Drop 4-5 ice cubes around the edges of the parchment liner (not directly on the surface where the loaf will sit). The cubes generate steam during the bake for proper oven spring.
Transfer on the bread sling
Lower the bread sling (with the boiled loaf still on it) into the Dutch oven on top of the liner. Cover immediately.
Covered bake
Bake covered for 30 minutes, rotate the pot 180°, then continue covered for another 25 minutes or until internal temp hits 205-210°F (96-99°C).
"Don't try this on an open baking sheet. The post-boil surface needs the trapped steam of a Dutch oven to develop the pretzel finish properly."
Step 8
Butter and Salt the Crust
The moment the loaf comes out of the oven, brush it with melted butter and sprinkle with flake salt. The hot crust will soak up just enough butter to glisten, and the salt locks on while the surface is tacky.
Click each step to mark complete
Butter immediately
Pull the loaf out of the Dutch oven onto a wire rack. Brush the entire surface with melted butter while the loaf is still hot.
Sprinkle the salt
While the butter is still wet, sprinkle Maldon flake salt across the top of the loaf. Don't be shy. The crust can take it.
Cool completely
Let the loaf cool on a wire rack for at least 1 hour before slicing. Cutting too early will gum the crumb and waste the work you just did.
Nutrition Facts
Per 1 slice (about 70g) • 10 servings per recipe
* Values are estimates based on standard ingredients
Storage
Room Temperature
2-3 days in a paper bag or wrapped in a clean cloth. The pretzel crust stays best at room temp.
Refrigerated
Not recommended. Refrigeration accelerates staling and softens the crust.
Frozen
Up to 3 months. Slice before freezing and toast slices directly from frozen.
Refresh
Toast slices in a toaster or warm a whole loaf at 350°F (175°C) for 8-10 minutes to revive the crust.
Your Feedback
Rate This Recipe
Loading ratings...
Troubleshooting
Baker's Notes
Common questions and solutions for perfect results
If you're serious about scoring, you need the right blade in your hand. Wire Monkey makes handcrafted bread lames from black walnut — built to last, balanced in the hand, and sharp enough to glide through cold dough cleanly every single time. No dragging, no hesitation marks. Just a clean cut.

Wire Monkey Handcrafted Bread Lames
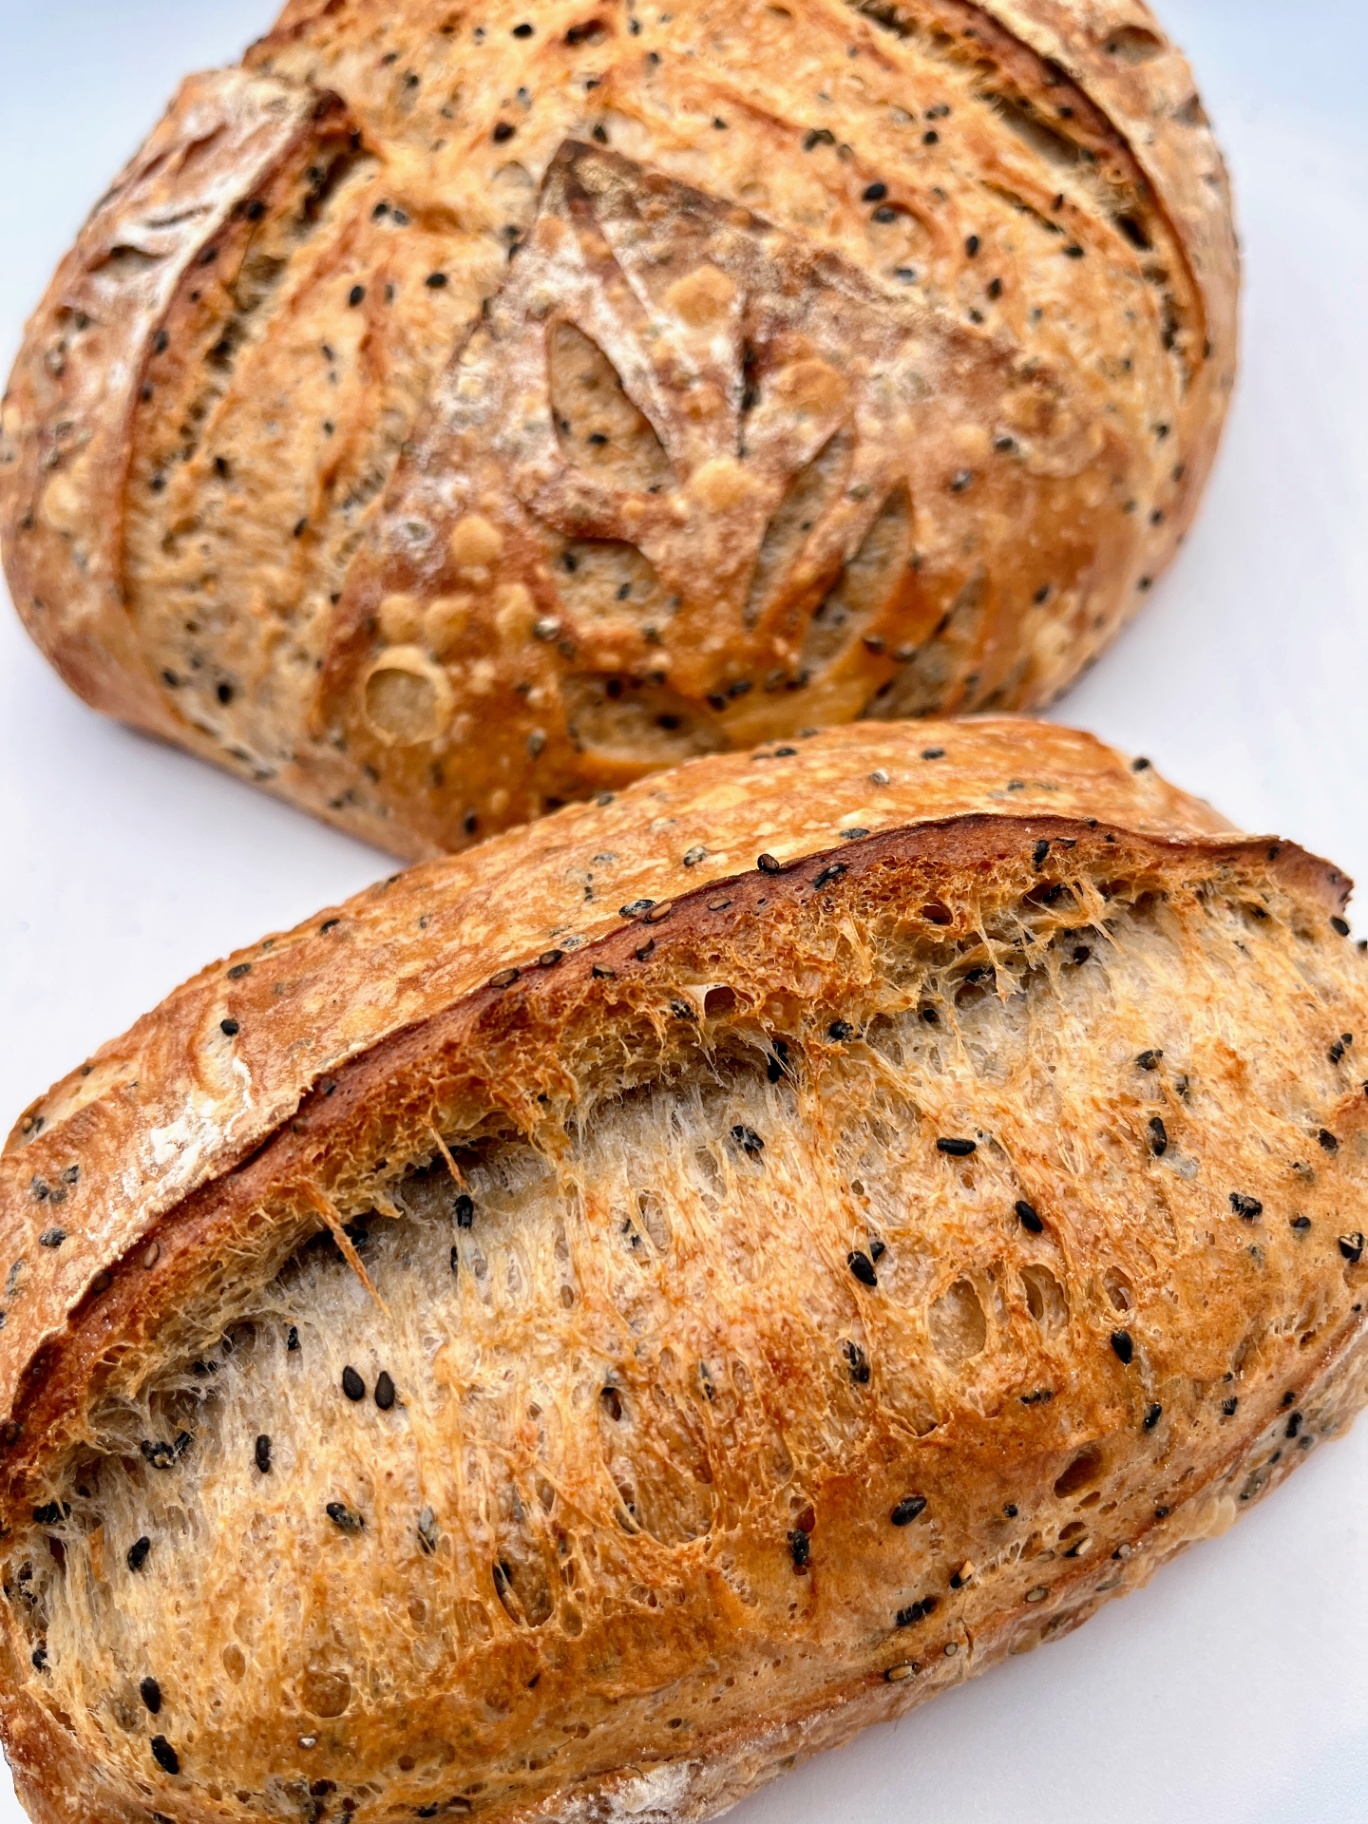
You Might Also Enjoy
More recipes from our pantry that pair well with this bake.
Get More Recipes in Your Inbox
Join thousands of home bakers receiving weekly recipes, tips, and techniques to elevate your bread game.
No spam, ever. Unsubscribe anytime.
More from Baking Great Bread at Home
Tools, resources, and community to help you bake better bread

Crust & Crumb Academy
Go deeper into your craft. FREE courses, challenges, and real feedback. No gatekeeping. Perfection is not required.

Sourdough Starter Companion
Your AI-powered starter assistant. Track feedings, troubleshoot issues, and keep your starter thriving.

BakingGreatBread.com
Real bread for the rest of us

Baking Great Bread Blog
Recipes, tips, and stories from the bread journey

Recipe Converter
Convert sourdough recipes to yeast and back again

Crust & Crumb App
Your AI-powered baking assistant

Facebook Community
Join 50,000+ bakers sharing, learning, and supporting each other

Sourdough for the Rest of Us
Free beginner's guide to sourdough