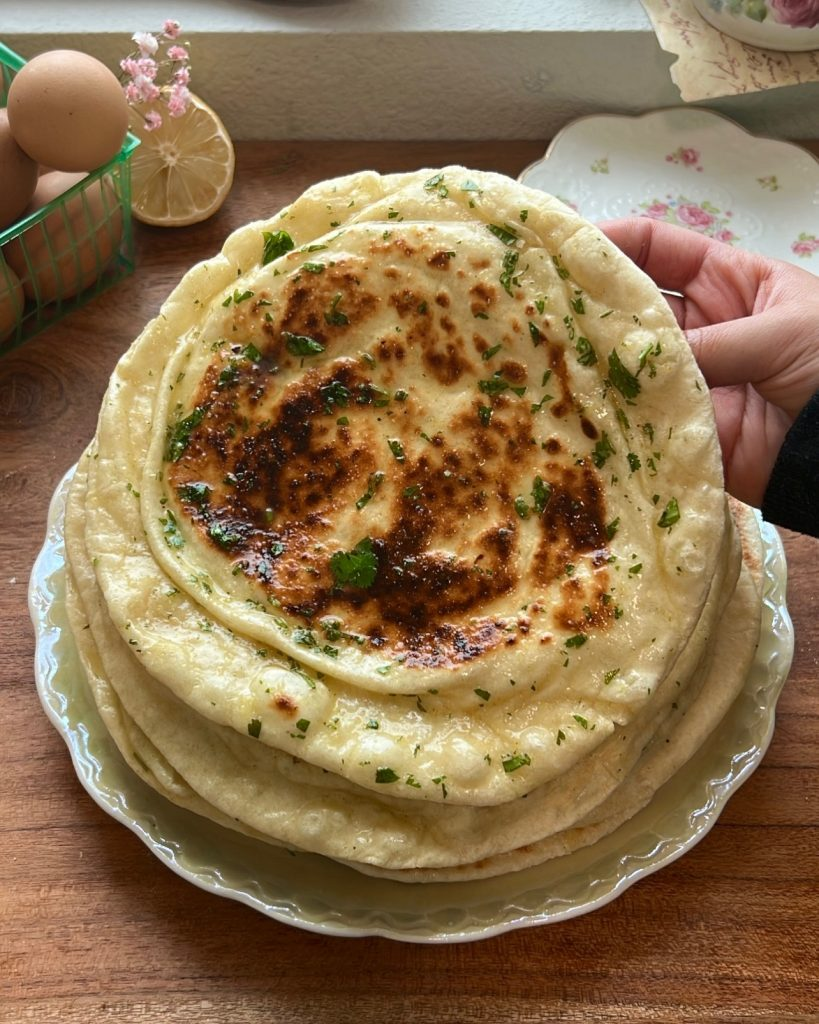
No yeast, no starter, no waiting — just great flatbread in 30 minutes
BeginnerSelf-Rising NaanBread
by Henry Hunter Jr.
The fastest path to homemade flatbread.
Rise Time
15 minutes rest
Bake Time
4-6 minutes per naan
Yield
Serves 4-6

Perfection is not required
"Perfection is not required. Progress is."— Henry Hunter Jr.
By Henry Hunter Jr., founder of Crust & Crumb Academy and Baking Great Bread at Home.
Authentic Bread Flavor
Henry Hunter Jr. is the founder of Baking Great Bread at Home and Crust & Crumb Academy. This recipe is part of the Road to Sourdough arc — a 3-week curriculum teaching home bakers how leavening actually works by baking the same bread three different ways.
Equipment Needed
Ingredients
The Dough
If you don't have self-rising flour, make your own: whisk together 240g (2 cups) all-purpose flour, 9g (2 teaspoons) baking powder, and 3g (½ teaspoon) salt. That's it.
Garlic Butter Finish
Optional but highly recommended. Brush on the moment each naan comes off the pan.
Pro Tip
Full-fat Greek yogurt is not negotiable here. Fat-free yogurt makes the dough sticky, hard to roll, and the finished naan rubbery. Use the real thing.
Mix
Mix the Dough
5 minutes
This dough comes together fast. The acid in the yogurt reacts with the in the self-rising flour to create lift — no yeast, no waiting for fermentation. It's chemistry doing the work.
Watch the Technique
Video by Oliver Wing — chef, cooking instructor, and founder of Cooking with Ollie on Skool.
Click each step to mark complete
Combine flour and yogurt
Add the self-rising flour and salt (if using AP flour) to a mixing bowl. Add the Greek yogurt and olive oil. Mix with a fork or your hands until a shaggy dough forms, then knead in the bowl for about 1 minute until it comes together into a smooth ball. If the dough is sticky, add flour 1 tablespoon at a time. If it's crumbly and dry, add yogurt 1 teaspoon at a time.
Pro Tip
Don't over-knead this dough. Unlike yeasted breads where you're building gluten structure over time, this dough just needs to come together. 1-2 minutes of kneading is enough.
The Chemistry
Self-rising flour contains baking powder, which is a combination of a base (baking soda) and an acid (cream of tartar or similar). When you add Greek yogurt — which is itself acidic — you get an additional acid-base reaction that produces carbon dioxide bubbles in the dough. Those bubbles, combined with the steam from the yogurt's water content when it hits the hot pan, are what create the blistered, puffy pockets you're looking for.
Why Greek Yogurt Specifically
Greek yogurt is strained, which means it's thicker and more acidic than regular yogurt. That acidity drives a stronger leavening reaction with the baking powder. Regular yogurt works in a pinch, but drain it first in a cheesecloth or fine-mesh strainer for 30 minutes to remove excess liquid. Sour cream is the best direct substitute — same fat content, similar acidity.
The Takeaway
No yeast needed. The yogurt's acidity and the baking powder's chemistry do the lifting.
Rest
Rest the Dough
15 minutes — the step everyone skips and shouldn't
Cover the dough ball with a clean kitchen towel or plastic wrap and let it sit at room temperature for 15 minutes. This is the step that separates chewy, easy-to-roll naan from stiff, cracking dough.
Click each step to mark complete
Cover and rest
Cover the dough and set a timer for 15 minutes. Don't skip this. The rest gives the strands time to relax, which makes rolling dramatically easier. It also gives the baking powder a head start activating before heat hits the pan.
⏱ Wait Time
15 minutes
Pro Tip
While the dough rests, melt the butter with the minced garlic in a small pan over low heat or in the microwave. You want it ready to brush the moment each naan comes off the skillet.
Precise Timers
Use these interactive timers to track your stages.
Dough Rest
Heat
Get the Pan Screaming Hot
This is the most important step in the whole recipe
Place your cast-iron skillet or heaviest pan over medium-high heat and let it preheat for at least 3-4 minutes. You want the pan hot enough that a drop of water sizzles and evaporates instantly.
Click each step to mark complete
Preheat the skillet
Set your cast-iron skillet over medium-high heat. Let it sit for 3-4 minutes untouched. Test the heat by flicking a few drops of water onto the surface — they should dance and evaporate in under a second. If they sit there steaming, the pan isn't hot enough yet. Do not add oil or butter to the pan. You want a dry, hot surface.
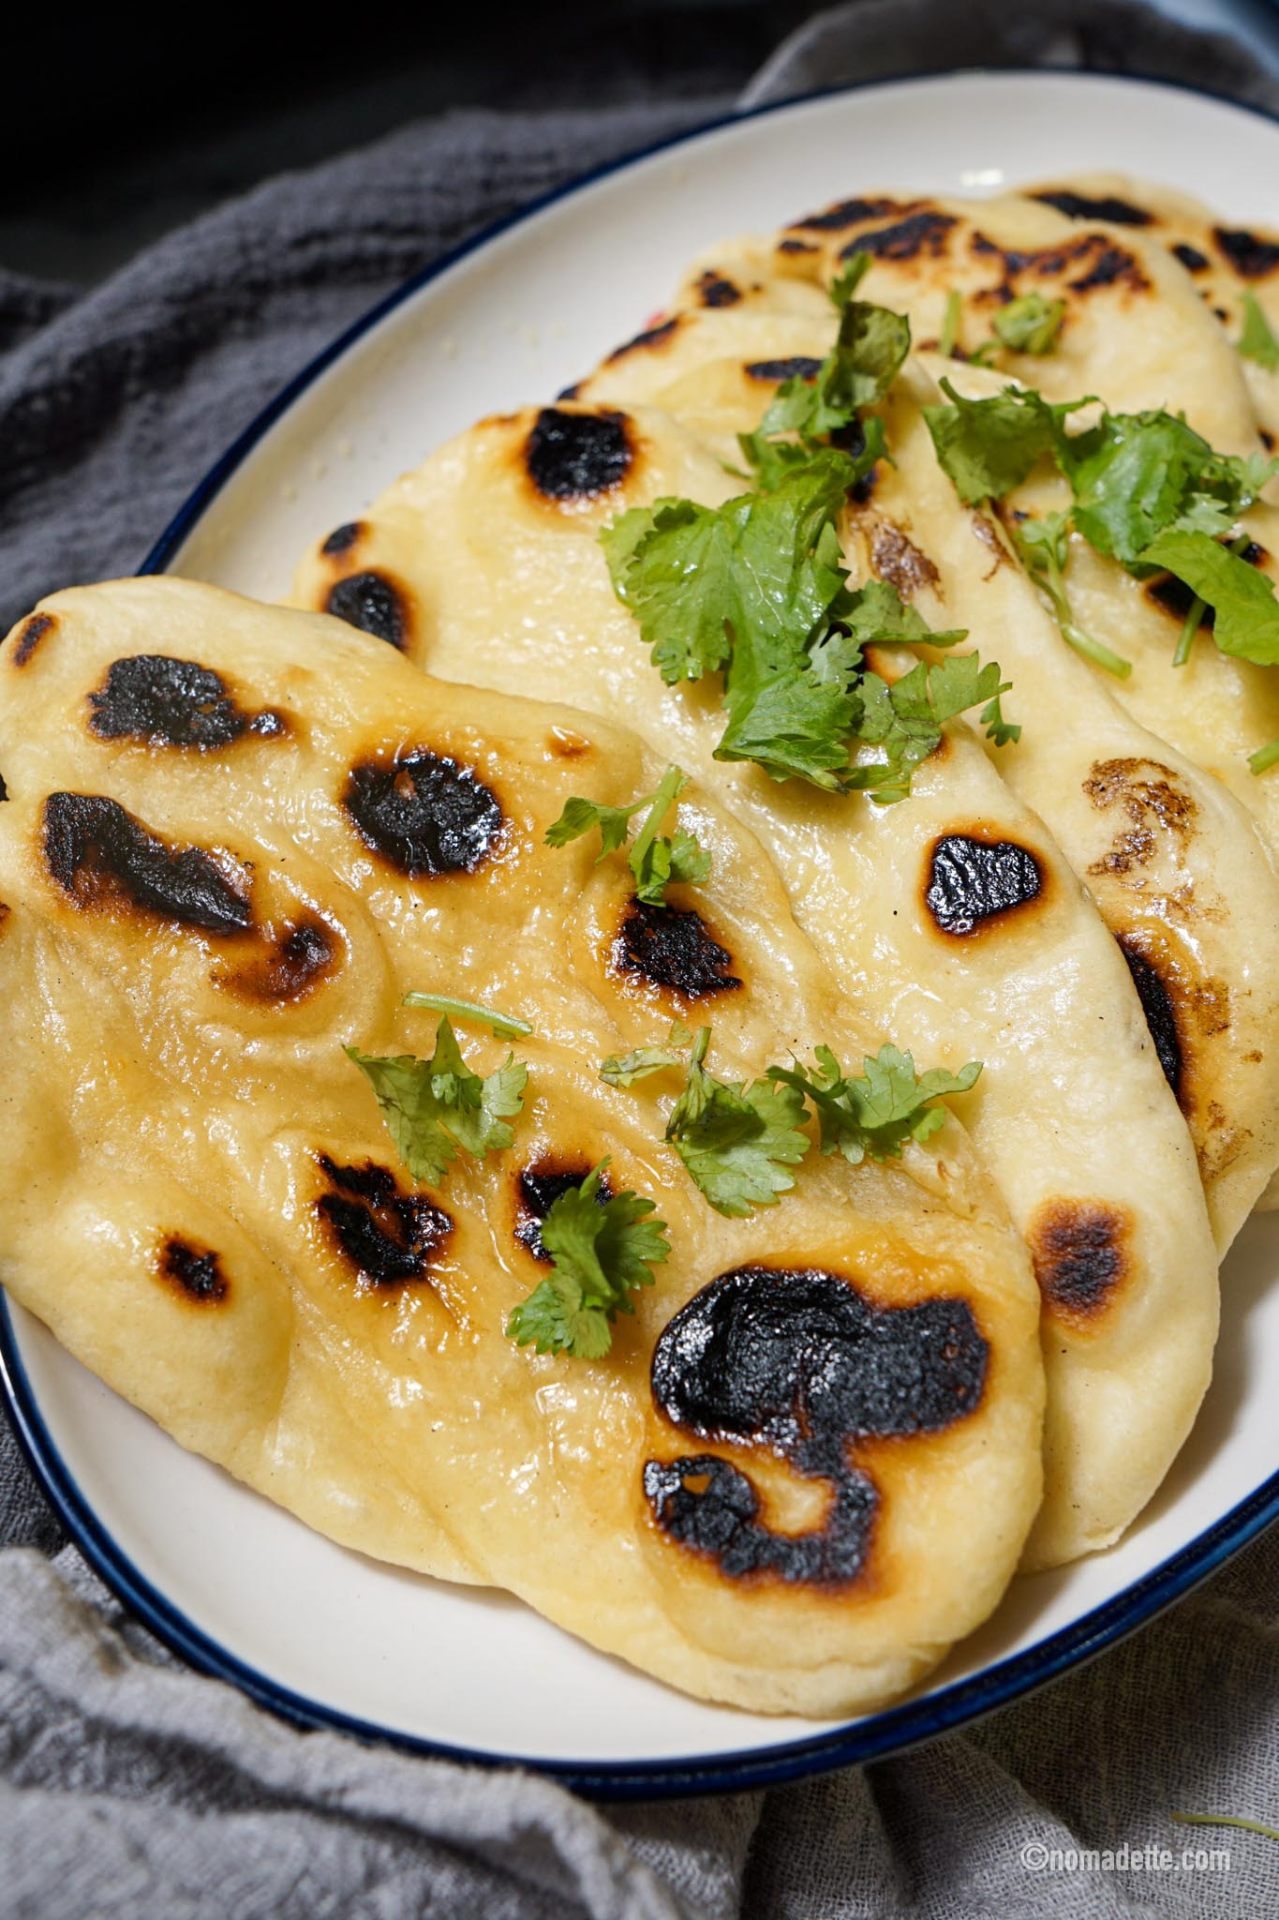
The Bubble Mechanism
Those gorgeous charred blisters on restaurant naan happen because the surface of the dough hits an extremely hot surface and the moisture inside turns to steam instantly. That steam has nowhere to go except up — it pushes through the soft gluten structure and creates a bubble. The gluten sets around that bubble before the steam escapes. Too low a temperature and the moisture evaporates slowly instead of creating pressure. You get flat, dry bread instead of blistered naan.
The Takeaway
A screaming hot, dry pan is the single biggest factor in getting restaurant-quality blisters. Don't rush the preheat.
Precise Timers
Use these interactive timers to track your stages.
Pan Preheat
Cook
Roll and Cook
4-6 minutes per naan
Divide, roll thin, and cook fast. Naan doesn't need long on the heat — it needs high heat for a short time.
Click each step to mark complete
Divide the dough
Turn the rested dough onto a lightly floured surface. Divide it into 6 equal pieces, roughly 70g each. Roll each piece into a smooth ball. Cover the ones you're not working with to keep them from drying out.
Roll each piece thin
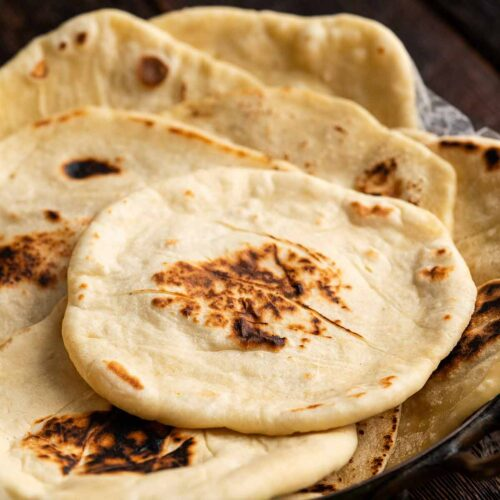
Lightly flour your surface and rolling pin. Roll each dough ball into an oval or teardrop shape, about 3-4mm thick (roughly ⅛ inch). Don't roll it too thick — thicker naan won't blister properly and can end up doughy in the center. The shape doesn't matter. Naan is supposed to look hand-made.
Cook the first side
Lay one rolled naan onto the dry, hot skillet. Cook for 2-3 minutes without touching it. You're looking for bubbles forming on the surface and the underside turning golden-brown with char spots. If it's not bubbling after 90 seconds, your pan isn't hot enough.
Flip and finish
Flip the naan and cook the second side for 1-2 minutes. The second side cooks faster. You want char spots and a fully cooked through center — press gently in the middle; it should feel firm, not doughy.
Garlic butter finish
The moment the naan comes off the pan, brush both sides generously with the garlic butter. Don't wait — the residual heat opens the surface and lets the butter soak in rather than sitting on top. Stack finished naans under a clean towel to keep them soft while you cook the rest.
Pro Tip
Cook one naan at a time unless your pan is very large. Crowding the pan drops the temperature and you lose the blistering effect.
Precise Timers
Use these interactive timers to track your stages.
First Side
Second Side
Shaping
Shaping Your Naan
Naan doesn't have a precise shape — that's part of the charm. Aim for an oval or teardrop, about 3-4mm thick.
Classic Oval
The traditional naan shape. Roll from the center outward, rotating the dough as you go.
RecommendedClick each step to mark complete
Start from center
Place the dough ball on a lightly floured surface. Press it flat with your palm first, then use a rolling pin from the center outward.
Rotate and roll
Rotate the dough 90 degrees and roll again. Repeat until you have an oval roughly 20-25cm long and 3-4mm thick.
Don't overthink it
Slight variations in thickness create more interesting char patterns on the skillet. Rustic is good.
Teardrop
Pull one end of the oval slightly longer for the classic teardrop shape you see in Indian restaurants.
Click each step to mark complete
Roll oval first
Follow the classic oval method above.
Stretch one end
Gently pull one end of the oval to create a tapered point. The wider end goes in the center of the pan.
Proof Test: The dough should be smooth and slightly tacky but not sticky. If it sticks to your fingers and won't release cleanly, dust with a little more flour.
The Final Step
Cook on the Stovetop
Naan cooks on the stovetop, not in the oven. High heat, dry pan, short cook time.
Baking Methods
The best option. Cast iron holds heat evenly and gets hot enough to create proper blistering.
Equipment: 10-12 inch cast-iron skillet
Preheat dry
Heat cast iron over medium-high for 3-4 minutes until a drop of water sizzles and vanishes immediately.
Cook first side
Cook 2-3 minutes until bubbles form on the surface and the underside has golden char spots.
Flip and finish
Cook second side 1-2 minutes. Remove and brush immediately with garlic butter.
"No oven needed. The stovetop is the right tool for this bread — high direct heat from below is what creates the blistered surface and soft interior."
Nutrition Facts
Per 1 naan • 6 servings per recipe
* Values are estimates based on standard ingredients
Storage
Room Temperature
2-3 days wrapped in a clean kitchen towel or stored in a zip-top bag at room temperature. Don't refrigerate — it accelerates staling.
Frozen
Up to 2 months. Stack cooled naans with parchment between each one and freeze in a zip-top bag.
Refresh
Reheat in a dry skillet over medium heat for 1 minute per side, or wrap in a damp paper towel and microwave for 20-30 seconds.
Your Feedback
Rate This Recipe
Loading ratings...
Troubleshooting
Baker's Notes
Common questions and solutions for perfect results
You Might Also Enjoy
More recipes from our pantry that pair well with this bake.

Get More Recipes in Your Inbox
Join thousands of home bakers receiving weekly recipes, tips, and techniques to elevate your bread game.
No spam, ever. Unsubscribe anytime.
More from Baking Great Bread at Home
Tools, resources, and community to help you bake better bread

Crust & Crumb Academy
Go deeper into your craft. FREE courses, challenges, and real feedback. No gatekeeping. Perfection is not required.

Sourdough Starter Companion
Your AI-powered starter assistant. Track feedings, troubleshoot issues, and keep your starter thriving.

BakingGreatBread.com
Real bread for the rest of us

Baking Great Bread Blog
Recipes, tips, and stories from the bread journey

Recipe Converter
Convert sourdough recipes to yeast and back again

Crust & Crumb App
Your AI-powered baking assistant

Facebook Community
Join 50,000+ bakers sharing, learning, and supporting each other

Sourdough for the Rest of Us
Free beginner's guide to sourdough