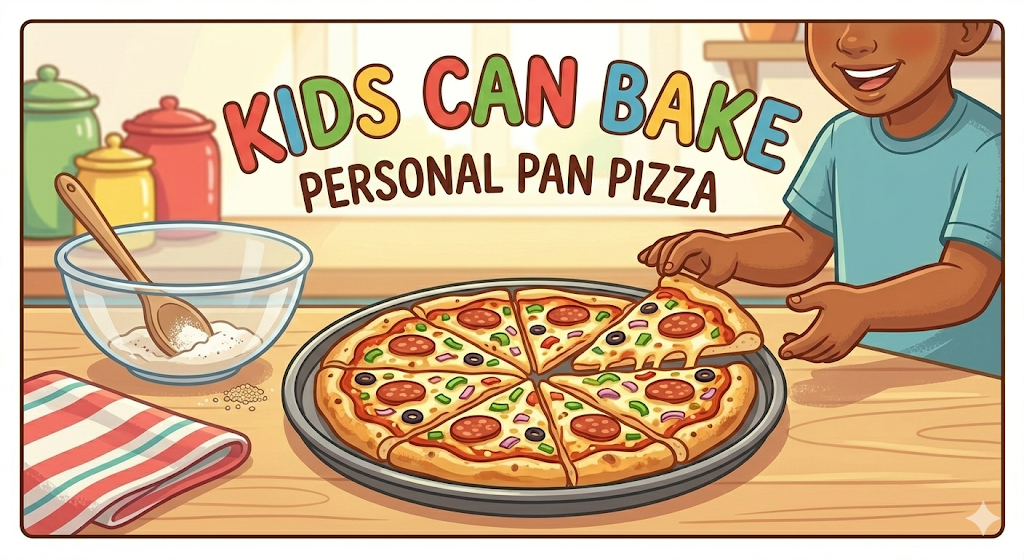
A Real Pizza Made by Real Kids, from Scratch
BeginnerKids Can Bake: Personal PanPizza
by Henry Hunter Jr.
Your first pizza, made with your own two hands
Rise Time
1 hour
Bake Time
12-15 minutes
Yield
One 10-inch personal pan pizza per person

Perfection is not required
"Perfection is not required. Progress is."— Henry Hunter Jr.
By Henry Hunter Jr., founder of Crust & Crumb Academy and Baking Great Bread at Home.
Authentic Flavor
Henry Hunter Jr. is the founder of Crust & Crumb Academy and Baking Great Bread at Home. He's been teaching people to bake bread for years, and believes every kid deserves to know what real food tastes like.
Equipment Needed
Ingredients
Pizza Dough (per person)
Each kid makes their own dough in their own bowl. No sharing, no dividing. This is YOUR pizza.
No-Cook Pizza Sauce (makes enough for 4-5 pizzas)
This sauce takes 2 minutes and tastes better than anything from a jar. An adult can make one batch for the whole group.
Cooked Pizza Sauce (makes enough for 4-5 pizzas)
If you have stovetop access and a little more time, this sauce has deeper flavor. An adult should handle the stove.
Toppings (pick what you like!)
This is the fun part. Set up a topping bar and let everyone build their own.
Pro Tip
Warm water means comfortable to touch, like bath water. If it's too hot for your finger, it's too hot for the yeast. Yeast is alive, and hot water kills it.
Step 1
Wake Up the Yeast
This is where the magic starts
Yeast is a tiny living thing, smaller than you can see. When you give it warm water and a little sugar, it wakes up and starts making bubbles. Those bubbles are what make your dough rise and your crust puffy. Think of it like feeding a pet: warm water is its bath, sugar is its snack.
Click each step to mark complete
Add warm water to your bowl
Pour ½ cup of warm water into your mixing bowl. It should feel like warm bath water when you dip your finger in. Not hot. Not cold. Just warm.
Add the sugar and yeast
Sprinkle 1 teaspoon of sugar and 1 teaspoon of instant yeast on top of the water. Give it a little stir with your fork. Now wait 5 minutes. You should see it start to bubble and foam. That means your yeast is alive and hungry. If nothing happens after 5 minutes, your water might have been too hot or too cold. Try again with fresh water.
⏱ Wait Time
Wait about 5 minutes until you see bubbles and foam on top
Pro Tip
If your yeast doesn't bubble, don't panic. It might be old yeast, or the water was too hot. Start over with a new teaspoon of yeast and water that's just warm to the touch.
Yeast Is a Living Organism
Yeast is a single-celled fungus. When you add warm water and sugar, it wakes up and starts eating the sugar. As it eats, it burps out carbon dioxide gas (that's the bubbles!) and a tiny bit of alcohol (that bakes away in the oven). This process is called . It's the same thing that makes bread rise, and it's been used by bakers for thousands of years.
The Takeaway
The bubbles in your bowl are yeast burps. Seriously. And those burps are what make your pizza crust light and airy.
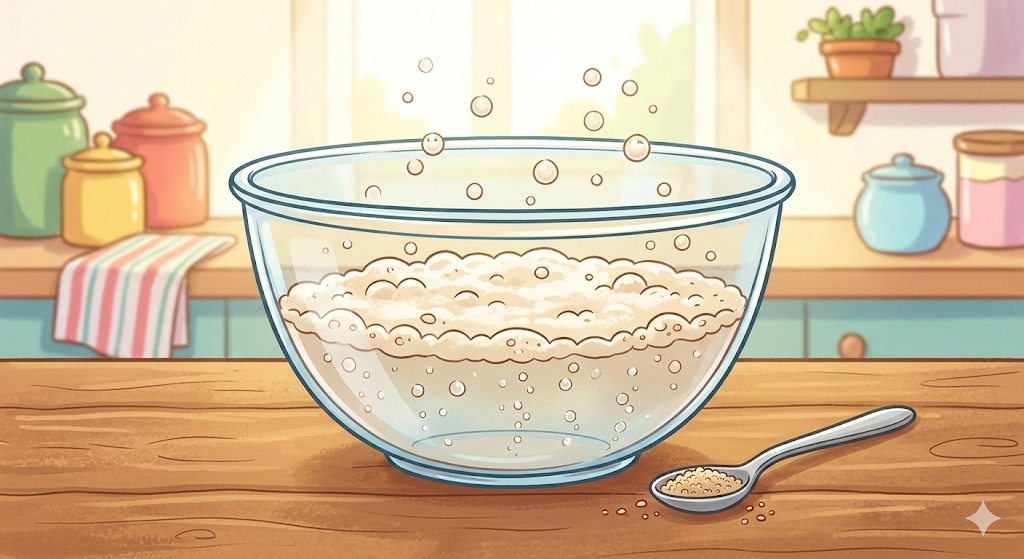
See the bubbles? Your yeast is awake!
Precise Timers
Use these interactive timers to track your stages.
Yeast Bloom
Step 2
Mix Your Dough
Hands in!
Now we turn those bubbly yeast water into real pizza dough. No mixer needed. Your hands are the best tools you own.
Click each step to mark complete
Add the olive oil and salt
Pour 2 teaspoons of olive oil into your yeast water. Then add ½ teaspoon of salt. Give it a quick stir.
Add the flour, a little at a time
Scoop 1¼ cups of all-purpose flour. Add about half of it to your bowl and stir with a fork until it gets thick and shaggy. Then add the rest and keep stirring. When the fork stops working, it's time for your hands.
Knead the dough
Dust your clean table or countertop with a tiny bit of extra flour. Dump your dough out and start kneading. Push it away from you with the heel of your hand, fold it back toward you, turn it a quarter turn, and do it again. Keep going for about 5 minutes. Your dough should go from rough and sticky to smooth and a little stretchy. If it sticks to your hands, add just a tiny pinch of flour. Don't go crazy with extra flour, a little sticky is normal.
Pro Tip
Kneading is like giving your dough a massage. Push, fold, turn. Push, fold, turn. You'll feel the dough change under your hands. It goes from rough and lumpy to smooth and bouncy. That's building, and it's what gives your crust its chew.
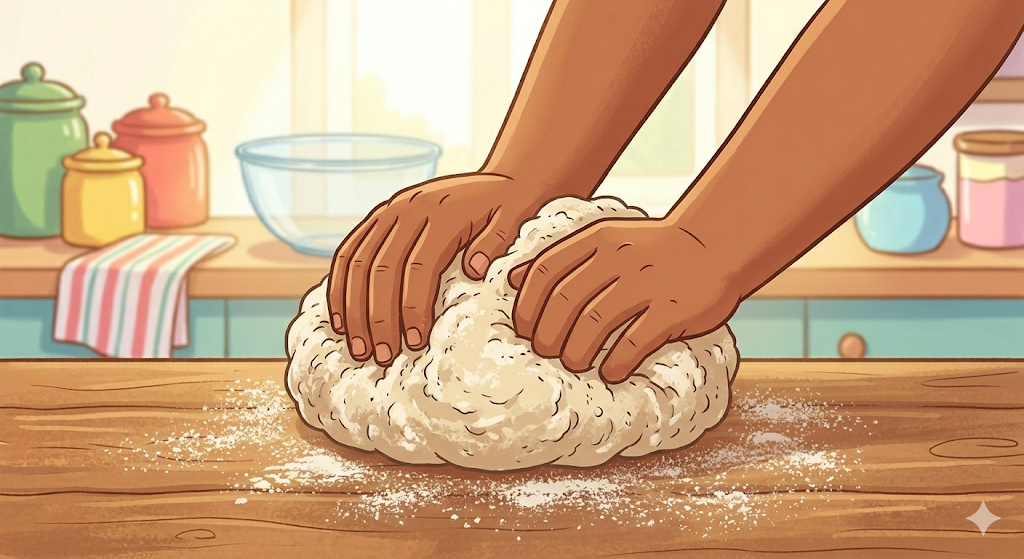
Push, fold, turn. You got this.
Precise Timers
Use these interactive timers to track your stages.
Kneading
Step 3
Let It Rise
Patience is part of baking
Your dough needs time to rest and grow. The yeast is still working inside, making bubbles that will puff up your crust. Put a little olive oil in your bowl, set your dough ball in it, and cover it with a clean towel or plastic wrap. Find a warm spot and wait.
Click each step to mark complete
Oil the bowl and cover the dough
Put a tiny drizzle of olive oil in your bowl and roll your dough ball around in it so it doesn't dry out. Cover the bowl with a clean towel or plastic wrap.
Wait for it to double in size
Set the bowl somewhere warm. Near a sunny window, on top of the stove (not turned on), or just on the counter. In about 45 minutes to 1 hour, your dough should be about twice as big as when you started. It'll look puffy and soft.
⏱ Wait Time
Let the dough rise until doubled, about 45 minutes to 1 hour
Trapped Gas
Remember those yeast burps from earlier? The yeast is still eating sugar (now from the flour itself) and making carbon dioxide gas. But now that gas is trapped inside the stretchy network you built by kneading. The gas blows up tiny pockets in the dough, like inflating hundreds of tiny balloons. That's why it gets bigger. When you bake it, those bubbles set in place and become the air holes in your crust.
The Takeaway
Rising dough is just yeast blowing bubbles inside a stretchy gluten net. The longer it rises, the more flavor it develops.

Before and after: the yeast did its job!
Precise Timers
Use these interactive timers to track your stages.
Dough Rising
Step 4
Make the Sauce
While your dough rises, let's make sauce
Good pizza starts with good sauce. You have two choices here. The no-cook version takes 2 minutes and an adult can make one batch for everyone. The cooked version takes 15 minutes and has a deeper flavor, but needs a stove. Both are way better than anything from a jar.
Click each step to mark complete
No-Cook Sauce (fastest option)
In a bowl, combine 1¾ cups crushed tomatoes, 1 tablespoon olive oil, ½ teaspoon garlic powder, ½ teaspoon dried oregano, ½ teaspoon salt, and ½ teaspoon sugar. Stir it up. Done. Each pizza needs about 3 tablespoons of sauce.
Cooked Sauce (deeper flavor, adult helps with stove)
Heat 1 tablespoon olive oil in a small pot over medium heat. Add 2 minced garlic cloves (or 1 teaspoon garlic powder) and stir for 30 seconds. Don't let it burn. Add 1¾ cups crushed tomatoes, ½ teaspoon dried basil, ½ teaspoon dried oregano, ½ teaspoon sugar, and ½ teaspoon salt. Stir, lower the heat, and let it simmer for 10 minutes. Let it cool before using.
Pro Tip
No-cook sauce is perfect for classrooms where you don't have a stove. Nobody will know the difference once it's baked.
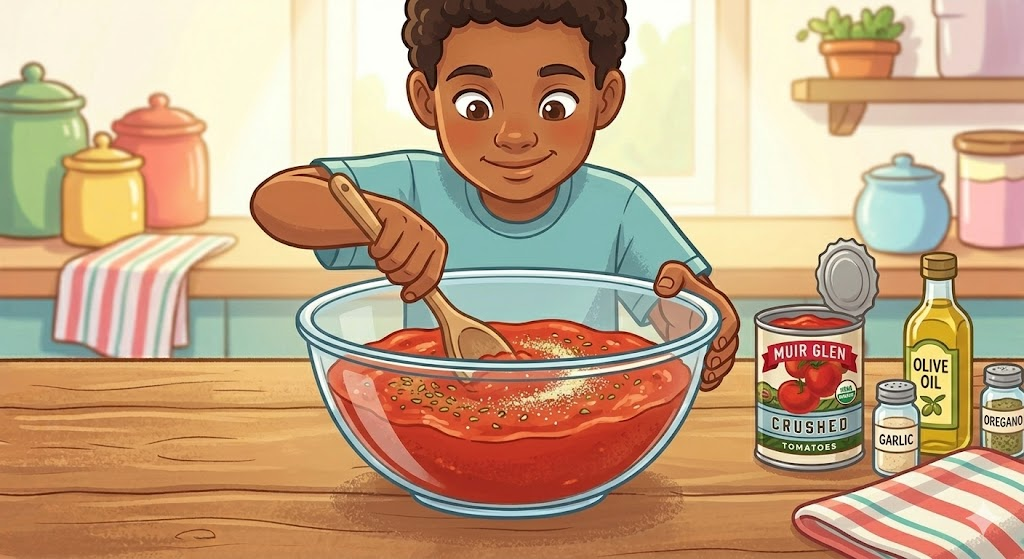
Two minutes. Better than anything from a jar.
Precise Timers
Use these interactive timers to track your stages.
Cooked Sauce Simmer
Step 5
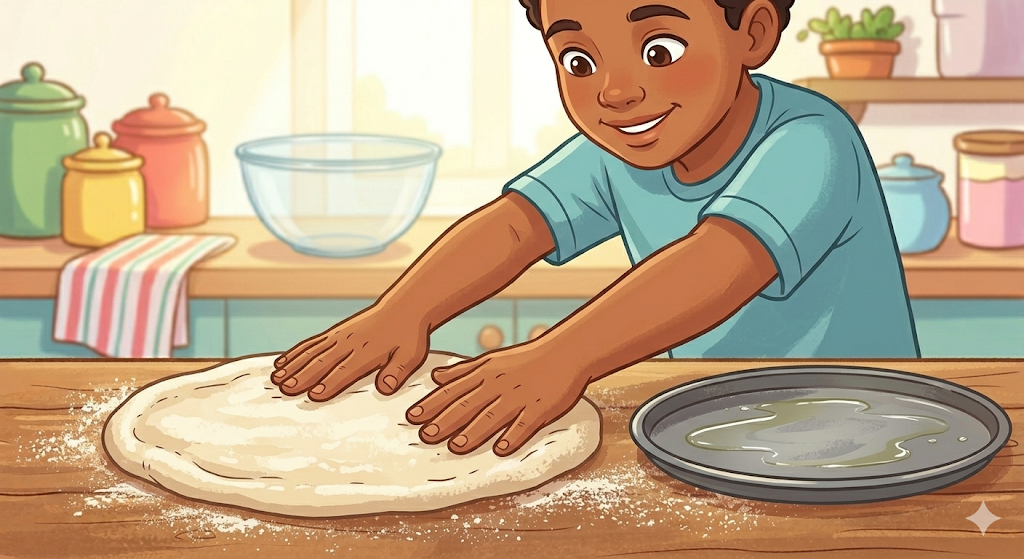
Shape Your Pizza
This is where it becomes YOUR pizza
Now for the best part. You're going to take that puffy dough ball and turn it into a pizza. No rolling pin needed, your hands do all the work.
Click each step to mark complete
Punch down the dough (gently!)
Make a fist and press it into the center of your risen dough. You'll hear the air hiss out. That's satisfying. Now pull the dough out of the bowl and set it on a lightly floured surface.
Press it flat
Using your fingertips, press the dough out into a flat circle. Start from the middle and push outward. Turn it as you go. Don't worry about making it perfectly round. Real pizza isn't a perfect circle. It should be about as wide as your pizza pan, roughly 10 inches across.
Transfer to the pan
Lightly oil your pizza pan or baking sheet. Carefully lift your dough and lay it on the pan. If it shrinks back, let it rest for 2 minutes and try again. The gluten just needs to relax.
Build a crust edge
Use your fingers to push up a small rim around the edge, about half an inch. This becomes your crust border. Some people like a thick crust, some like thin. You decide.
Fingertips, not fists. Push from the center out.
Step 6
Top Your Pizza
Build it your way
Here's the rule: sauce first, then cheese, then toppings. That's it. There are no wrong answers after that.
Click each step to mark complete
Spread the sauce
Spoon about 3 tablespoons of sauce onto the center of your dough. Use the back of the spoon to spread it in circles, leaving about a half inch at the edge for your crust. Don't drown it. A thin, even layer is all you need.
Add the cheese
Sprinkle ½ cup of shredded mozzarella evenly over the sauce. Try to get it all the way to the edge of the sauce, but not on the crust rim.
Add your toppings
Now the fun part. Lay your toppings on top of the cheese. Pepperoni, peppers, mushrooms, olives, whatever you like. Don't pile them too high or the center won't cook through. Spread them out evenly.
Pro Tip
Less is more with toppings. A pizza piled 3 inches high looks cool but ends up soggy in the middle. Pick 2-3 toppings and spread them evenly.
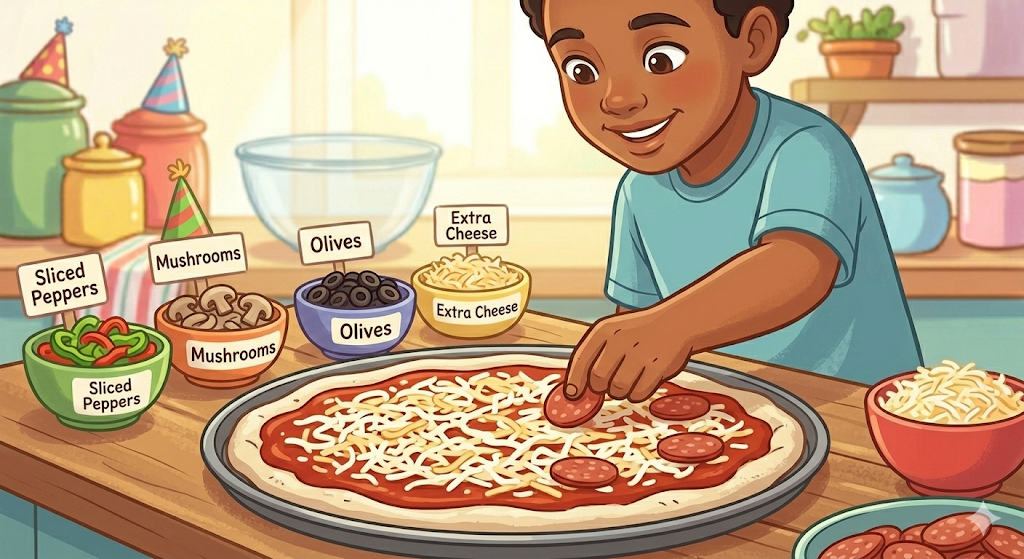
Sauce, cheese, toppings. In that order.
Shaping
Shape Your Pizza
No rolling pin? No problem. Your hands are the best pizza-shaping tools ever made.
Hand-Stretched Round
The classic. Press and stretch with your fingertips for a rustic, real-deal pizza shape.
RecommendedClick each step to mark complete
Press from the center
Set your dough on a lightly floured surface. Press your fingertips into the center and push outward, rotating as you go.
Stretch to size
Pick the dough up and let gravity help stretch it. Hold it at the edge with both hands and rotate slowly, letting it hang. Lay it on the oiled pan when it's about 10 inches across.
Build the rim
Push up a small border around the edge with your fingertips, about half an inch high.
Free-Form Shape
Oval, rectangle, blob. It all tastes the same. Let kids make whatever shape they want.
Click each step to mark complete
Press it any shape you want
There's no wrong shape. Square, oval, heart, dinosaur. Just keep it about the same thickness all over so it bakes evenly.
Proof Test: Press your finger gently into the edge of the dough. If it springs back slowly, it's ready to shape. If it snaps back fast, let it rest a few more minutes.
Step 7
Bake Your Pizza
This is the moment. Your pizza goes into a hot oven and comes out as actual pizza. An adult should handle putting it in and taking it out.
Step by Step
Preheat the oven
An adult should preheat the oven to 450°F (230°C). The oven needs to be fully hot before the pizza goes in. This takes about 15-20 minutes. If your oven goes higher, 475°F (245°C) is even better.
Bake it
An adult places the pizza in the oven on the middle rack. Bake for 12-15 minutes. You're looking for the cheese to be melted and bubbly, and the crust edges to be golden brown.
Let it cool (the hardest part)
An adult takes the pizza out with oven mitts. Let it sit on the pan for 3-5 minutes before cutting. The cheese is lava-hot right out of the oven. Waiting a few minutes keeps you from burning the roof of your mouth.
Preheat Oven
Bake Pizza
Cool Down
Every oven is different. Start checking at 10 minutes. The bottom of the crust should be lightly golden when you lift the edge with a spatula.
Baking Methods
The simplest method. Works in any kitchen, any classroom, any oven.
Equipment: Round pizza pan or flat baking sheet, lightly oiled
Preheat
Preheat oven to 450°F (230°C) for at least 15-20 minutes. If you have a pizza stone, put it in the oven while it preheats.
Bake
Place pizza on middle rack. Bake 12-15 minutes until cheese is bubbly and crust is golden.
Cool
Remove with oven mitts. Let cool on the pan for 3-5 minutes before slicing.
"An adult must handle the oven. No exceptions. Hot ovens and kids don't mix without supervision."
Nutrition Facts
Per 1 personal pizza (dough + sauce + cheese) • 1 servings per recipe
* Values are estimates based on standard ingredients
Storage
Room Temperature
Leftover pizza keeps at room temperature for a few hours. Best eaten fresh.
Frozen
Wrap individual slices in plastic wrap, then foil. Freeze up to 1 month. Reheat in a 375°F (190°C) oven for 5-7 minutes.
💡 The microwave works but makes the crust soft. Oven reheating is always better.
Your Feedback
Rate This Recipe
Loading ratings...
Troubleshooting
Baker's Notes
Common questions and solutions for perfect results
If you're serious about scoring, you need the right blade in your hand. Wire Monkey makes handcrafted bread lames from black walnut — built to last, balanced in the hand, and sharp enough to glide through cold dough cleanly every single time. No dragging, no hesitation marks. Just a clean cut.

Wire Monkey Handcrafted Bread Lames
You Might Also Enjoy
More recipes from our pantry that pair well with this bake.


Get More Recipes in Your Inbox
Join thousands of home bakers receiving weekly recipes, tips, and techniques to elevate your bread game.
No spam, ever. Unsubscribe anytime.
More from Baking Great Bread at Home
Tools, resources, and community to help you bake better bread

Crust & Crumb Academy
Go deeper into your craft. FREE courses, challenges, and real feedback. No gatekeeping. Perfection is not required.

Sourdough Starter Companion
Your AI-powered starter assistant. Track feedings, troubleshoot issues, and keep your starter thriving.

BakingGreatBread.com
Real bread for the rest of us

Baking Great Bread Blog
Recipes, tips, and stories from the bread journey

Recipe Converter
Convert sourdough recipes to yeast and back again

Crust & Crumb App
Your AI-powered baking assistant

Facebook Community
Join 50,000+ bakers sharing, learning, and supporting each other

Sourdough for the Rest of Us
Free beginner's guide to sourdough