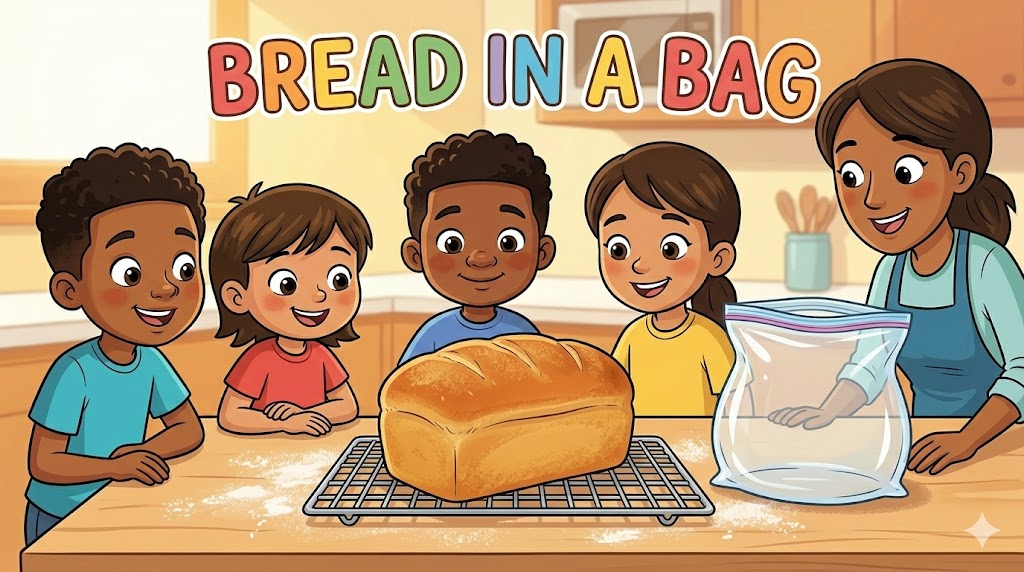
Squish, Shake, and Bake Your First Loaf of Real Bread
BeginnerKids Can Bake: Bread in aBag
by Henry Hunter Jr.
Your first loaf of bread, made inside a bag
Rise Time
45 minutes
Bake Time
25 minutes
Yield
1 small loaf (about 8 slices)

Perfection is not required
"Perfection is not required. Progress is."— Henry Hunter Jr.
By Henry Hunter Jr., founder of Crust & Crumb Academy and Baking Great Bread at Home.
Authentic Bread Flavor
Henry Hunter Jr. is the founder of Crust & Crumb Academy and Baking Great Bread at Home. He's been teaching people to bake bread for years, and believes every kid deserves to know what real food tastes like.
Equipment Needed
Ingredients
Stage 1: The Yeast Batter
This goes in the bag first. The yeast activates in warm water with sugar and a little flour, creating a bubbly batter you can see through the bag.
Stage 2: The Rest of the Dough
After the yeast gets going, you add the rest of the ingredients to the same bag and squish until it becomes real dough.
For the Pan
A little oil or butter to keep the bread from sticking.
Pro Tip
Use a heavy-duty freezer bag, not a regular sandwich bag. Regular bags will split when you start squishing. Ask me how I know.
Step 1
Stage 1: The Yeast Batter
Mix it in the bag and watch it come alive
This is where the magic starts. You're going to put the first round of ingredients into a zip-top bag, seal it up, and squish it all together. Then you'll watch the wake up and start making bubbles right inside the bag. It's like a science experiment you can eat.
Click each step to mark complete
Add the first ingredients to the bag
Open your gallon-size zip-top bag and add 1 cup of flour, 3 tablespoons of sugar, 2¼ teaspoons of instant yeast, and 1 cup of warm water. The water should feel like warm bath water on your finger. Not hot.
Seal the bag and squish
Push most of the air out of the bag and seal it tight. Now squish, squeeze, and shake the bag until everything is mixed together. You'll have a thin, pancake-batter-like mixture. That's exactly right.
Let the yeast wake up
Set the bag on the counter (sealed) and wait about 10 minutes. Watch what happens. The bag will start to puff up as the yeast produces carbon dioxide gas. The batter will get bubbly and foamy. That inflating bag is proof that your yeast is alive and working.
⏱ Wait Time
10 minutes
Pro Tip
If the bag doesn't puff up after 10 minutes, your yeast might be dead or your water was too hot. Open the bag, check the temperature of the mixture (it should be warm, not hot), and try again with fresh yeast if needed.
Fermentation in a Bag
The yeast is a tiny living organism. When you gave it warm water and sugar, it woke up and started eating. As it eats the sugar, it produces two things: carbon dioxide gas and a tiny bit of alcohol. The gas is what's inflating your bag like a balloon. This same gas is what will make your bread rise later. The alcohol bakes away in the oven, so don't worry about that. This whole process is called , and it's the same science that makes bread, pizza dough, and even root beer fizzy.
The Takeaway
The bag puffs up because yeast produces carbon dioxide gas as it eats sugar. That same gas creates the air pockets inside your finished bread.
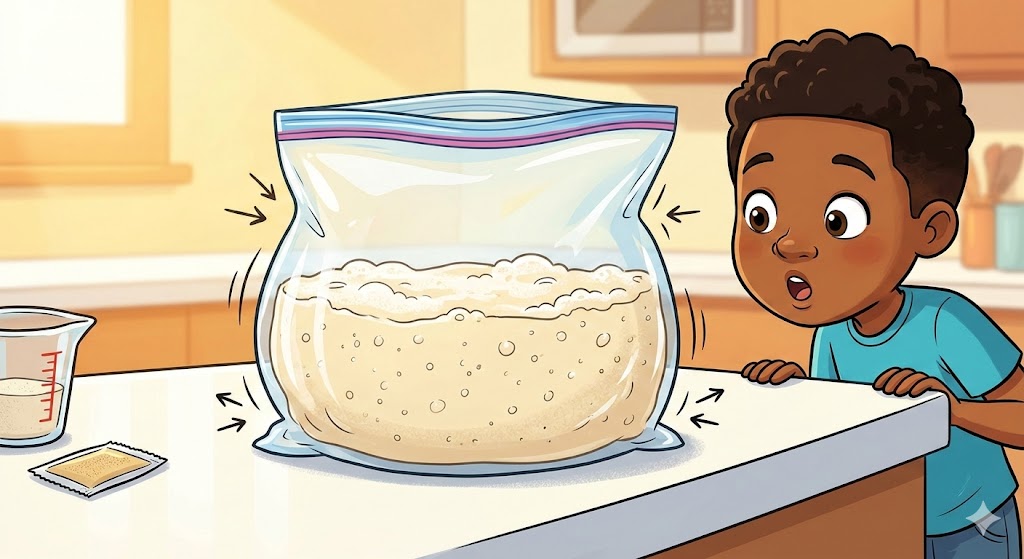
The bag is inflating! That's carbon dioxide gas from the yeast eating sugar.
Precise Timers
Use these interactive timers to track your stages.
Yeast Activation in Bag
Step 2
Stage 2: Add the Rest and Squish
From batter to dough, all inside the bag
Now you'll add the remaining flour, salt, and fat to the bag. This is where the batter transforms into actual dough. You'll feel it happen through the plastic.
Click each step to mark complete
Add the remaining ingredients
Open the bag and add 2 cups of flour, 1½ teaspoons of salt, and 3 tablespoons of olive oil or melted butter. Don't dump all the flour in at once. Add about half, seal, squish. Then add the rest, seal, squish again.
Squish until it becomes dough
Seal the bag and start squishing. At first it will feel like a sticky mess. Keep going. Squeeze it, fold the bag over itself, press it flat, fold it again. After a couple minutes, you'll feel it change. The dough will start pulling away from the sides of the bag. It will feel like a smooth, firm ball instead of a gooey paste. That moment when it changes is forming.
Check your dough
When the dough feels smooth and pulls cleanly away from the bag walls, it's ready. Open the bag and poke it. It should feel like a firm stress ball, smooth on the outside and slightly springy. If it's still very sticky, add 1 tablespoon of flour at a time and squish more.
Pro Tip
The transition from sticky batter to smooth dough happens fast. One minute it's a mess, the next it's a ball. Keep squishing and you'll feel the exact moment it comes together.
Building Gluten Through the Bag
Flour contains two proteins called glutenin and gliadin. When they get wet and you start squishing, they link together and form a stretchy network called . Gluten is what gives bread its structure and chew. In a normal recipe, you'd build gluten by with your hands on a table. But squishing through the bag does the same thing. Every time you fold and press the bag, you're stretching and rearranging those protein strands. That's why the dough goes from a sticky mess to a smooth ball. You're literally building the skeleton of your bread.
The Takeaway
Squishing the bag builds gluten, the stretchy protein network that gives bread its structure. Same science as kneading, just without the mess.
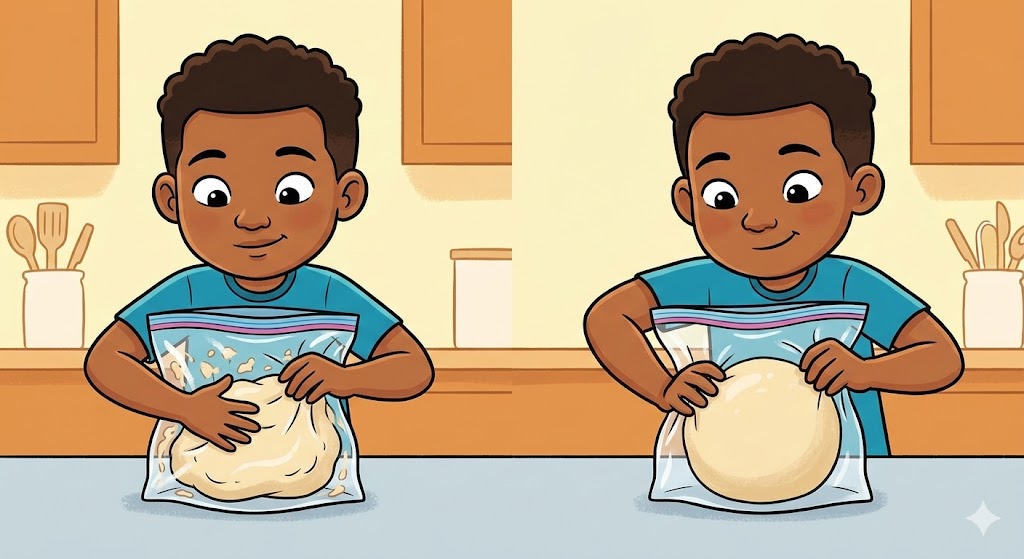
Keep squishing! You'll feel the dough change from sticky to smooth.
Step 3
Knead It for Real
Time to get your hands in the dough
The bag got you most of the way there, but now it's time for a few minutes of real hand . This is the part that feels like playing with the world's best play-dough.
Click each step to mark complete
Dump the dough out
Sprinkle a tiny bit of flour on a clean countertop or table. Open the bag and turn it inside out over the surface, letting the dough fall out. It should come out pretty clean.
Knead for 5 minutes
Push the dough away from you with the heel of your hand. Fold it back toward you. Turn it a quarter turn. Repeat. Keep going for about 5 minutes. The dough should feel smooth, elastic, and slightly warm from your hands. It should not stick to the counter. If it does, add a tiny pinch of flour.
The poke test
Poke the dough with your finger. If it slowly springs back and leaves just a small dent, it's ready. If it springs back fast and hard, knead a little more. If it doesn't spring back at all, you've over-kneaded (rare with hand kneading, so don't worry too much).
Pro Tip
This is supposed to be fun. Push, fold, turn. Push, fold, turn. You'll feel the dough get smoother and more alive under your hands. Some kids say it feels like it's breathing. That's the gluten doing its thing.
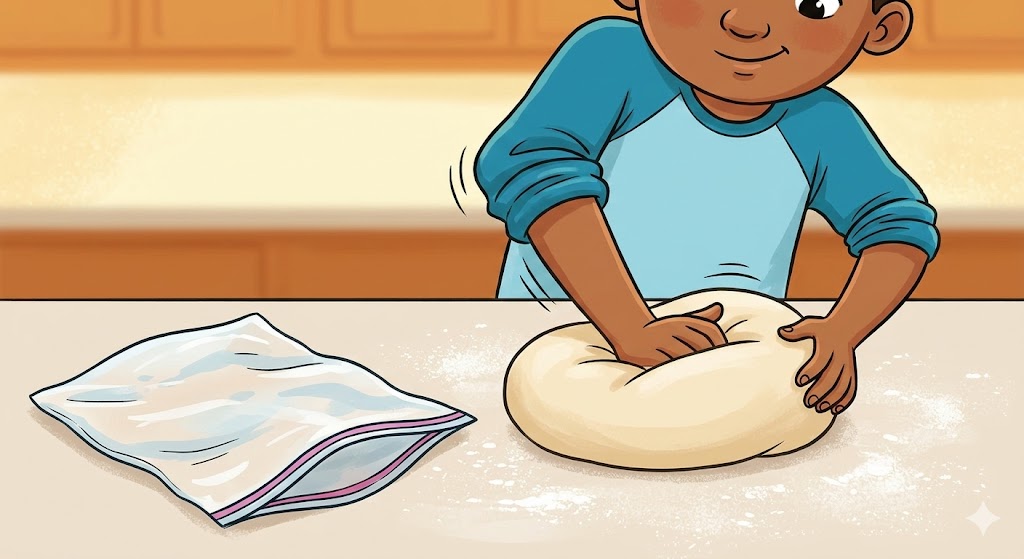
The bag did most of the work. Now your hands finish the job.
Precise Timers
Use these interactive timers to track your stages.
Hand Kneading
Step 4
Shape Your Loaf
From ball to bread
Now you'll shape your dough into a loaf and put it in a pan. The shape you make now is the shape your bread will be when it's done.
Click each step to mark complete
Grease your pan
Rub a little butter or oil inside your loaf pan so the bread doesn't stick. Get the bottom and all four sides.
Shape the dough
Pat your dough into a flat rectangle, roughly the width of your loaf pan. Now roll it up tightly from one short end to the other, like a sleeping bag. Pinch the seam closed with your fingers. Tuck the ends under. Place it seam-side down in the greased pan.
No loaf pan? No problem
If you don't have a loaf pan, shape the dough into a round ball (a ) and place it on a parchment-lined baking sheet. It'll bake into a rustic round loaf instead of a sandwich loaf. Both are great.
Pro Tip
When you roll the dough up, roll it tight. Loose rolling creates big air gaps inside the loaf. Tight rolling gives you an even crumb with consistent texture from crust to crust.
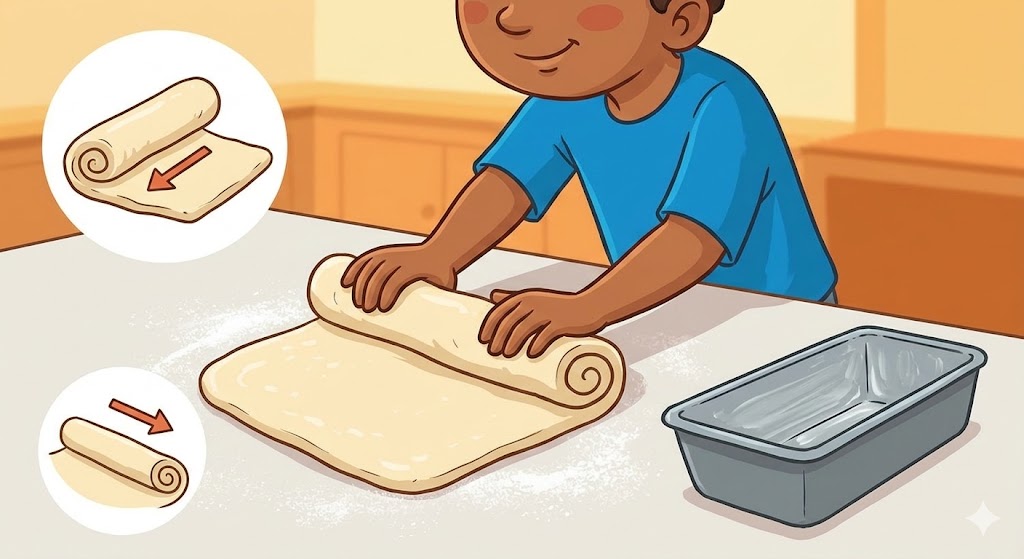
Roll it tight like a sleeping bag. Seam side down in the pan.
Step 5
The Final Rise
Let the yeast do its thing one more time
Cover your pan and let the dough rise until it's peeking above the rim. This is , the last rise before baking.
Click each step to mark complete
Cover and wait
Cover the loaf pan loosely with a clean towel or plastic wrap. Set it somewhere warm. The dough needs about 30-45 minutes to rise. You're looking for it to puff up until it's just above the rim of the pan. It should look pillowy and soft.
Check if it's ready
Gently poke the side of the dough with a floured finger. If it springs back slowly and leaves a small indent, it's ready to bake. If it snaps back quickly, give it another 10 minutes.
⏱ Wait Time
30-45 minutes
Two Rises, Better Bread
The first rise (in the bag and during kneading) built up lots of gas and developed flavor. When you shaped the loaf, you pushed most of that gas out and reorganized the gluten into a tighter structure. The second rise lets the yeast produce fresh gas bubbles inside that new, tighter structure. This creates a finer, more even crumb (the pattern of holes inside the bread). If you only did one rise, the bread would have big, uneven holes and a coarser texture. Two rises give you the soft, even slices that make great sandwiches.
The Takeaway
The first rise builds flavor and gas. Shaping reorganizes the structure. The second rise fills that structure with fresh, even bubbles for a better crumb.
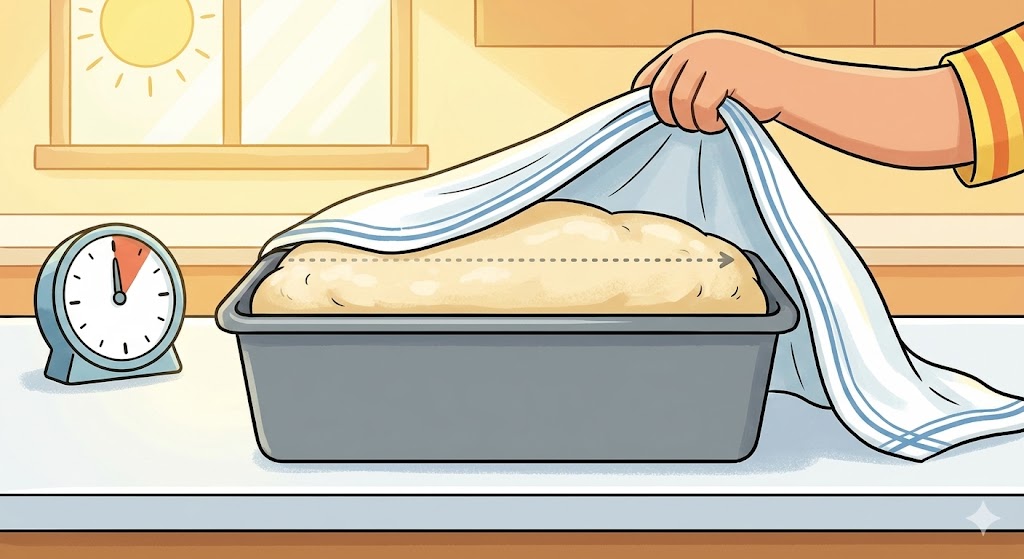
When it peeks above the rim, it's ready for the oven.
Precise Timers
Use these interactive timers to track your stages.
Final Rise
Shaping
Shape Your Loaf
Two options depending on what equipment you have.
Loaf Pan (Sandwich Bread)
Makes a classic rectangular loaf perfect for sandwiches and toast.
RecommendedClick each step to mark complete
Pat into a rectangle
Pat the dough into a flat rectangle roughly the width of your loaf pan.
Roll it up tight
Starting from one short end, roll the dough up tightly like a sleeping bag. Keep tension as you roll.
Seal and place
Pinch the seam closed. Tuck the ends under. Place seam-side down in a greased loaf pan.
Free-Form Round (No Pan Needed)
No loaf pan? Shape it into a ball and bake it on a sheet. You'll get a rustic round loaf.
Click each step to mark complete
Shape into a ball
Pull the edges of the dough toward the center, rotate, and repeat until you have a tight ball with a smooth top.
Place on parchment
Set the ball seam-side down on a parchment-lined baking sheet.
Slash the top (optional)
Use a sharp knife to cut an X or a single line across the top. This controls how the bread expands in the oven and looks professional.
Proof Test: Poke the side of the risen dough with a floured finger. If it springs back slowly and leaves a small dent, it's ready. If it snaps back fast, give it more time.
Step 6
Bake Your Bread
This is it. Your bag of flour, water, yeast, and a little patience is about to become an actual loaf of bread.
The Maillard Reaction
When the surface of the dough gets hot enough (above about 285°F / 140°C), the proteins and sugars on the surface start a chemical reaction called the Maillard reaction. This is the same reaction that browns a steak, toasts a marshmallow, and gives french fries their color. It creates hundreds of new flavor compounds that didn't exist in the raw dough. That golden-brown crust doesn't just look good. It tastes completely different from the soft white interior. One loaf of bread, two totally different textures and flavors, all because of chemistry.
The Takeaway
The golden-brown crust is created by the Maillard reaction, a chemical process between proteins and sugars that only happens at high temperatures. It's the same science that browns toast and steaks.
Step by Step
Preheat the oven (ADULT)
An adult preheats the oven to 375°F (190°C). Make sure the rack is in the middle position.
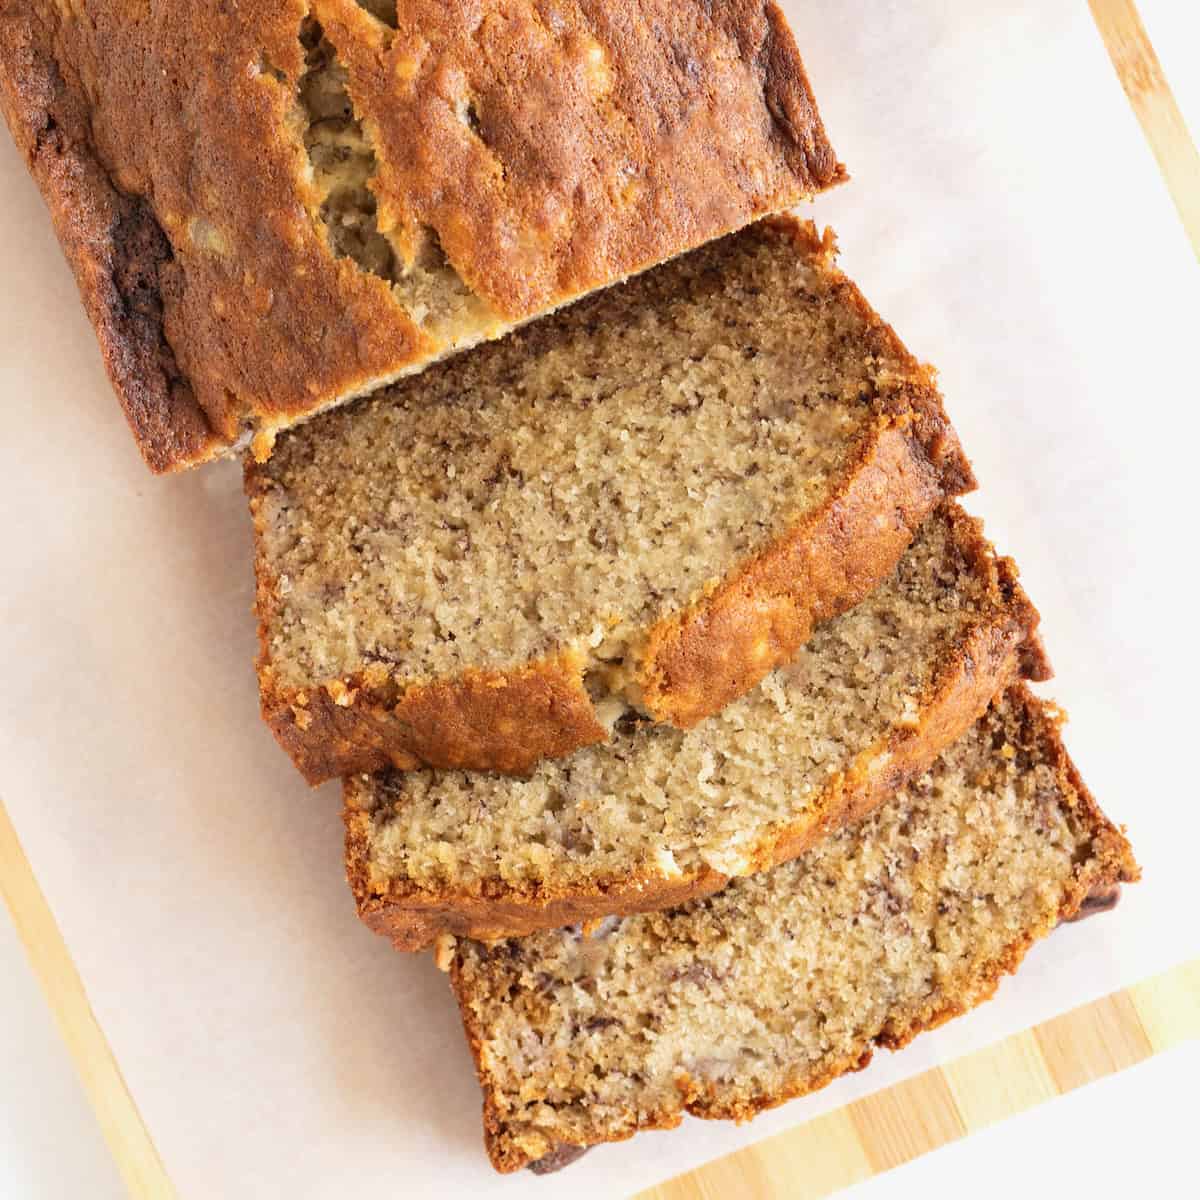
Bake for 25 minutes
An adult places the loaf pan in the oven on the middle rack. Bake for 25 minutes. The bread is done when the top is golden brown and it sounds hollow when you tap it with your knuckle. If you have a thermometer, the inside should read 190-200°F (88-93°C).
Cool before slicing (this is hard, but trust me)
An adult removes the bread from the oven. Let it cool in the pan for 5 minutes, then turn it out onto a cooling rack or clean towel. Wait at least 15 more minutes before cutting. If you slice hot bread, the inside will be gummy. Patience makes better bread.
Preheat Oven
Bake
Cool in Pan
Cool on Rack
The hollow tap test works like this: flip the bread out of the pan and knock on the bottom with your knuckles. If it sounds hollow like a drum, it's done. If it sounds like a thud, put it back in (without the pan) for another 5 minutes.
Baking Methods
The classic method. Produces a sandwich-style loaf.
Equipment: Greased 8½ x 4½ inch loaf pan
Preheat
Preheat oven to 375°F (190°C) for at least 15 minutes.
Bake
Place loaf pan on middle rack. Bake 25 minutes until golden brown on top.
Check doneness
Tap the bottom of the bread. If it sounds hollow, it's done. Internal temp should be 190-200°F (88-93°C).
Cool
Cool in pan 5 minutes, then turn out onto a rack. Wait at least 15 minutes before slicing.
"An adult must handle all oven tasks. No exceptions."
Nutrition Facts
Per 1 slice • 8 servings per recipe
* Values are estimates based on standard ingredients
Storage
Room Temperature
3-4 days in a bread bag or wrapped in a clean towel. Best on day one and two.
Frozen
Slice first, then freeze in a zip-top bag for up to 2 months. Toast slices straight from the freezer.
Refresh
If the crust goes soft, toast individual slices or warm the whole loaf in a 350°F (175°C) oven for 10 minutes.
Your Feedback
Rate This Recipe
Loading ratings...
Troubleshooting
Baker's Notes
Common questions and solutions for perfect results
You Might Also Enjoy
More recipes from our pantry that pair well with this bake.


Get More Recipes in Your Inbox
Join thousands of home bakers receiving weekly recipes, tips, and techniques to elevate your bread game.
No spam, ever. Unsubscribe anytime.
More from Baking Great Bread at Home
Tools, resources, and community to help you bake better bread

Crust & Crumb Academy
Go deeper into your craft. FREE courses, challenges, and real feedback. No gatekeeping. Perfection is not required.

Sourdough Starter Companion
Your AI-powered starter assistant. Track feedings, troubleshoot issues, and keep your starter thriving.

BakingGreatBread.com
Real bread for the rest of us

Baking Great Bread Blog
Recipes, tips, and stories from the bread journey

Recipe Converter
Convert sourdough recipes to yeast and back again

Crust & Crumb App
Your AI-powered baking assistant

Facebook Community
Join 50,000+ bakers sharing, learning, and supporting each other

Sourdough for the Rest of Us
Free beginner's guide to sourdough