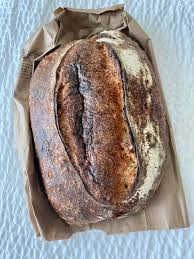
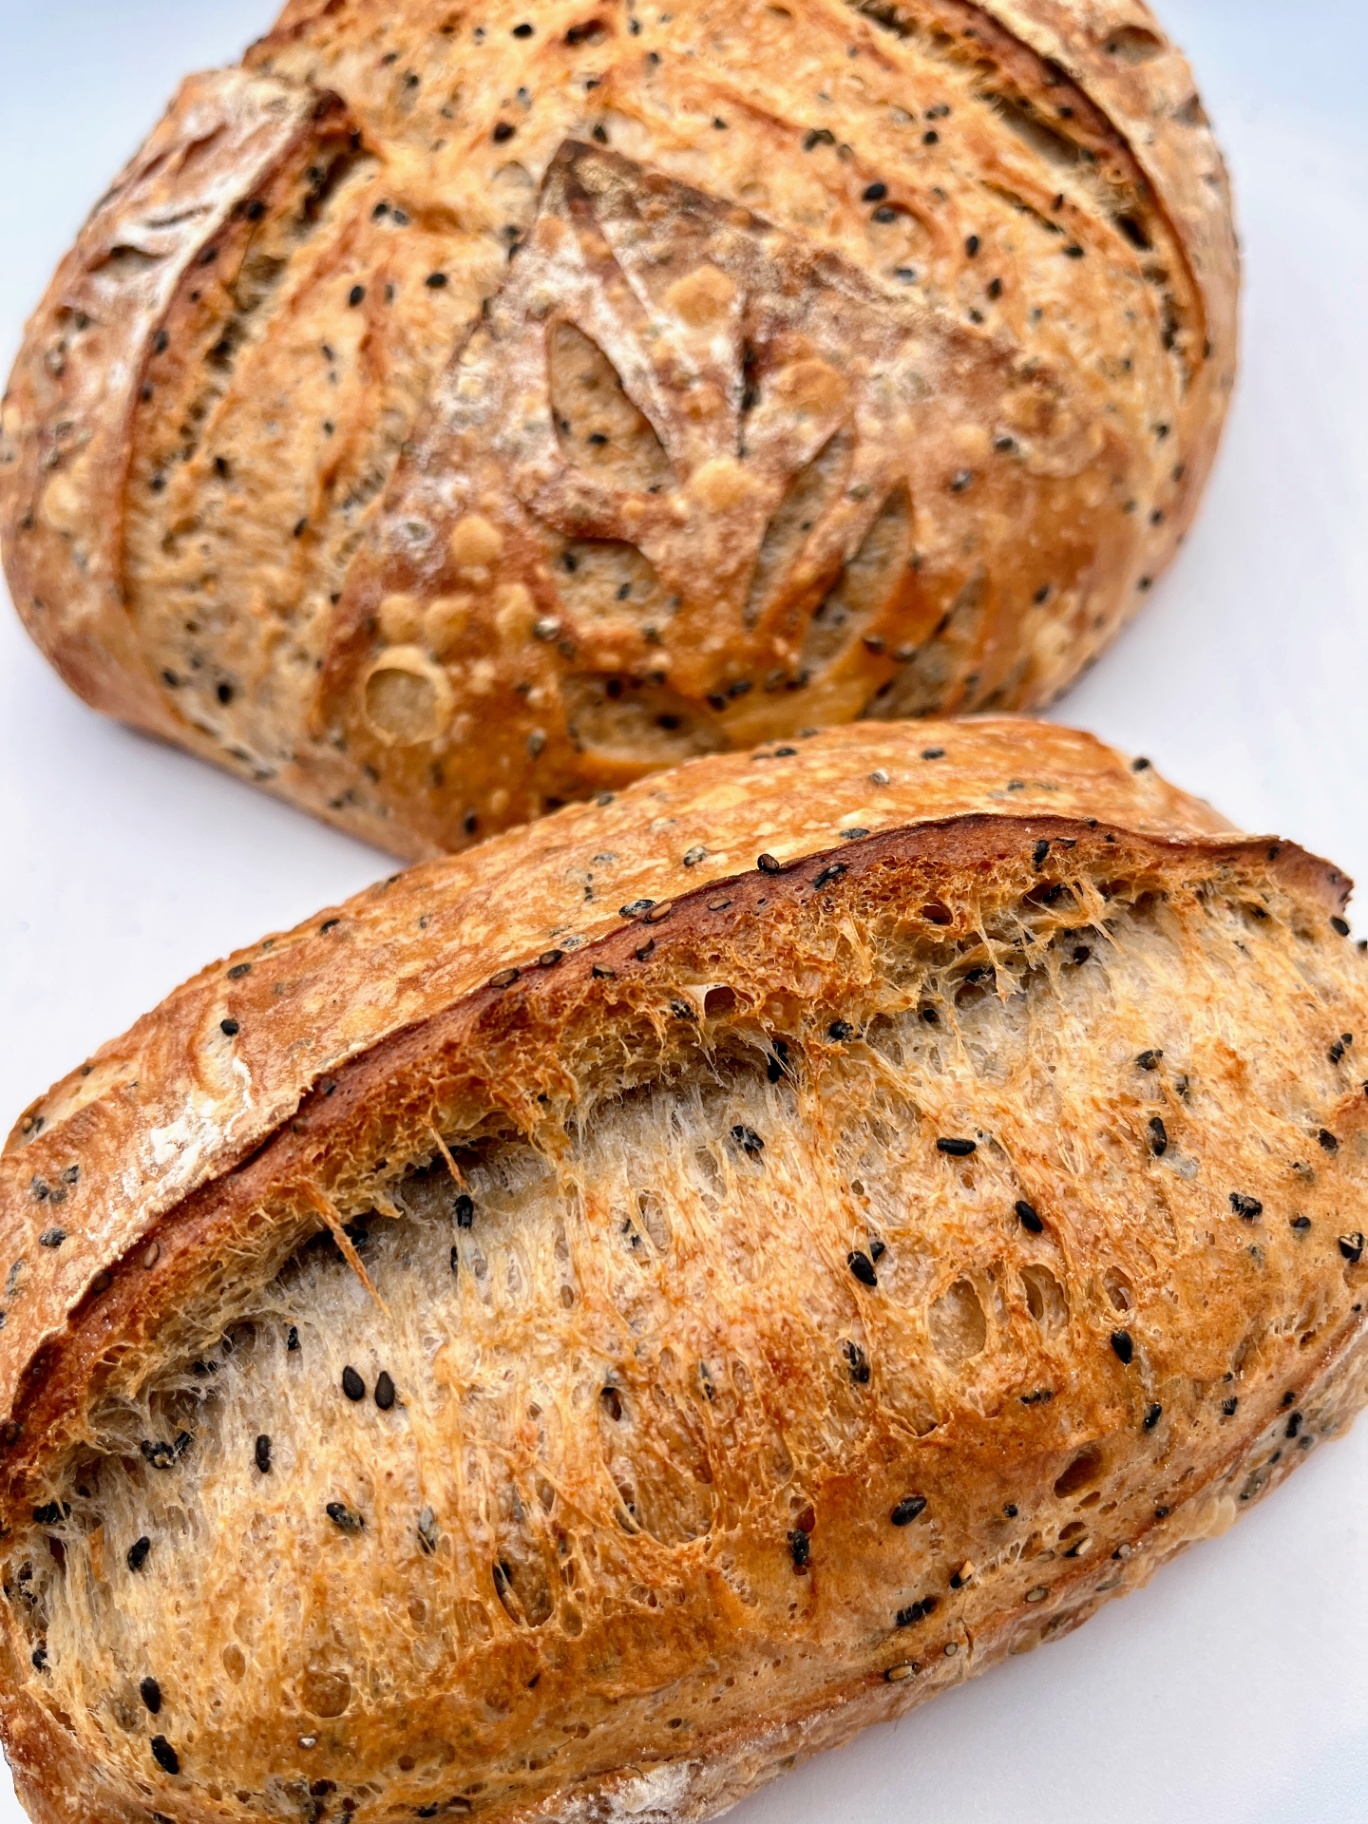
Tartine-style country loaf at 72% hydration, built for home ovens
IntermediateHenry's CountrySourdough
by Henry Hunter Jr.
The Tartine country loaf, tuned for your kitchen.
Fermentation
8–12 hours levain + 1 hour fermentolyse + 3–5 hours bulk
Bake Time
40–45 minutes per loaf
Yield
Two artisan country loaves, boule or batard

Perfection is not required
"Perfection is not required. Progress is."— Henry Hunter Jr.
By Henry Hunter Jr., founder of Crust & Crumb Academy and Baking Great Bread at Home.
Authentic Flavor
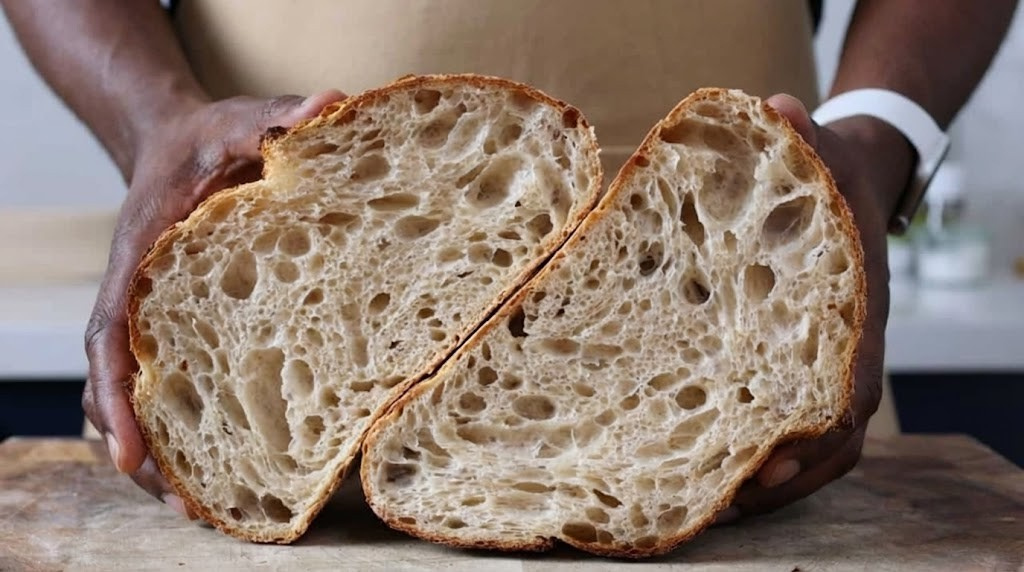
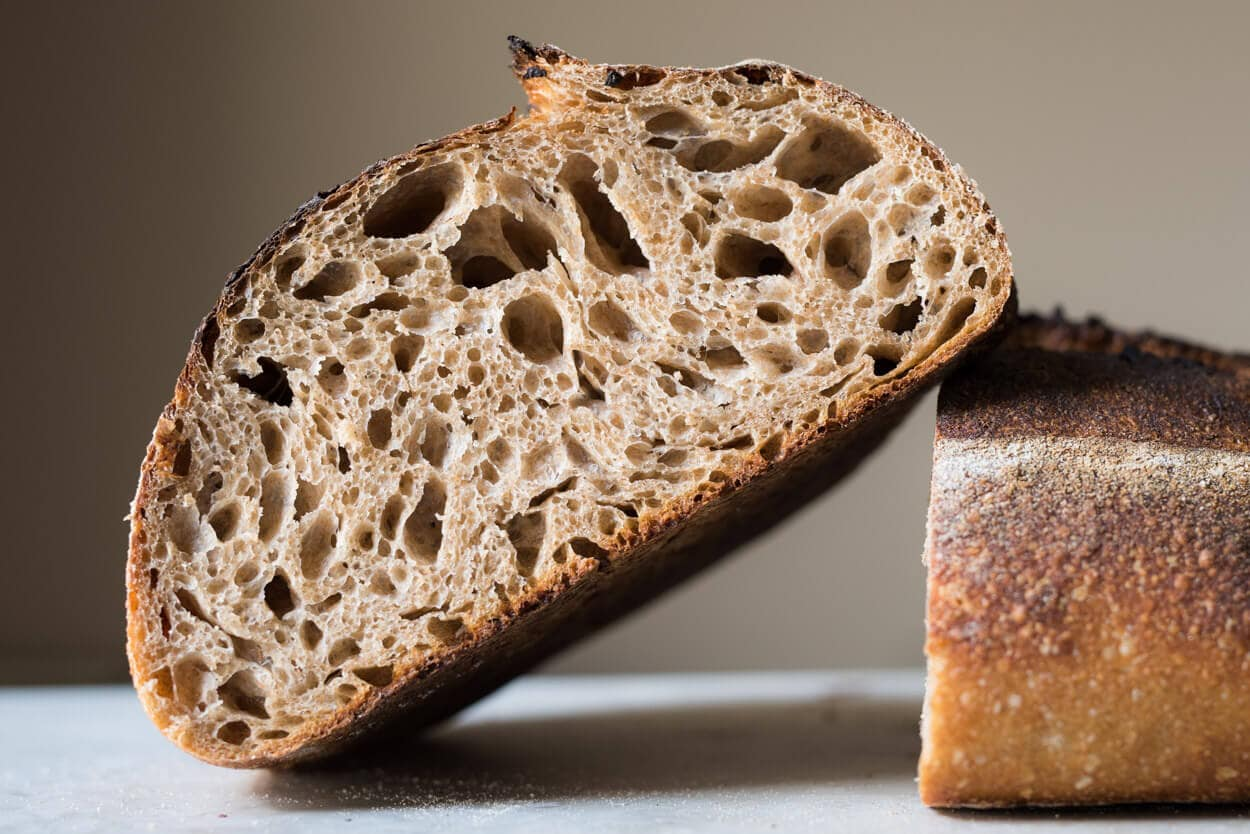
This is the country loaf I keep coming back to. It borrows the soul of Chad Robertson's Tartine country bread — the 90/10 flour blend, the 2% salt, the long cold retard, the Dutch oven bake — and tunes the hydration down to 72% so supermarket bread flour behaves and the dough is forgiving on the bench. The autolyse becomes a fermentolyse. The schedule fits a real life. The result is a blistered mahogany crust, a pronounced ear, and an open, lactic-forward crumb that's better the next day on the cheese board.
Equipment Needed
Ingredients
Levain (Build 8–12 Hours Ahead)
Built from your mature 100% hydration starter. Yields about 220g, you'll use 200g.
Final Dough
What you'll weigh out the morning of bake day after the levain is ripe.
Reserve 20g for the salt step. Mix the rest with the levain.
Pro Tip
Volumes are a courtesy. Grams are the recipe. A 2% salt error is the difference between a seasoned loaf and a bland one.
Day 1 — Evening
Build the Levain
Build a young, sweet the night before bake day. You're aiming for peak ripeness, not collapsed sourness.
Click each step to mark complete
Mix the Levain
In a clean jar, combine 20g mature starter, 100g bread flour, and 100g warm water (about 80°F / 27°C). Stir until smooth. Cover loosely and hold at 75 to 78°F (24 to 26°C).
Float Test for Readiness
After 8 to 12 hours the levain should have roughly doubled, the top should be domed and bubbly, and a teaspoon dropped in water should float. That's the . If it sinks, give it another hour and retest.
⏱ Wait Time
8 to 12 hours
Pro Tip
Use the levain at peak, not past peak. A collapsed levain still bakes bread, but flavor turns sharply sour and dough strength drops.
Sweet, not sour
A young levain at peak activity is loaded with active yeast and only mild lactic acid. That gives you strong rise without the sharp acetic tang of an over-fermented starter.
Read the jar
Mark the level after you mix. Domed top, visible bubbles on the sides, and roughly doubled is ready. A flat or sunken top means you missed the window.
The Takeaway
Build the levain at night. Wake up. Test it floats. Move on.
Precise Timers
Use these interactive timers to track your stages.
Levain Build (minimum)
Day 2 — Morning
Fermentolyse
mixes flour, water, and together up front. Salt waits. The dough hydrates and starts fermenting at the same time.
Click each step to mark complete
Disperse the Levain
In a large bowl, whisk 200g ripe into 600g of the water (reserve the other 20g for the salt step). Whisk until the levain is fully dispersed and the water turns milky.
Add the Flours
Add 800g bread flour and 100g whole wheat flour. Mix by hand or with a dough whisk until no dry flour remains. The dough will look shaggy and rough. That's correct.
Rest
Cover the bowl. Rest at room temperature for 45 to 60 minutes. The dough will smooth out and become noticeably more extensible.
⏱ Wait Time
45 to 60 minutes
Pro Tip
Reserve the 20g of water for the salt step. It helps the salt dissolve and incorporate cleanly without over-tightening the dough.
Precise Timers
Use these interactive timers to track your stages.
Fermentolyse Rest
Day 2 — Salt
Add the Salt
Salt arrives after the rest. It tightens the gluten, slows enzyme activity, and seasons the dough.
Click each step to mark complete
Pour and Squeeze
Pour 20g salt and the reserved 20g water over the dough. Squeeze and fold the dough on itself for 2 to 3 minutes until the salt disappears and the dough smooths out and tightens. This is the start of .
Pro Tip
Wet your hand before squeezing the salt in. Less sticking, more even distribution.
Day 2 — Bulk
Bulk Fermentation with Folds
Four sets of folds at 30-minute intervals, then leave the dough alone. runs 3 to 5 hours total at 74 to 78°F (23 to 26°C).
Click each step to mark complete
Stretch and Fold (Set 1)
Wet your hand. Reach under one side of the dough, lift, stretch up, and fold over the top. Rotate the bowl 90° and repeat three more times. Cover. Wait 30 minutes.
Stretch and Fold (Set 2)
Repeat the . The dough is still slack. Cover. Wait 30 minutes.
Coil Fold (Set 3)
By now the dough has tightened. Switch to a : slide both wet hands under the center, lift the dough, and let both ends fold under. Rotate the bowl 90° and repeat. Cover. Wait 30 minutes.
Coil Fold (Set 4)
One more . After this, the dough is on its own. Bulk continues another 60 to 120 minutes.
Read the Dough
You're looking for a 30 to 50% rise above the starting volume, bubbles visible on the surface and along the sides through a clear container, a soft dome on top, and a custard-like jiggle when you tap the bowl. Smells yeasty and slightly tangy, not sharply sour.
⏱ Wait Time
3 to 5 hours at 74 to 78°F
Pro Tip
Mark the bowl with tape at the start. You can't read 30 to 50% rise by eye. Tape doesn't lie.
10°F shifts the timeline
Every 10°F (5.5°C) above 75°F shortens bulk by roughly 25%. A cool 68°F kitchen can push bulk past 6 hours. A warm 82°F kitchen can finish bulk in 3 hours.
Read the signs, not the timer
Rise percentage, jiggle, dome shape, and surface bubbles tell the truth. Time is a rough guide. Temperature is the real variable.
The Takeaway
Watch the dough. The clock is a suggestion.
Precise Timers
Use these interactive timers to track your stages.
Rest After Fold 1
Rest After Fold 2
Rest After Fold 3
Final Bulk
Day 2 — Pre-Shape
Divide and Pre-Shape
Two pieces, two soft rounds, a short , then final shaping.
Click each step to mark complete
Turn Out and Divide
Turn the dough onto an unfloured counter. Divide into two equal pieces (about 870g each).
Pre-Shape into Rounds
Using your and one wet hand, drag each piece across the counter into a loose round. Build surface tension without degassing aggressively.
Bench Rest
Cover loosely with a clean towel. Rest 20 to 30 minutes. The dough should relax enough to spread slightly but still hold a soft dome.
⏱ Wait Time
20 to 30 minutes
Pro Tip
An unfloured counter helps you build tension during pre-shape. Save the flour for the bannetons.
Precise Timers
Use these interactive timers to track your stages.
Bench Rest
Day 2 — Shape
Final Shape
into a or . Choose based on the bannetons you have.
Click each step to mark complete
Shape and Transfer
Flour the top of each round lightly. Flip seam-side up. Shape into a (envelope fold then cup-and-drag) or (rectangle, fold thirds, roll into a tight log). Transfer seam-side up into a floured banneton.
Pro Tip
If the dough resists shaping, let it rest another 5 to 10 minutes. Forced shaping tears the gluten you spent hours building.
Day 2 — Cold Proof
Cold Retard
Into the fridge for the . 8 to 18 hours. Twelve is the sweet spot.
Click each step to mark complete
Cover and Refrigerate
Cover each banneton with a shower cap or plastic bag. Refrigerate at 38 to 40°F (3 to 4°C). Eight hours is the minimum for flavor and handling. Twelve is the sweet spot. Eighteen still bakes well. Past 24 hours, expect some loss of oven spring. Past 36 hours, the dough is usually over-proofed.
⏱ Wait Time
8 to 18 hours (12 is ideal)
Pro Tip
Bake straight from the fridge. Cold dough scores cleaner and holds shape better in a screaming-hot Dutch oven.
Shaping
Shaping the Country Loaf
Pick boule or batard based on the banneton you have. Both work. The boule is more forgiving for first-timers.
Watch the Technique
Boule (Round)
RecommendedClick each step to mark complete
Flour and Flip
Lightly flour the top of the pre-shaped round. Flip seam-side up.
Envelope Fold
Fold the four sides into the center like an envelope.
Cup and Drag
Flip seam-side down. Cup hands around the dough and drag in small circles to tension the skin.
Into the Banneton
Transfer seam-side up to a floured round banneton.
Batard (Oval)
Click each step to mark complete
Flatten to Rectangle
Flour and flip seam-side up. Stretch into a rough rectangle, long side facing you.
Fold Thirds
Fold the top third down. Fold the bottom third up over it.
Roll into a Log
Roll from the top edge toward you into a tight log. Pinch the seam closed.
Into the Banneton
Transfer seam-side up to a floured oval banneton.
Proof Test: Press a floured finger about 1 inch into the cold dough. If it springs back slowly and incompletely, it's ready. If it springs back fast and full, give it more time. The works on cold dough too.
Day 3 — Bake
Score and Bake
Preheat the Dutch oven for a full 45 minutes. Score in one decisive motion. Bake one loaf at a time if you only have one Dutch oven. The second loaf stays cold until it's ready to go in.
Step by Step
Preheat
Place the Dutch oven and lid in a cold oven. Preheat to 475°F (245°C) for at least 45 minutes. Cast iron lies about its temperature until it has truly soaked through.
Turn Out and Score
Turn one cold loaf out of its banneton onto parchment paper. in one decisive motion: a single off-center slash for a at a 30 to 45° angle, or a cross or square for a . Depth: ¼ to ½ inch.
Bake Covered (20 Minutes)
Use the parchment as a sling to lower the dough into the screaming-hot Dutch oven. Cover with the lid. Bake at 475°F (245°C) for 20 minutes. The trapped steam drives .
Bake Uncovered (20 to 25 Minutes)
Remove the lid. Reduce the oven to 450°F (230°C). Bake another 20 to 25 minutes until the crust is deep mahogany — almost too dark for comfort. Color is flavor.
Check Internal Temp
Internal temp should read 205 to 210°F (96 to 99°C). If the crust is pale but the inside reads, leave it 5 more minutes. Don't pull a pale loaf.
Cool
Cool on a wire rack, uncovered, for at least 1 hour and ideally 2 before slicing. The crumb is still setting. Cut early and you'll get a gummy interior.
Bake the Second Loaf
Re-preheat the Dutch oven for 15 minutes between loaves. Repeat the bake.
Preheat Dutch Oven
Bake with Lid On
Bake Uncovered
Cool Before Slicing
If the crust browns faster than expected during the uncovered bake, tent loosely with foil. Don't pull early.
Baking Methods
Equipment: 9 to 10 inch Dutch oven with lid, parchment paper
Preheat 45 min
Dutch oven and lid in cold oven. Preheat to 475°F (245°C) for 45 minutes minimum.
Score and load
Flip cold dough onto parchment, decisively, lower into hot Dutch oven using parchment as a sling.
20 min lid on
Covered bake at 475°F (245°C).
20–25 min lid off
Reduce to 450°F (230°C). Bake until deep mahogany, internal temp 205–210°F (96–99°C).
Cool 60+ min
Wire rack, uncovered, at least 1 hour before slicing.
Nutrition Facts
Per 1 slice (~50g) • servings per recipe
* Values are estimates based on standard ingredients
Storage
Room Temperature
3 to 4 days cut-side down on a wooden board, in a paper bag, or in a bread box. Never in plastic at room temp — it traps moisture and turns the crust leathery within hours.
Refrigerated
Not recommended. The fridge accelerates staling for lean doughs.
Frozen
Up to 3 months. Slice before freezing for easy grab-and-toast portions, or freeze the whole loaf wrapped tightly in plastic then foil.
Refresh
Spritz the crust with water and warm the whole loaf at 350°F (175°C) for 10 to 15 minutes. For slices, toast directly from frozen.
Your Feedback
Rate This Recipe
Loading ratings...
Troubleshooting
Baker's Notes
Common questions and solutions for perfect results
If you're serious about scoring, you need the right blade in your hand. Wire Monkey makes handcrafted bread lames from black walnut — built to last, balanced in the hand, and sharp enough to glide through cold dough cleanly every single time. No dragging, no hesitation marks. Just a clean cut.

Wire Monkey Handcrafted Bread Lames
You Might Also Enjoy
More recipes from our pantry that pair well with this bake.
Get More Recipes in Your Inbox
Join thousands of home bakers receiving weekly recipes, tips, and techniques to elevate your bread game.
No spam, ever. Unsubscribe anytime.
More from Baking Great Bread at Home
Tools, resources, and community to help you bake better bread

Crust & Crumb Academy
Go deeper into your craft. FREE courses, challenges, and real feedback. No gatekeeping. Perfection is not required.

Sourdough Starter Companion
Your AI-powered starter assistant. Track feedings, troubleshoot issues, and keep your starter thriving.

BakingGreatBread.com
Real bread for the rest of us

Baking Great Bread Blog
Recipes, tips, and stories from the bread journey

Recipe Converter
Convert sourdough recipes to yeast and back again

Crust & Crumb App
Your AI-powered baking assistant

Facebook Community
Join 50,000+ bakers sharing, learning, and supporting each other

Sourdough for the Rest of Us
Free beginner's guide to sourdough