Swirled, pull-apart enriched bread with a buttery cinnamon-sugar filling
IntermediateCinnamonBabka
by Henry Hunter Jr.
The Friday night secret to babka that actually works.
Fermentation
8-12 hours (overnight cold retard)
Bake Time
35-40 minutes
Yield
One 9x5 inch loaf, serves 8-10

Perfection is not required
"Perfection is not required. Progress is."— Henry Hunter Jr.
By Henry Hunter Jr., founder of Crust & Crumb Academy and Baking Great Bread at Home.
Authentic Flavor
Henry Hunter Jr. is the founder of Crust & Crumb Academy and the author of several bread baking books including Sourdough for the Rest of Us and From Oven to Market. He learned to bake bread from a German baker while stationed in Germany and has been teaching home bakers ever since.
Equipment Needed
Ingredients
The Enriched Dough
A rich, buttery dough built for layers. Develop the gluten fully before adding butter.
Cinnamon Sugar Filling
Keep this at room temperature and paste-like, not warm and fluid. Warm filling slides and collapses your layers.
Egg Wash
Simple Syrup Finish
Brush on while the loaf is still warm. This is what gives babka its bakery-window gloss.
Pro Tip
Pull your butter and eggs out of the refrigerator an hour before you start. Cold butter won't incorporate properly and cold eggs slow your yeast.
Day 1 — Evening
Mix the Dough
This is an . The butter goes in last and slowly. Don't rush this step.
Click each step to mark complete
Activate the Yeast
Combine warm milk, sugar, and yeast in the bowl of your stand mixer. Stir gently and let it sit for 5 minutes until it looks creamy and slightly foamy. If nothing happens after 10 minutes, your milk was too hot or your yeast is old.
Add Eggs and Flour
Add the eggs to the yeast mixture and mix briefly to combine. Add the bread flour and salt. Mix on low speed with the dough hook until a shaggy dough forms, about 2 minutes. Increase to medium and knead for 6-8 minutes until the dough is smooth, elastic, and clears the sides of the bowl.
Add the Butter — Low and Slow
With the mixer running on medium-low, add the softened butter one tablespoon at a time. Wait until each piece is fully absorbed before adding the next. The dough will look greasy and may slap around the bowl. That's normal. Keep going. Once all the butter is in, increase to medium-high and knead for another 4-5 minutes until the dough is smooth, glossy, and pulls away from the sides cleanly.
The Science
Fat coats the gluten proteins and prevents them from linking together. If you add butter at the start, you never build the strong, elastic network the dough needs to hold its layers and trap the gas that makes babka light. Develop the gluten first, then introduce the fat.
What to Look For
After all the butter is incorporated and you've kneaded another few minutes, pull a small piece of dough and stretch it gently between your fingers. It should stretch thin enough to see light through it without tearing. That's the windowpane test, and it tells you the gluten is properly developed.
The Takeaway
Develop first. Enrich second. That order is not negotiable.
Precise Timers
Use these interactive timers to track your stages.
Initial Knead
Butter Incorporation Knead
Day 1 — Evening
Bulk Fermentation
for an enriched dough looks different than lean dough. The fat and sugar slow the yeast, so don't expect the dramatic rise you'd see from a baguette dough.
Click each step to mark complete
First Rise
Shape the dough into a ball, place it in a lightly oiled bowl, and cover tightly with plastic wrap. Let it rise at room temperature until it has grown 50 to 75 percent, about 1 to 1.5 hours. You're not waiting for it to double.
⏱ Wait Time
1 to 1.5 hours
Pro Tip
If your kitchen is warmer than 75F (24C), keep an eye on it. Enriched doughs can overproof faster than you expect in a warm room.
Precise Timers
Use these interactive timers to track your stages.
Bulk Fermentation
Day 1 — Night
Cold Retard (The Friday Night Move)
This is where the Friday Night Baker gets the advantage. The isn't just slowing the dough down. It's building flavor, relaxing the gluten, and keeping your butter cold and firm so your layers stay distinct.
Click each step to mark complete
Into the Refrigerator
After the first rise, punch the dough down gently, reshape it into a ball, and place it back in the oiled bowl. Cover tightly and move it to the refrigerator. Leave it overnight, 8 to 12 hours. The cold fermentation is doing real work while you sleep.
⏱ Wait Time
8-12 hours
Flavor Development
Yeast slows down in cold temperatures but bacteria in the dough keep working. Those bacteria produce organic acids and esters that layer in flavor you simply cannot get from a same-day bake. In an enriched dough, those flavor compounds interact with the butter, eggs, and sugar to create something richer and more complex.
Gluten Relaxation
Cold, rested gluten is extensible and cooperative. When you pull that dough out Saturday morning and start rolling it out for the filling, it goes where you tell it to go. It doesn't spring back and fight you. This makes shaping dramatically easier and gives you more consistent filling distribution.
Butter Structure
Cold, firm butter maintains its structure during rolling and stays put when you spread the filling. Warm butter blends fully into the dough and you lose the distinct layers that give babka its characteristic pull-apart interior.
The Takeaway
Mix Friday night. Bake Saturday morning. That gap is where the real work gets done.
Day 2 — Morning
Make the Cinnamon Filling
Make this before you pull the dough out of the refrigerator. You want it at room temperature and paste-like, not warm and fluid. Warm filling slides and collapses your layers.
Click each step to mark complete
Mix the Filling
In a small bowl, combine softened butter, brown sugar, cinnamon, and salt. Mix until smooth and paste-like. It should be the consistency of soft frosting. If it's too soft or shiny, let it cool for a few minutes. If you can pour it, it's too loose.
Pro Tip
The sugar in this filling will pull moisture from the butter as it bakes and create that sticky, slightly caramelized interior that makes cinnamon babka so good. Moisture content is everything here. Don't add any liquid to this filling.
Day 2 — Morning
Roll, Fill, and Shape
Cold dough rolls beautifully. Don't let it warm up before you start.
Click each step to mark complete
Roll Out the Dough
Remove the dough from the refrigerator. On a lightly floured surface, roll it out into a rectangle approximately 12x16 inches (30x40 cm). Work from the center outward. The cold dough will be cooperative and extensible.
Spread the Filling
Spread the cinnamon filling evenly across the dough, leaving a half-inch border on all edges. The filling will shift toward the edges when you roll, so that border matters. If you spread to the edge, the filling escapes the roll and creates a mess in the pan.
Roll into a Log
Starting from the long edge, roll the dough tightly into a log. Keep the tension even as you roll. A loose roll means open layers and filling that migrates during baking. Pinch the seam firmly to seal.
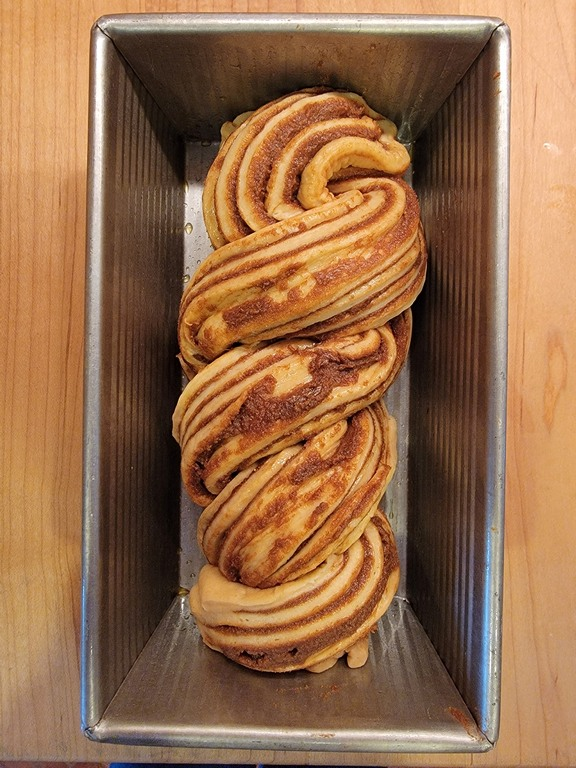
Cut and Twist
Using a sharp knife or bench scraper, cut the log lengthwise down the center, exposing the layers. With the cut sides facing up, twist the two strands around each other, keeping the layers visible throughout. This is the babka swirl. Tuck the ends under and transfer to your parchment-lined loaf pan.
Pro Tip
A sharp knife matters here. Dragging a dull blade through the log compresses the layers instead of cutting them clean. Use a serrated knife or a bench scraper with a firm press-and-pull motion.
Day 2 — Morning
Final Proof
The loaf needs to proof before baking. How long depends on whether you mixed Friday night or Saturday morning.
Click each step to mark complete
Proof in the Pan
Cover the loaf pan loosely with plastic wrap. For the Friday Night Baker whose dough was cold, expect the final proof to take 2 to 3 hours at room temperature. For the Saturday Baker working with dough that's been at room temperature throughout, this may take 1 to 1.5 hours. The loaf is ready when it has puffed noticeably in the pan, jiggles slightly when you move it, and springs back slowly but visibly when you poke it gently.
⏱ Wait Time
1.5 to 3 hours
Precise Timers
Use these interactive timers to track your stages.
Final Proof Check
Shaping
Shape the Babka
The twist is what makes babka babka. Work with cold dough for the cleanest layers.
Classic Twist (Recommended)
Roll, fill, cut lengthwise, twist with cut sides up, transfer to pan.
RecommendedClick each step to mark complete
Roll Out
Roll cold dough to approximately 12x16 inches on a lightly floured surface.
Fill
Spread cinnamon filling evenly, leaving a half-inch border on all edges.
Roll into Log
Roll tightly from the long edge. Pinch seam to seal.
Cut Lengthwise
Cut the log down the center with a sharp knife. Keep cut sides facing up.
Twist
Twist the two strands around each other, cut sides up throughout. Tuck ends under.
Transfer
Place twisted loaf into parchment-lined 9x5 inch pan.
Proof Test: The loaf is ready to bake when it has puffed noticeably, jiggles slightly when you move the pan, and a gentle poke with your finger springs back slowly but visibly. If it springs back immediately, it needs more time.
Day 2 — Morning
Bake
Enriched doughs brown fast. The sugars in the dough, the egg wash, and the cinnamon filling will all accelerate browning. A fully baked babka looks darker than you expect. That's correct.
Step by Step
Preheat the Oven
Preheat your oven to 350F (175C). Give it a full 30 minutes to come to temperature. A properly preheated oven is not optional here.
Apply the Egg Wash
Whisk together the egg and milk. Brush it gently over the top of the loaf, getting into the crevices of the swirl. This gives you the deep golden color and glossy finish.
Bake
Bake at 350F (175C) for 35 to 40 minutes. Start checking the internal temperature at 30 minutes. If the top is browning too fast before the interior is done, tent it loosely with foil and continue baking. The loaf is done when the internal temperature reads 190 to 195F (88 to 90C). Do not pull it early because of surface color.
Oven Preheat
Bake Time
Line your pan with parchment that overhangs the sides. Any filling that migrates out of the loaf and hits a bare metal pan will go from caramelized to scorched. Parchment is not optional with babka.
Baking Methods
Bake at 350F (175C) in a parchment-lined 9x5 loaf pan for 35-40 minutes.
Equipment: 9x5 inch loaf pan, parchment paper, instant-read thermometer
Preheat
Preheat oven to 350F (175C) for at least 30 minutes.
Egg Wash
Brush proofed loaf with egg wash before loading.
Bake
Bake 35-40 minutes, tenting with foil if top browns too fast. Pull at 190-195F (88-90C) internal.
Syrup
Brush with simple syrup immediately out of the oven while still hot.
"A babka that looks too dark is probably done. A babka that looks perfect may still be raw in the center. Always use your thermometer."
Day 2 — After Baking
Simple Syrup and Cool
The simple syrup finish is what separates homemade babka from bakery babka. Don't skip it.
Click each step to mark complete
Make the Simple Syrup
While the babka is in the oven, combine equal parts sugar and water in a small saucepan. Bring to a simmer over medium heat, stirring until the sugar dissolves completely. Remove from heat.
Brush and Rest
The moment the babka comes out of the oven, brush the simple syrup generously over the entire top and into the crevices while the loaf is still hot. This softens the crust, adds a subtle sweetness, and gives you that glossy bakery finish. Let the loaf cool in the pan for at least 15 minutes before lifting it out by the parchment. Cutting into a hot babka collapses the interior. The patience is worth it.
Precise Timers
Use these interactive timers to track your stages.
Cool in Pan
Nutrition Facts
Per 1 slice (approximately 90g) • 10 servings per recipe
* Values are estimates based on standard ingredients
Storage
Room Temperature
2-3 days wrapped tightly in plastic or stored in a zip-lock bag. The simple syrup keeps it moist longer than most enriched breads.
Refrigerated
Up to 5 days. Wrap well. Warm individual slices before eating.
Frozen
Up to 2 months. Slice before freezing for easier portioning.
Refresh
Warm slices at 300F (150C) for 8-10 minutes or toast lightly. A few seconds in the microwave also works in a pinch.
Your Feedback
Rate This Recipe
Loading ratings...
Troubleshooting
Baker's Notes
Common questions and solutions for perfect results
If you're serious about scoring, you need the right blade in your hand. Wire Monkey makes handcrafted bread lames from black walnut — built to last, balanced in the hand, and sharp enough to glide through cold dough cleanly every single time. No dragging, no hesitation marks. Just a clean cut.

Wire Monkey Handcrafted Bread Lames
You Might Also Enjoy
More recipes from our pantry that pair well with this bake.
Get More Recipes in Your Inbox
Join thousands of home bakers receiving weekly recipes, tips, and techniques to elevate your bread game.
No spam, ever. Unsubscribe anytime.
More from Baking Great Bread at Home
Tools, resources, and community to help you bake better bread

Crust & Crumb Academy
Go deeper into your craft. FREE courses, challenges, and real feedback. No gatekeeping. Perfection is not required.

Sourdough Starter Companion
Your AI-powered starter assistant. Track feedings, troubleshoot issues, and keep your starter thriving.

BakingGreatBread.com
Real bread for the rest of us

Baking Great Bread Blog
Recipes, tips, and stories from the bread journey

Recipe Converter
Convert sourdough recipes to yeast and back again

Crust & Crumb App
Your AI-powered baking assistant

Facebook Community
Join 50,000+ bakers sharing, learning, and supporting each other

Sourdough for the Rest of Us
Free beginner's guide to sourdough