Bright Summer Flavors in Every Slice
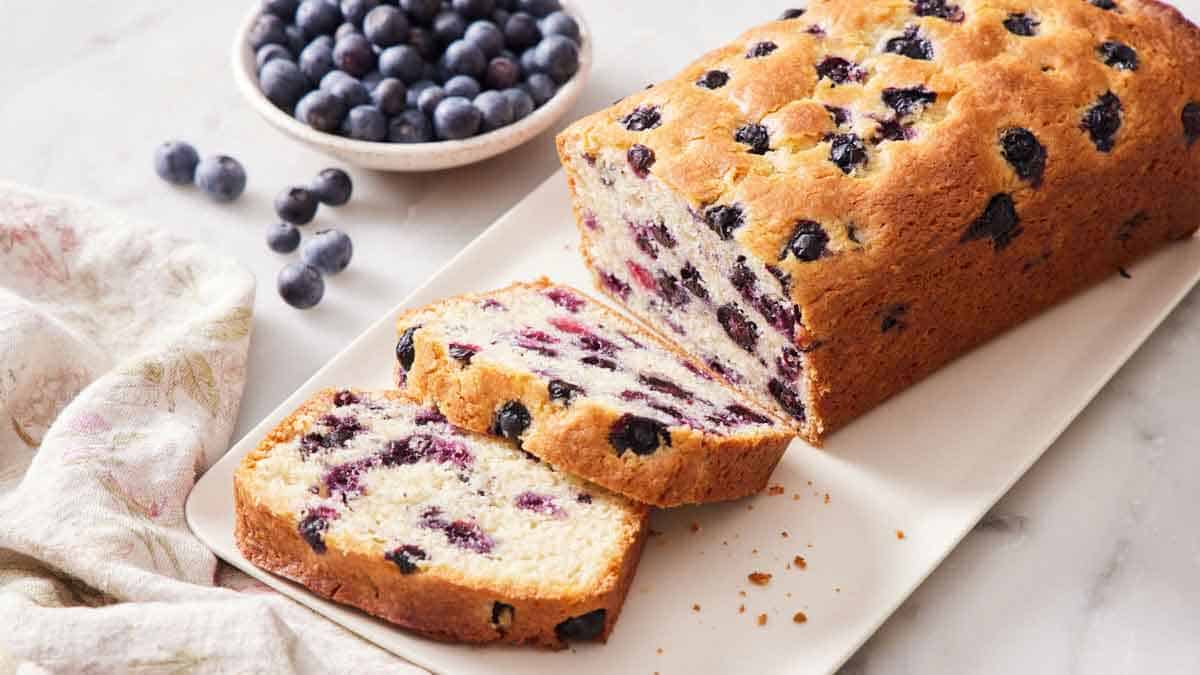
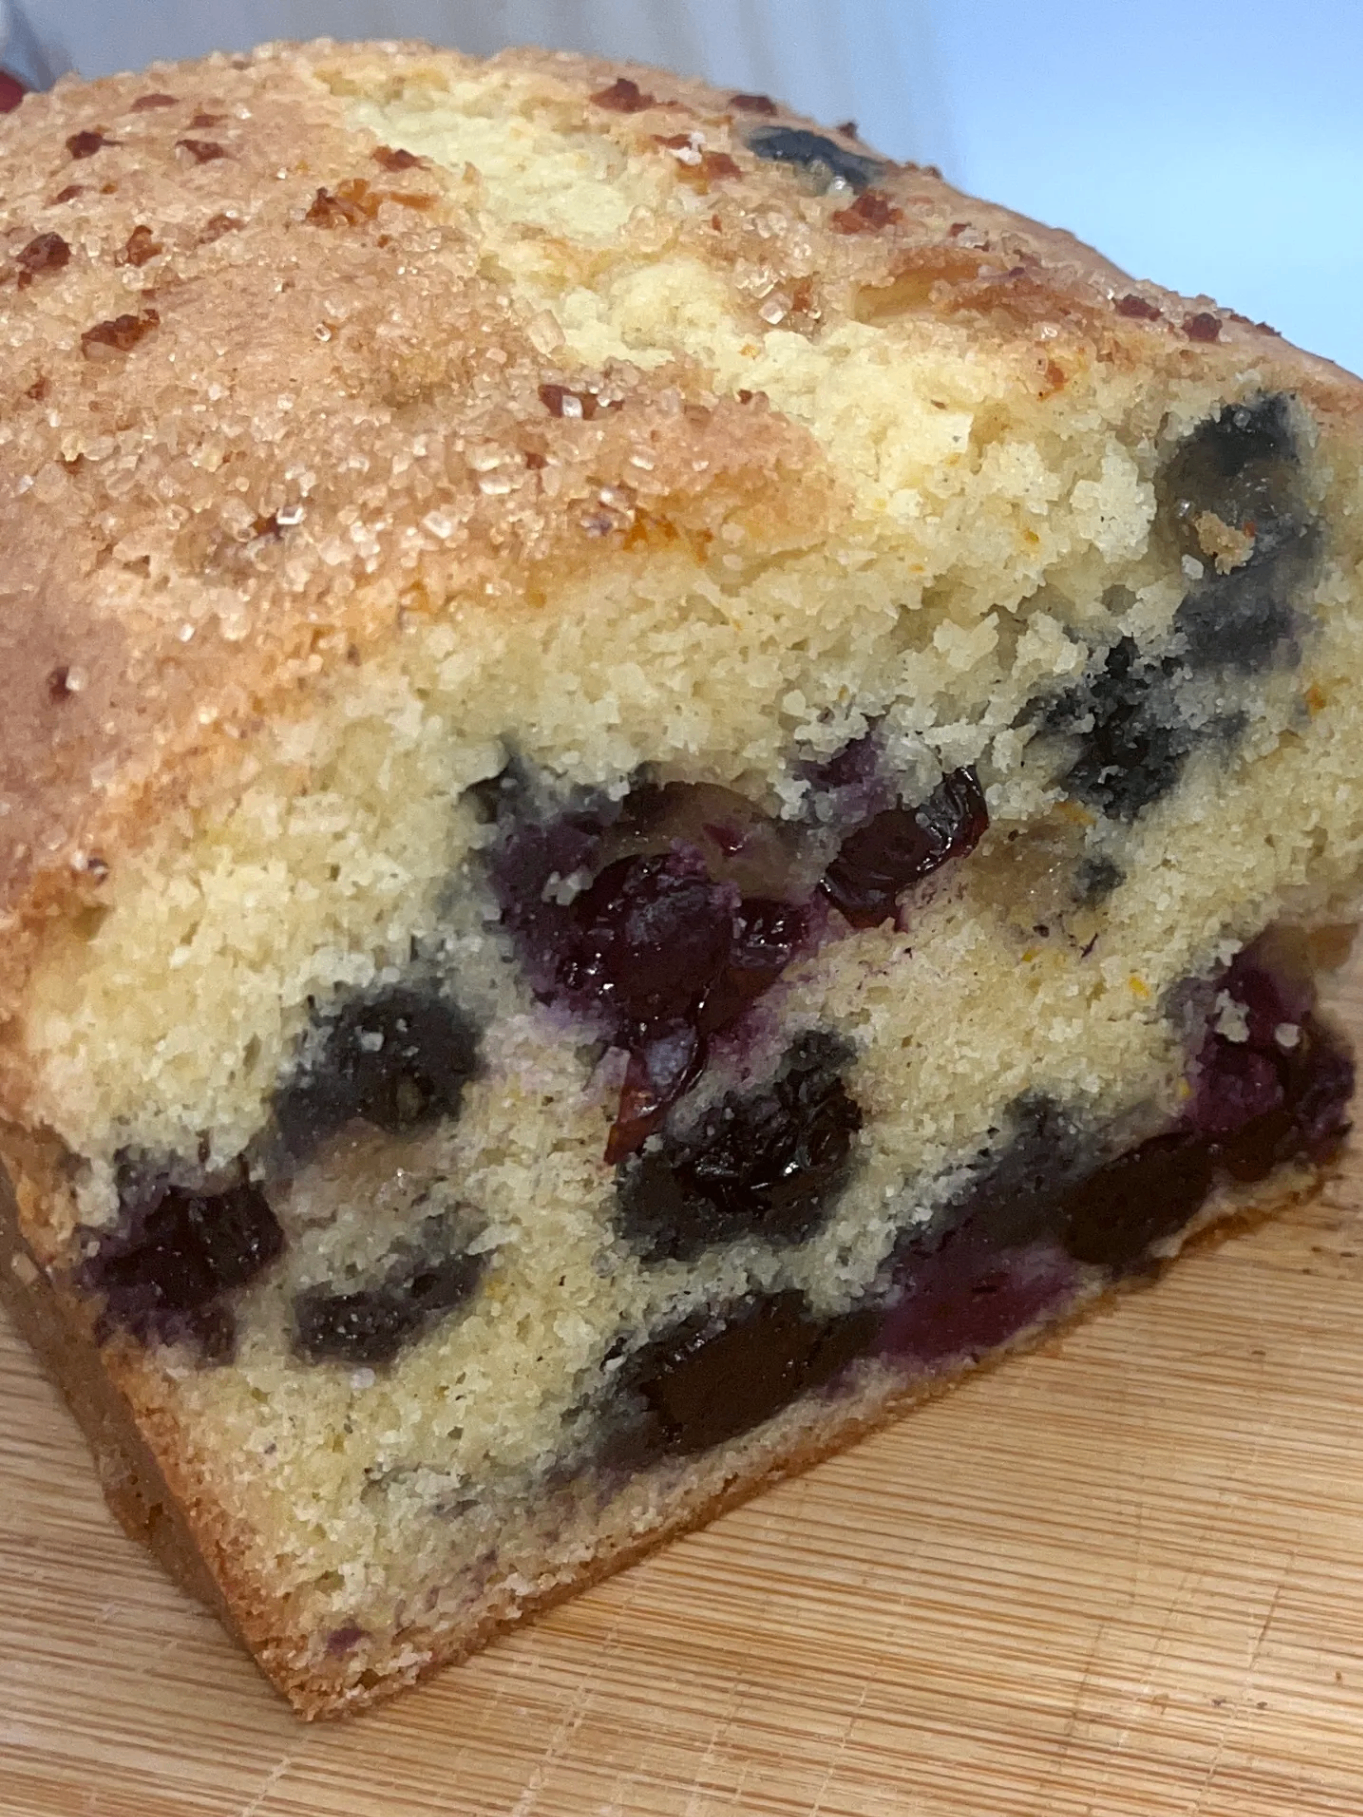
BeginnerLemon Blueberry QuickBread
by Henry Hunter Jr.
Bright, moist bursting with fresh blueberries and lemon zest.
Bake Time
55-60 minutes
Yield
1 loaf (10-12 slices)

Perfection is not required
"Great bread isn't about perfect technique—it's about understanding the dough."— Henry Hunter Jr.
By Henry Hunter Jr., founder of Crust & Crumb Academy and Baking Great Bread at Home.
Authentic Flavor
This tender hits all the right notes: bright lemon zest, juicy blueberries in every bite, and a moist crumb that stays fresh for days. Perfect for summer breakfast, afternoon tea, or whenever you need something sweet without the fuss. No yeast, no , no waiting around. Mix, pour, bake, enjoy.
Equipment Needed
Ingredients
Dry Ingredients
Wet Ingredients
Add-Ins
Prep
Prep Your Pan and Oven
Getting your oven and pan ready before you start mixing means everything goes smoothly. Quick bread batter shouldn't sit around waiting.
Click each step to mark complete
Preheat oven
Set your oven to 350°F (175°C). Position a rack in the center.
Prepare the loaf pan
Grease a 9x5 inch loaf pan with butter or non-stick spray. Dust lightly with flour, tapping out the excess. Alternatively, line with parchment paper for easy removal.
Pro Tip
A properly greased and floured pan makes all the difference. Nothing worse than a beautiful loaf stuck to the bottom.
Mixing
Mix the Dry Ingredients
Whisking the dry ingredients together distributes the leavening evenly so you get consistent rise throughout the loaf.
Click each step to mark complete
Combine dry ingredients
In a large mixing bowl, whisk together the flour, baking powder, and salt until evenly combined.
Reserve flour for blueberries
Remove 1 tablespoon of the flour mixture and set aside for coating the blueberries.
Pro Tip
Use the method for measuring flour: fluff the flour with a spoon, spoon it into your measuring cup, then level off with a straight edge. Scooping directly compacts the flour and you'll end up with too much.
Prep
Prep the Blueberries
This simple step prevents your blueberries from sinking to the bottom of the loaf during baking.
Click each step to mark complete
Coat the blueberries
Place the fresh blueberries in a small bowl. Add the reserved tablespoon of flour mixture and toss gently until all berries are lightly coated.
Set aside
Keep the coated blueberries ready to fold in at the end.
Pro Tip
If using frozen blueberries, do NOT thaw them first. Add them straight from frozen and coat with flour. Thawed berries release too much liquid and turn your batter purple.
Mixing
Mix the Wet Ingredients
Beating the wet ingredients together creates a smooth, emulsified base that will incorporate easily into the dry ingredients.
Click each step to mark complete
Zest the lemons
Using a microplane or fine grater, both lemons, being careful to get only the bright yellow outer layer. Avoid the white pith underneath, which is bitter.
Juice the lemons
Cut the zested lemons in half and juice them. You need 2 tablespoons (30ml).
Combine wet ingredients
In a medium bowl, whisk together the sugar, melted butter, eggs, milk, lemon zest, and lemon juice until smooth and well combined.
Pro Tip
Room temperature eggs and milk incorporate better than cold. If you forgot to take them out, place eggs in warm water for 5 minutes.
Mixing
Combine Wet and Dry
This is where most quick breads go wrong. Overmixing develops gluten and makes the bread tough and dense. Mix just until the flour disappears.
Click each step to mark complete
Pour wet into dry
Make a well in the center of the dry ingredients. Pour the wet mixture into the well.
Fold gently
Using a rubber spatula, the wet ingredients into the dry using broad, gentle strokes. Scrape the bottom and sides of the bowl.
Stop when just combined
Mix only until you no longer see streaks of dry flour. Some small lumps are perfectly fine. Do NOT overmix.
Fold in blueberries
Gently fold in the flour-coated blueberries with 2-3 more strokes. Distribute them evenly but don't stir aggressively.
Pro Tip
Count your strokes if it helps. You should need no more than 15-20 folds total. The batter should look rough, not smooth.
Shaping
Pan Options
This versatile batter works in multiple pan sizes.
Standard Loaf
RecommendedClick each step to mark complete
Pour batter
Pour batter into greased 9x5 loaf pan. Smooth top with spatula.
Bake
Bake 55-60 minutes at 350°F.
Mini Loaves
Click each step to mark complete
Divide batter
Divide batter among 3-4 mini loaf pans (5x3 inch).
Reduce bake time
Reduce baking time to 35-40 minutes. Great for gifting!
Muffins
Click each step to mark complete
Fill muffin cups
Line standard muffin tin with paper liners. Fill cups ¾ full.
Bake
Bake 22-25 minutes at 350°F. Makes about 12 muffins.
Proof Test: Insert a toothpick into the center. It should come out clean or with just a few moist crumbs attached. Wet batter on the toothpick means it needs more time.
Baking
Bake
Low and slow gives time to rise and set before the top browns too much. The center takes longest to cook, so test there.
Step by Step
Fill the pan
Pour the batter into the prepared loaf pan. Use a spatula to spread it evenly and smooth the top.
Bake
Place in preheated oven and bake for 55-60 minutes.
Check for doneness
The loaf is done when the top is golden brown, the edges pull slightly away from the pan, and a toothpick inserted into the center comes out clean or with just a few moist crumbs.
Tent if needed
If the top is browning too quickly before the center is done, tent loosely with aluminum foil for the last 15-20 minutes.
Bake
Quick breads often crack on top. This is totally normal and actually a sign of good oven spring. Don't try to prevent it.
Baking Methods
Equipment: 9x5 loaf pan, Oven rack in center position
Preheat oven
Preheat oven to 350°F.
Bake
Bake 55-60 minutes. Tent with foil if browning too fast.
Test for doneness
Test with toothpick for doneness.
Cooling
Cool and Serve
Patience pays off here. Cutting into a hot quick bread results in a gummy texture and the loaf can fall apart. Let it cool properly.
Click each step to mark complete
Initial cooling
Let the loaf cool in the pan on a wire rack for 10 minutes. This allows it to firm up enough to handle.
Remove from pan
Run a butter knife around the edges of the pan, then carefully turn the loaf out onto the wire rack.
Cool completely
Let the loaf cool completely on the rack, about 30-45 minutes more, before slicing.
Slice and serve
Use a serrated knife for clean slices. Serve plain, or with a pat of butter.
⏱ Wait Time
10 minutes in pan + 30-45 minutes on rack
Pro Tip
This bread tastes even better the next day after the flavors have had time to meld. If you can wait, it's worth it.
Precise Timers
Use these interactive timers to track your stages.
Cool in pan
Cool on rack
Nutrition Facts
Per 1 slice (about 80g) • 12 servings per recipe
* Values are estimates based on standard ingredients
Storage
Room Temperature
Wrap tightly in plastic wrap or store in an airtight container at room temperature for 3-4 days.
Frozen
Wrap the whole loaf (or individual slices) tightly in plastic wrap, then aluminum foil. Freeze for up to 3 months. Thaw overnight at room temperature or toast slices directly from frozen.
Your Feedback
Rate This Recipe
Loading ratings...
Troubleshooting
Baker's Notes
Common questions and solutions for perfect results
If you're serious about scoring, you need the right blade in your hand. Wire Monkey makes handcrafted bread lames from black walnut — built to last, balanced in the hand, and sharp enough to glide through cold dough cleanly every single time. No dragging, no hesitation marks. Just a clean cut.

Wire Monkey Handcrafted Bread Lames
You Might Also Enjoy
More recipes from our pantry that pair well with this bake.


Get More Recipes in Your Inbox
Join thousands of home bakers receiving weekly recipes, tips, and techniques to elevate your bread game.
No spam, ever. Unsubscribe anytime.
More from Baking Great Bread at Home
Tools, resources, and community to help you bake better bread

Crust & Crumb Academy
Go deeper into your craft. FREE courses, challenges, and real feedback. No gatekeeping. Perfection is not required.

Sourdough Starter Companion
Your AI-powered starter assistant. Track feedings, troubleshoot issues, and keep your starter thriving.

BakingGreatBread.com
Real bread for the rest of us

Baking Great Bread Blog
Recipes, tips, and stories from the bread journey

Recipe Converter
Convert sourdough recipes to yeast and back again

Crust & Crumb App
Your AI-powered baking assistant

Facebook Community
Join 50,000+ bakers sharing, learning, and supporting each other

Sourdough for the Rest of Us
Free beginner's guide to sourdough