Two-Tone Pink & Cream Pull-Apart Star Bread
IntermediateBeetroot StarBread
by Henry Hunter Jr.
One dough. Two colors. Zero artificial dye.
Fermentation
1–1½ hours
Bake Time
28–32 minutes
Yield
Serves 8–10

Perfection is not required
"Perfection is not required. Progress is."— Henry Hunter Jr.
By Henry Hunter Jr., founder of Crust & Crumb Academy and Baking Great Bread at Home.
Authentic Flavor
Henry Hunter Jr. is the founder of Crust & Crumb Academy and Baking Great Bread at Home. This recipe came directly from the Academy bake-along community — where bakers push the base recipe and teach each other what's possible.
Equipment Needed
Ingredients
The Dough (1.5x Base)
This is the star bread dough scaled up to 1.5x so you have enough to split into pink and white halves and still roll four generous 12-inch circles.
Beetroot Color
Natural pink color — no artificial dye. Roasted beet puree gives the most vibrant result. Beetroot powder works and saves time.
Cinnamon Sugar Filling
Softened butter acts as the binder and keeps the cinnamon sugar in place between layers. Don't skip softening it — cold butter tears the dough.
Finish
Pro Tip
If your beetroot puree is watery, reduce it in a small saucepan over medium heat for 5 minutes first. You want a thick, smooth paste, not a liquid. Watery puree makes the pink dough too wet and throws off the balance.
Day 1 or same day
Prepare the Beetroot
Natural beetroot gives you that vivid pink without any artificial color. The same process used in the — roast, puree, strain. You can do this the night before.
Click each step to mark complete
If using fresh beets
Wrap 2 medium beets in foil. Roast at 400°F (200°C) for 45–60 minutes until fork-tender. Let cool completely, peel, and puree in a blender until completely smooth. Strain through a fine-mesh sieve. You want 75g of pure, thick, smooth puree.
If using beetroot powder
Mix 3 tablespoons of beetroot powder with 2 tablespoons warm milk to form a smooth, thick paste. Let sit 5 minutes and stir again before using.
Check consistency
Your puree should be the consistency of tomato paste. If it's watery, reduce it in a small saucepan over medium heat, stirring constantly, for 4–5 minutes until thick. Watery beetroot throws off the dough's hydration and makes the pink half impossible to match in texture.
Pro Tip
Roast the beets the night before to streamline bake day. The puree keeps in the fridge, covered, for 3 days. Canned beets work in a pinch but give a less vibrant color.
Mix
Make the Dough
One batch of enriched dough — milk, butter, egg, a little sugar. This 1.5x batch gives you enough to work with after splitting. Mix it all together first, then divide and color.
Click each step to mark complete
Activate the yeast
Combine the warm milk, instant yeast, and sugar in the bowl of a stand mixer. Stir briefly and let sit for 5 minutes until frothy.
Mix the dough
Add the bread flour, egg, salt, and softened butter. Mix on low with the dough hook for 2 minutes until a shaggy dough forms, then increase to medium and knead for 8–10 minutes until smooth and slightly tacky. By hand: knead for 12–14 minutes on a lightly floured surface.
Windowpane test
Pinch off a small piece and stretch it slowly between your fingers. If it stretches thin enough to see light through without tearing, the gluten is developed. If it tears, knead another 2–3 minutes.
Pro Tip
Get the gluten fully developed before you split the dough. You can't knead it properly once the beetroot is in — the color will be uneven and the dough won't tighten the same way.
Acids affect gluten
Beetroot is slightly acidic. Adding it during mixing weakens gluten development. By building the dough fully first and then adding the puree, you get a stronger, more elastic pink dough that handles the rolling and shaping without tearing.
Hydration control
Adding wet puree mid-mix would throw off your hydration calculations. Splitting the finished dough and kneading in the puree by hand gives you control — you can add flour to the pink half if it gets too wet.
The Takeaway
Build strong gluten first, then add color. You'll get a better dough and a more vibrant finished star.
Precise Timers
Use these interactive timers to track your stages.
Yeast Bloom
Knead
Divide
Divide and Color
Split the dough in half by weight. One half stays white. The other gets the beetroot. Even weight means even layers and a balanced two-tone star.
Click each step to mark complete
Weigh and divide
Weigh your total dough. Divide it into two exactly equal pieces. This matters — unequal halves mean uneven layers when you stack the circles.
White dough
Place the white half in a lightly greased bowl. Cover with plastic wrap.
Color the pink dough
Place the other half on a clean work surface. Add your beetroot puree on top and knead it in, either in the mixer on low for 3–4 minutes or by hand. Keep working until the color is completely even with no streaks.
Match the consistency
Hold a piece of pink dough next to a piece of white dough. They should feel identical — same softness, same tackiness. If the pink is stickier or wetter, add bread flour 1 tablespoon at a time and knead in until they match.
Place in bowl and cover
Put the pink dough in a separate lightly greased bowl. Cover both bowls with plastic wrap.
Pro Tip
Wear gloves if you care about stained hands. Beetroot comes out of fabric quickly when rinsed cold but it will temporarily dye your skin a light pink. It washes off within a day.
First Rise
First Rise
Both doughs rise together. The pink dough may move slightly slower because the puree adds weight. That's normal — give it extra time if needed.
Click each step to mark complete
Rise together
Place both covered bowls in a warm spot (75–78°F / 24–26°C). Let rise until both doughs have doubled in size, about 1 to 1½ hours.
Check both
Press a floured finger into each dough. The indent should spring back slowly — about halfway in 10–15 seconds. If it springs back immediately, it needs more time. If the indent stays, it's overproofed.
⏱ Wait Time
1–1½ hours
Pro Tip
The pink dough sometimes lags 15–20 minutes behind the white. Don't rush it. Wait for both to double before you move to shaping.
Precise Timers
Use these interactive timers to track your stages.
First Rise
Filling
Make the Cinnamon Sugar Filling
Simple and fast. Softened butter is the binder that keeps the cinnamon sugar locked between layers instead of falling out during twisting.
Click each step to mark complete
Mix the filling
In a small bowl, combine the softened butter, sugar, cinnamon, and salt. Stir until it forms a smooth, spreadable paste.
Pro Tip
The butter must be truly soft — not melted, not cold. Room temperature soft, where it yields easily to a finger press. Melted butter will leak out of the layers and pool on the pan.
Shape
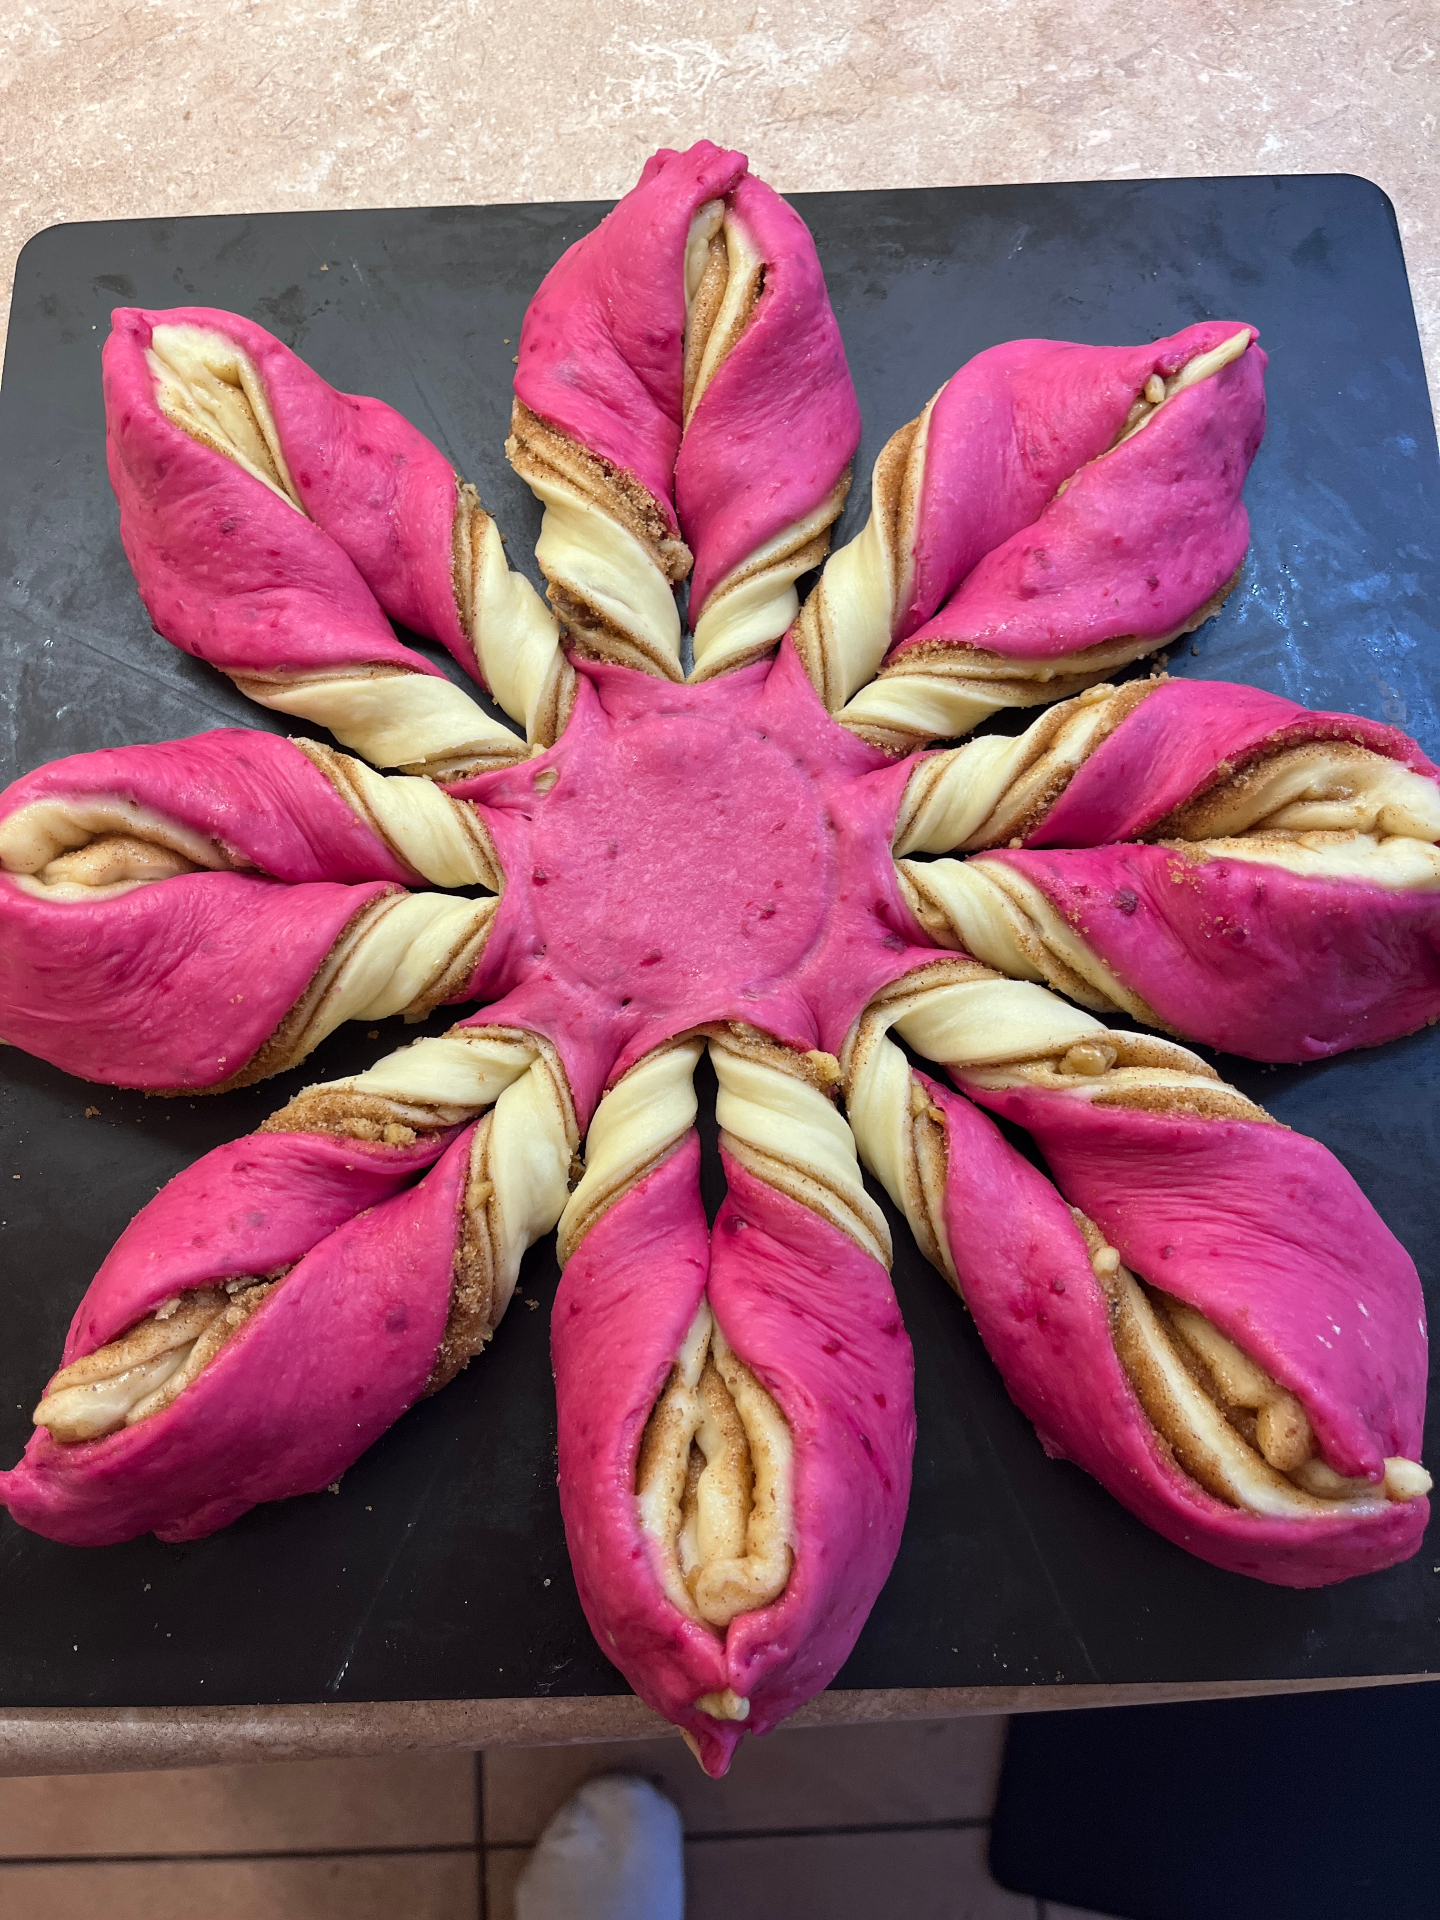
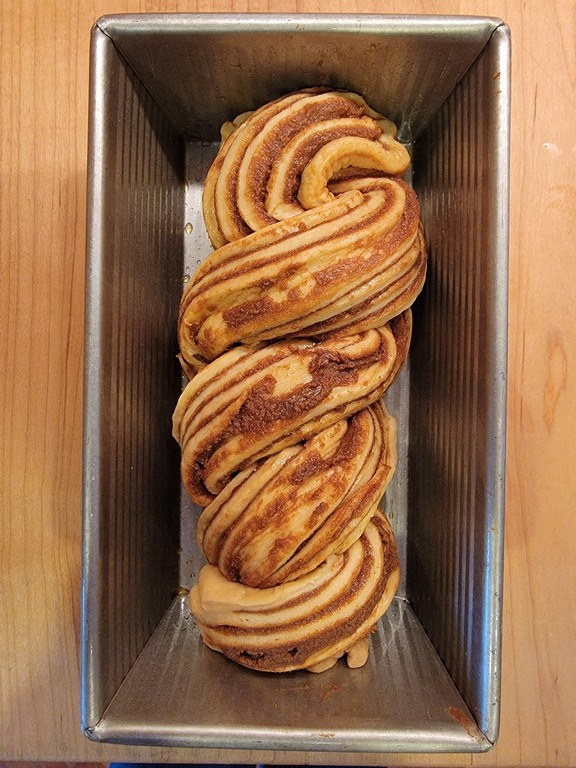
Shape the Two-Tone Star
This is where the magic happens. You're rolling both doughs, alternating the colors in your four circle stack to create that pink-and-white two-tone pattern. Same technique as the standard star bread — the only difference is which color goes where.
Click each step to mark complete
Chill the dough
Punch down both doughs gently. Refrigerate both for 15–20 minutes. Cold dough is dramatically easier to roll thin and stack without tearing.
Divide each dough into two pieces
Divide the white dough into 2 equal pieces. Divide the pink dough into 2 equal pieces. You now have 4 total pieces — 2 white, 2 pink — each roughly 130–140g.
Roll all four circles
On a lightly floured surface, roll each piece into a 12-inch circle. They don't need to be perfect, but aim for consistent thickness throughout. Roll one at a time and keep the others covered.
Stack with alternating colors
Place a pink circle on your parchment-lined baking sheet. Spread ⅓ of the cinnamon filling over it, leaving a ½-inch border. Place a white circle on top. Spread another ⅓ of the filling. Place the second pink circle on top. Spread the remaining filling. Place the second white circle on top with no filling. Your stack goes: pink → white → pink → white (bottom to top).
Mark the center
Place a small bowl or glass (about 3 inches wide) in the center of the dough stack. Press lightly to mark a circle. Do not cut through. This is your guide.
Cut 16 strips
Using a bench scraper or sharp knife, cut from the edge of the center circle straight out to the outer edge. Cut 16 equal sections — think of slicing a pizza into 16 slices. Even spacing matters here. Take your time.
Twist the points
Take two adjacent strips and twist them away from each other (outward) twice. Pinch the ends together firmly to form a point. Repeat around the circle until all 8 points are formed. The two-tone pattern will appear in each twist — pink on one side, white on the other.
Remove the guide
Remove the guide bowl from the center. You should have a clean star shape with a visible center circle.
Pro Tip
The alternating stack (pink-white-pink-white) is what creates the two-tone twist pattern in every point. If you stack same colors together, the effect disappears and you just get solid pink or solid white points.
How the two-tone twist works
When you cut the 16 strips and twist two adjacent strips outward, each strip contains all four layers of dough. Because you alternated pink and white, every twist exposes pink dough on one face and white dough on the other. That contrast is what creates the striking two-tone petal look you see in each point of the star.
The stack order matters
Pink-white-pink-white (bottom to top) means the two outside faces of each twist are opposite colors. If you stacked pink-pink-white-white, the contrast would only show at the color boundary — half the effect.
The Takeaway
Alternate your colors in the stack and the twist does the visual work for you.
Shaping
The Two-Tone Star
Same shaping process as the standard star bread. What makes this version different is the alternating color stack that creates the pink-and-white petal effect in each twist.
Standard 8-Point Star
Four circles, alternating pink and white, three filling layers, 16 cuts, 8 twists. The classic star bread technique applied to a two-tone dough.
RecommendedClick each step to mark complete
Stack
Pink → filling → white → filling → pink → filling → white (no filling on top).
Guide
Place a 3-inch bowl in the center to mark the center circle.
Cut
16 even strips from center circle to outer edge.
Twist
Take two adjacent strips, twist outward twice, pinch ends together. Repeat for 8 points total.
Proof Test: The points should feel pillowy and hold their shape without springing back immediately when poked. If they spring back fast, give them another 10 minutes.
Bake
Proof and Bake
A short proof to puff the star, then into the oven. The beetroot pink deepens slightly during baking and the white turns golden — that contrast is part of what makes this bread so striking.
Step by Step
Final proof
Cover loosely with plastic wrap and let proof for 30–45 minutes until slightly puffed. The points should look pillowy, not flat.
Preheat
Preheat your oven to 375°F (190°C) with a rack in the center.
Egg wash
Whisk the egg and milk together. Brush gently over the entire surface. The egg wash helps the white portions turn deep golden. The pink portions will go a deeper rose-pink with a hint of brown at the edges.
Bake
Bake for 28–32 minutes until the white portions are deep golden and the pink portions have a slight sheen. The filling should be bubbling lightly between the twists. Internal temperature 190°F (88°C).
Cool and finish
Let cool on the pan for 10–15 minutes. Dust with powdered sugar if desired — it looks beautiful against the pink and cream tones. Serve pull-apart style.
Final Proof
Bake
Cool
Don't judge doneness by color alone on this bread — the pink sections can look underdone even when they're not. Use an instant-read thermometer. 190°F (88°C) in the center means it's done.
Baking Methods
Equipment: Parchment-lined baking sheet or round pizza pan
Preheat
375°F (190°C), center rack, at least 20 minutes before baking.
Egg wash
Brush the entire surface with egg wash.
Bake
28–32 minutes until white portions are deep golden and internal temp reads 190°F (88°C).
Cool
Cool on the pan 10–15 minutes before serving. Dust with powdered sugar if desired.
Nutrition Facts
Per 1 slice • 10 servings per recipe
* Values are estimates based on standard ingredients
Storage
Room Temperature
2–3 days wrapped in foil or stored in an airtight container
Refrigerated
Up to 5 days, tightly wrapped. Bring to room temperature or warm briefly before serving.
Frozen
Up to 2 months. Wrap tightly in plastic wrap and foil before freezing.
Refresh
Warm at 325°F (165°C) for 8-10 minutes, or microwave individual portions for 15-20 seconds.
💡 Warm at 325°F (163°C) for 10–12 minutes. The cinnamon filling will soften back up and the bread will taste fresh-baked.
Your Feedback
Rate This Recipe
Loading ratings...
Troubleshooting
Baker's Notes
Common questions and solutions for perfect results
If you're serious about scoring, you need the right blade in your hand. Wire Monkey makes handcrafted bread lames from black walnut — built to last, balanced in the hand, and sharp enough to glide through cold dough cleanly every single time. No dragging, no hesitation marks. Just a clean cut.

Wire Monkey Handcrafted Bread Lames
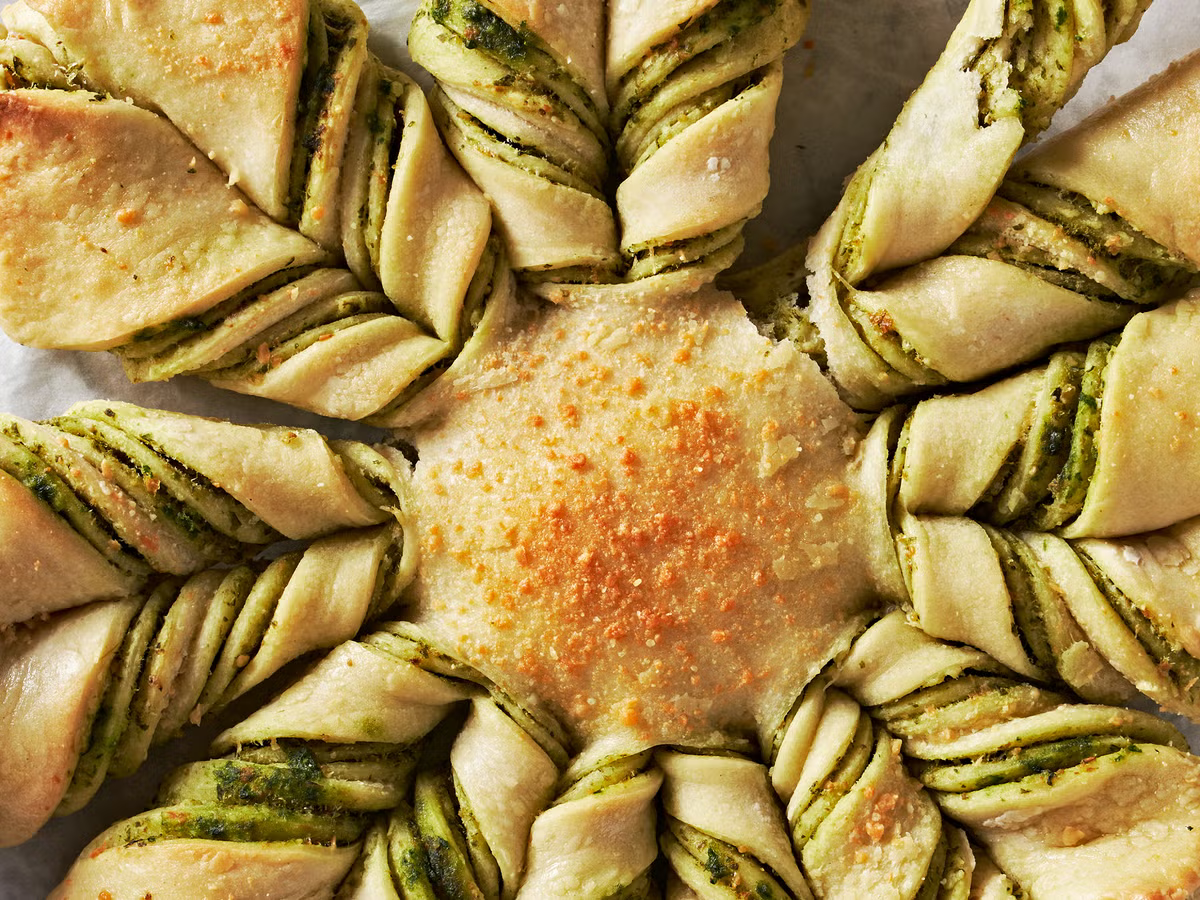
You Might Also Enjoy
More recipes from our pantry that pair well with this bake.
Get More Recipes in Your Inbox
Join thousands of home bakers receiving weekly recipes, tips, and techniques to elevate your bread game.
No spam, ever. Unsubscribe anytime.
More from Baking Great Bread at Home
Tools, resources, and community to help you bake better bread

Crust & Crumb Academy
Go deeper into your craft. FREE courses, challenges, and real feedback. No gatekeeping. Perfection is not required.

Sourdough Starter Companion
Your AI-powered starter assistant. Track feedings, troubleshoot issues, and keep your starter thriving.

BakingGreatBread.com
Real bread for the rest of us

Baking Great Bread Blog
Recipes, tips, and stories from the bread journey

Recipe Converter
Convert sourdough recipes to yeast and back again

Crust & Crumb App
Your AI-powered baking assistant

Facebook Community
Join 50,000+ bakers sharing, learning, and supporting each other

Sourdough for the Rest of Us
Free beginner's guide to sourdough