Bakery-Style Hoagies Built With Baguette Technique
IntermediateHoagieRolls
by Henry Hunter Jr.
The shaping practice that makes every other bread easier.
Fermentation
1-1.5 hours
Bake Time
20-22 minutes
Yield
6 rolls, approximately 9 inches each. Scale to 120g of dough per roll for 9-inch hoagies, 150g for a heartier 10-inch roll.

Perfection is not required
"Perfection is not required. Progress is."— Henry Hunter Jr.
By Henry Hunter Jr., founder of Crust & Crumb Academy and Baking Great Bread at Home.
Authentic Bread Flavor
Henry Hunter Jr. teaches bread shaping, fermentation, and technique at Crust & Crumb Academy and through the Baking Great Bread at Home community. These rolls are one of his favorite vehicles for teaching baguette shaping to bakers who think they're not ready for it yet.
Equipment Needed
Ingredients
The Dough
Optional Egg Wash
Pro Tip
Bread flour is non-negotiable here. The higher protein level builds the gluten strength needed to hold the shape through shaping, proofing, and scoring. All-purpose flour produces a weaker structure that spreads instead of rises. Use good bread flour and don't cut corners.
Mix
Mix and Develop the Dough
We're building a strong, smooth dough that will hold its shape through the baguette-style shaping. A solid is the goal before we move on.
Click each step to mark complete
Combine and mix
In the bowl of your stand mixer, combine the bread flour, water, olive oil, honey, and instant yeast. Mix on low speed until a shaggy dough forms, about 2-3 minutes. Add the salt and continue mixing on low for 2 more minutes.
Develop on medium speed
Increase to medium speed (speed 4 on a KitchenAid) and knead for 8-10 minutes until the dough is smooth, slightly tacky, and clears the sides of the bowl. It should not stick aggressively to the bottom.
Windowpane test
Pull a small piece of dough and stretch it between your fingers toward a light source. It should stretch thin enough to be slightly translucent without tearing. If it tears quickly, knead 2-3 more minutes and test again. Don't skip this — underdeveloped gluten means rolls that spread flat instead of rising tall.
Pro Tip
Hand kneading works too. Use a wet surface, not floured, and knead with push-fold-turn motions for 12-15 minutes. The dough will transform from rough and sticky to smooth and elastic.
Precise Timers
Use these interactive timers to track your stages.
Initial Mix
Medium Speed Knead
Bulk
Bulk Fermentation
A relatively short for this enriched dough. We're not chasing a lot of flavor complexity here — we want a well-risen, airy structure that holds up to shaping.
Click each step to mark complete
First rise until doubled
Shape the dough into a ball, place in a lightly oiled bowl, and cover with plastic wrap or a shower cap. Leave at room temperature (72-76°F / 22-24°C) until the dough has roughly doubled in size, about 1 to 1.5 hours.
⏱ Wait Time
1-1.5 hours
Pro Tip
Cold overnight bulk works beautifully here for improved flavor. Mix the dough, let it rise 30-45 minutes at room temperature, then refrigerate overnight. In the morning, pull it out, divide, and go straight to shaping. The cold dough also makes the baguette-style shaping easier — cooler dough has better tension.
Precise Timers
Use these interactive timers to track your stages.
Bulk Fermentation
Divide
Divide and Pre-Shape
This is where hoagie rolls diverge from standard roll shaping. We're going to pre-shape oblong, not round — because the final shape is oblong, and starting closer to that shape means less stress on the dough when you get there.
Click each step to mark complete
Divide the dough
Turn the risen dough out onto a lightly floured surface. Using a bench scraper, divide into 6 equal pieces. Each piece should weigh approximately 120g for a 9-inch roll. Use a scale — eyeballing gives you rolls that bake unevenly.
Pre-shape oblong
Take each piece and gently flatten it with your palm into a rough oval shape — not a circle. Think of the eventual hoagie shape and start moving in that direction now. This is the step most recipes skip, and it's the step that makes the final shape cleaner and more consistent.
Bench rest
Cover the pre-shaped pieces with a clean kitchen towel or plastic wrap and let them rest 15-20 minutes. The gluten needs to relax before final shaping. Rushing this step means the dough fights you when you try to roll it out — it springs back and refuses to extend.
The Logic of Pre-Shaping Toward Your Final Shape
When you pre-shape into a ball and then try to roll that ball into a long cylinder, you're fighting the gluten every step of the way. The round pre-shape has tension pulling in all directions. You have to work the dough harder to get it to extend, which degrades the surface and can tear the skin. When you pre-shape oblong — into something already resembling the final shape — the gluten has already been oriented in the right direction. Final shaping becomes a refinement, not a battle.
Baguette Practice in Disguise
Every hoagie roll you shape this way is a baguette rep. The pre-shape, the bench rest, the final fold sequence, and the scoring pattern are all identical to baguette technique. Baguettes are one of the most technically demanding breads in the baker's repertoire. By building this into a simpler enriched dough, you're developing real muscle memory for a much harder skill. When you eventually make baguettes, your hands will already know what to do.
The Takeaway
Pre-shape toward your final shape. Work with the dough's natural orientation, not against it.
Precise Timers
Use these interactive timers to track your stages.
Bench Rest
Shape
Final Shape — Baguette Method
This is the heart of what makes these rolls different. Take your time. The shaping sequence builds the surface tension that drives oven spring and gives the rolls their structure.
Click each step to mark complete
Flatten the pre-shaped piece
Take one rested piece of dough. Using your fingertips, gently press it flat into an oval — roughly 5 inches wide and 7-8 inches long. Work from the center outward. Don't use a rolling pin — you want to degas it gently, not completely.
Pull and tuck the ends
Grab the two short ends of the oval and pull them outward slightly to lengthen the piece. Then fold each end in toward the center, about one inch. This establishes the tapered ends you see on a baguette and prevents the hoagie from being a blunt-ended brick.
Fold the top edge to center
Fold the top long edge of the oval down to the middle of the dough, pressing firmly with your fingertips to seal it. You're building a seam.
Fold the bottom edge to center
Rotate the dough 180 degrees. Fold the other long edge to the center and press to seal.
Final fold and seal
Fold the top half all the way over to meet the bottom edge. Use the heel of your hand to seal the seam firmly along the entire length. This is the same closing motion used for a baguette.
Roll to length
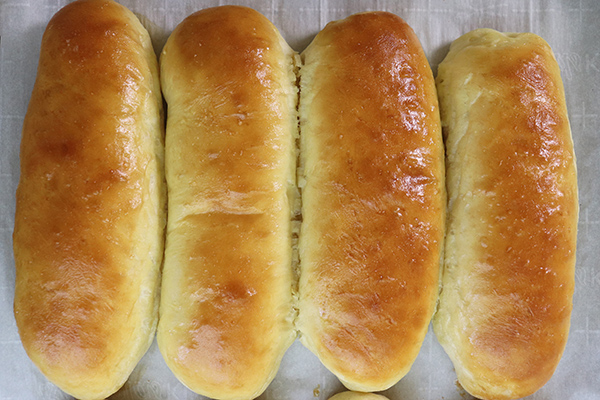
Place the shaped roll seam-side down. Using both hands, gently roll it back and forth to even out the shape and extend it to your target length — 8-9 inches for a standard hoagie. Apply more pressure at the ends to taper them slightly.
Place in mold or on sheet
Place the shaped roll seam-side down in a lightly greased hoagie roll mold, or on a parchment-lined baking sheet with rolls spaced at least 3 inches apart. Repeat with remaining pieces.
Pro Tip
If the dough keeps springing back and won't extend to length, cover it and let it rest another 5-10 minutes. The gluten is still too tight. Forcing it at this stage tears the surface. Patience here pays off in the oven.
Proof
Final Proof
The rolls need to be visibly puffy and nearly doubled before they go in. Under-proofed hoagie rolls give you dense, tough bread that doesn't open on the score.
Click each step to mark complete
Cover and proof
Cover the rolls loosely with plastic wrap or a clean kitchen towel. Proof at room temperature (72-76°F / 22-24°C) until the rolls are visibly puffy — about 50-75% larger than their shaped size. This takes approximately 45-60 minutes. Do not judge by time alone.
Preheat the oven
About 30 minutes before baking, preheat your oven to 450°F (232°C). Place a metal pan or cast iron skillet on the lower rack — this will be your steam source.
Poke test
Press a floured finger gently into the side of a roll. It should spring back slowly but not completely. If it springs back immediately, give it more time. If the indentation stays put and doesn't recover, bake immediately.
⏱ Wait Time
45-60 minutes
Precise Timers
Use these interactive timers to track your stages.
Final Proof
Oven Preheat
Shaping
The Baguette-Style Hoagie Shaping Method
Henry's shaping sequence builds surface tension gradually through a series of folds, exactly the way a baguette is shaped. Pre-shape oblong, not round. Work with the dough's natural tendency to extend.
Baguette-Style Hoagie — Recommended
RecommendedClick each step to mark complete
Pre-shape oblong
Flatten each piece into an oval. No rolling pin. Just gentle pressure from your fingertips.
Pull and tuck ends
Stretch the short ends outward slightly, then fold each in about 1 inch toward center.
Fold top edge to center
Fold the top long edge down to the middle. Press firmly to seal.
Rotate and repeat
Rotate 180 degrees. Fold the other long edge to center and seal.
Final fold and seal
Fold the top half all the way over to meet the bottom edge. Press the seam firmly along the full length with the heel of your hand.
Roll to length
Seam-side down, roll gently to 8-9 inches, tapering the ends slightly.
Proof Test: Rolls are ready when a floured finger poke springs back slowly but not completely. The rolls should look pillowy — not tight and smooth (underproofed) or jiggly and fragile (overproofed).
Score & Bake
Score and Bake
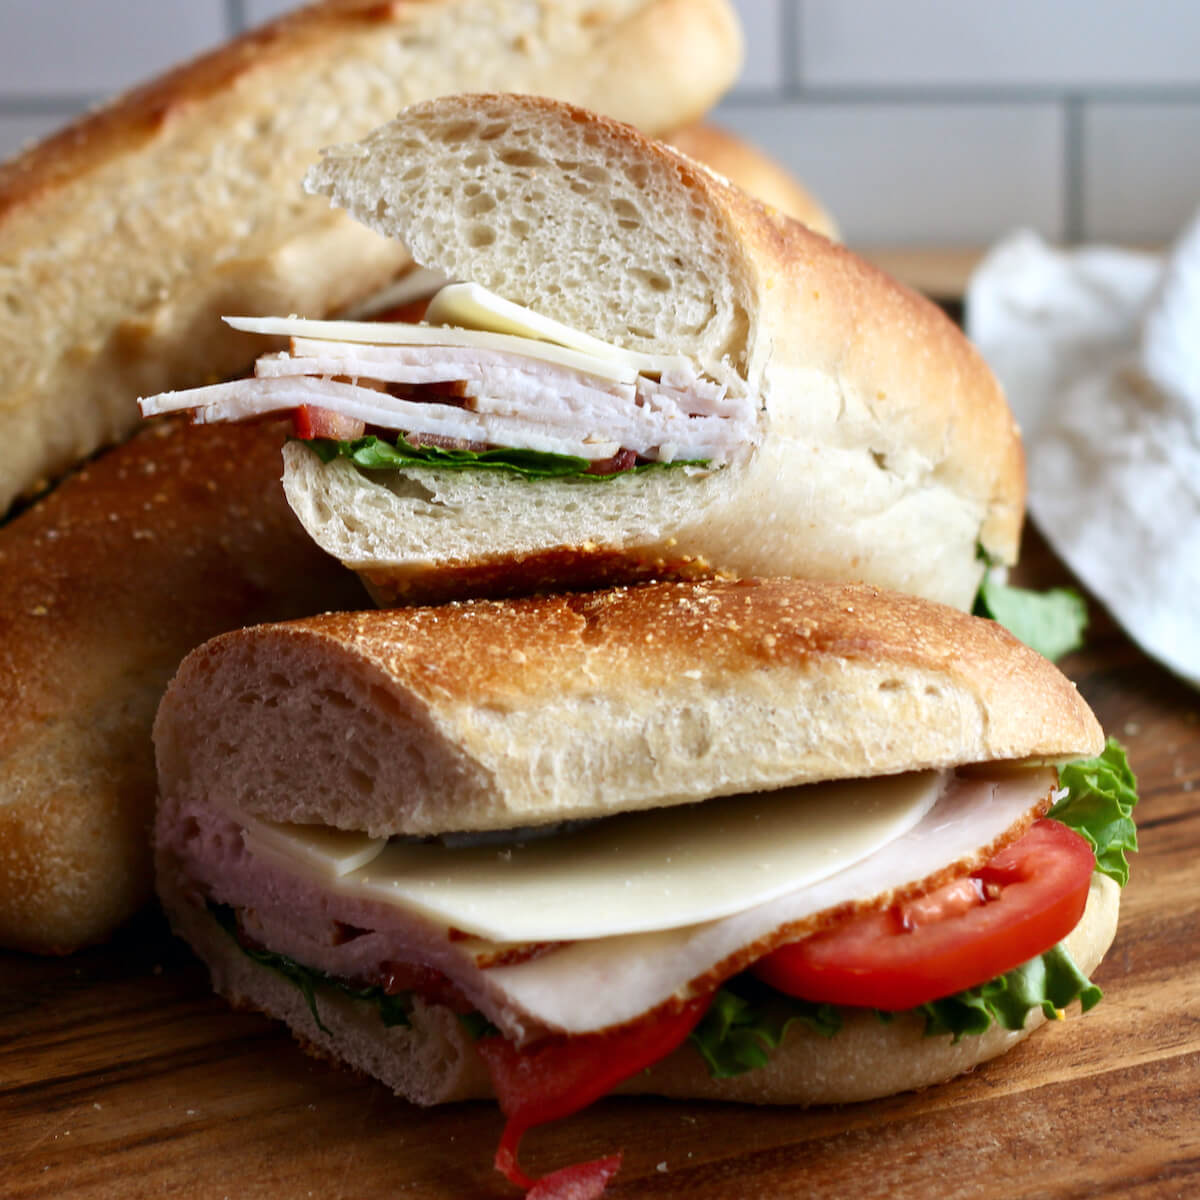
We score these like baguettes — a series of overlapping diagonal cuts. It's the same motion, same angle, same purpose. Steam in the first phase of baking creates the crispy crust and open score.
The Purpose of the Score
When bread hits a hot oven, the yeast has one final burst of activity before the heat kills it — oven spring. The score gives the expanding dough a controlled place to open. Without a score, the bread bursts wherever the crust is weakest, which is random and messy. With a score, you're directing the expansion.
The Baguette Pattern
The overlapping diagonal cuts of a baguette score allow the bread to expand laterally — upward and outward — without tearing. Each cut functions like a flap that opens during oven spring. On a hoagie roll, this creates an ear along each score line, adds surface area for the filling to grip, and gives the roll its distinctive bakery look. It also gives you real baguette scoring practice on a forgiving enriched dough before you try it on a high-hydration lean dough where the stakes are higher.
The Takeaway
Every hoagie you score this way is baguette practice. Build the muscle memory here.
Step by Step
Apply egg wash (optional)
Whisk together the egg white and water. Brush lightly over each roll. The egg wash promotes browning and gives the crust a slight sheen. Skip it if you prefer a more rustic, matte finish.
Score like a baguette
Using a lame or sharp knife held at a 30-35 degree angle, make 3-4 overlapping diagonal cuts across the top of each roll. Each cut should be about 2.5-3 inches long and about ⅓ to ½ inch deep. Start the second cut before the first one ends — the cuts should overlap slightly, just like a baguette. One long straight slash down the center also works and is easier for beginners.
Create steam and load the oven
Just before loading the rolls, pour 1 cup of boiling water into the preheated metal pan on the lower rack. Load the rolls immediately and close the oven door. The steam in the first 10-12 minutes of baking keeps the crust pliable so the score opens and the rolls can expand fully.
Bake with steam then dry
Bake at 450°F (232°C) for 10 minutes with steam. Then carefully remove the steam pan (or open the oven door for 30 seconds to release steam). Continue baking another 10-12 minutes until the rolls are deep golden brown and the internal temperature reaches 200-205°F (93-96°C).
Cool on a wire rack
Transfer rolls to a wire rack immediately. Cool at least 20-30 minutes before cutting. The crust crisps up as it cools.
Steam Bake Phase
Dry Bake Phase
Cooling
Baking Methods
Equipment: Baking sheet or hoagie roll mold, metal pan for steam
Preheat oven and steam pan to 450°F (232°C)
Full preheat with the steam pan inside, at least 30 minutes.
Pour boiling water into steam pan, load rolls
1 cup of boiling water into the hot pan. Close door immediately.
Steam phase 10 minutes at 450°F (232°C)
Do not open the oven.
Remove steam, bake dry 10-12 more minutes
Until deep golden brown. Internal temp 200-205°F (93-96°C).
Nutrition Facts
Per 1 roll (approx 120g baked) • 6 servings per recipe
* Values are estimates based on standard ingredients
Storage
Room Temperature
Best eaten day-of. Still good on day 2 in a bread bag. By day 3, toast them or use for croutons.
Frozen
Freeze after fully cooled. Up to 3 months. Refresh in a 350°F (175°C) oven for 8-10 minutes.
Refresh
Warm in a 350°F (175°C) oven for 8-10 minutes. The crust comes right back.
Your Feedback
Rate This Recipe
Loading ratings...
Troubleshooting
Baker's Notes
Common questions and solutions for perfect results
You Might Also Enjoy
More recipes from our pantry that pair well with this bake.


Get More Recipes in Your Inbox
Join thousands of home bakers receiving weekly recipes, tips, and techniques to elevate your bread game.
No spam, ever. Unsubscribe anytime.
More from Baking Great Bread at Home
Tools, resources, and community to help you bake better bread

Crust & Crumb Academy
Go deeper into your craft. FREE courses, challenges, and real feedback. No gatekeeping. Perfection is not required.

Sourdough Starter Companion
Your AI-powered starter assistant. Track feedings, troubleshoot issues, and keep your starter thriving.

BakingGreatBread.com
Real bread for the rest of us

Baking Great Bread Blog
Recipes, tips, and stories from the bread journey

Recipe Converter
Convert sourdough recipes to yeast and back again

Crust & Crumb App
Your AI-powered baking assistant

Facebook Community
Join 50,000+ bakers sharing, learning, and supporting each other

Sourdough for the Rest of Us
Free beginner's guide to sourdough